Using QNSQY: GUI, TUI & CLI
QNSQY ships as one binary that runs three ways, a desktop app (GUI), a terminal interface (TUI), and a command-line tool (CLI), with the exact same cryptography underneath. Every feature below has a GUI / TUI / CLI switch: choose how you want to run it and the steps update to match. Terminal commands are shown for both Linux and Windows. Your data, passwords, and private keys never leave your machine.
Encrypt
Free & upEncrypt a file with a password, or to a recipient's public key. The output is a quantum-resistant .qs file (hybrid ML-KEM + X25519 key exchange, AES-256-GCM). Password-based encryption derives the key with Argon2id.
In the left rail under CORE, click Encrypt.
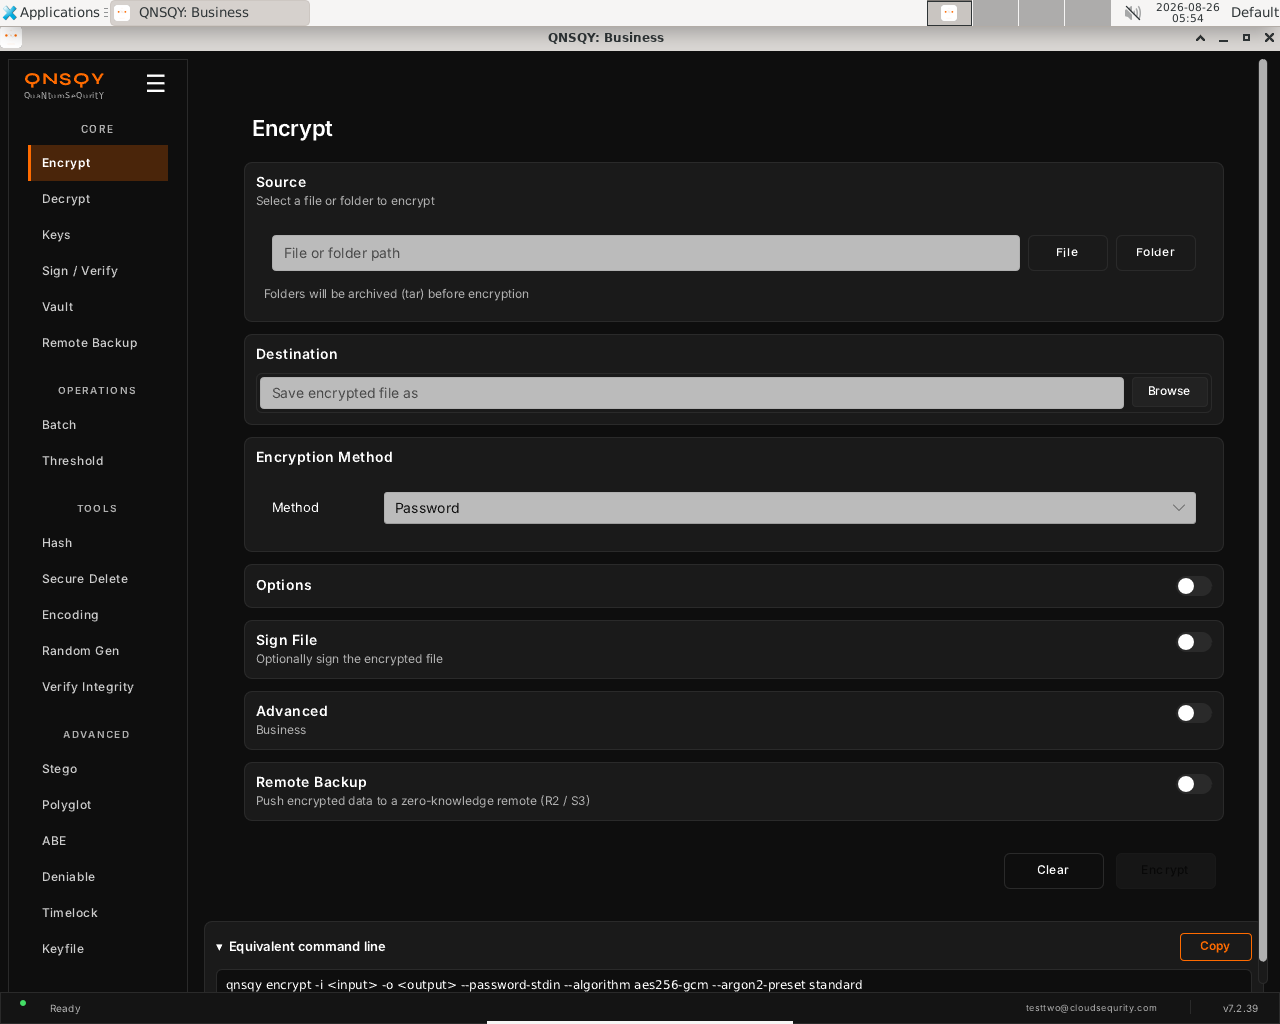
The Encrypt screen, opened from the left rail (CORE → Encrypt) Under Source, click File (or Folder) and choose what to encrypt.
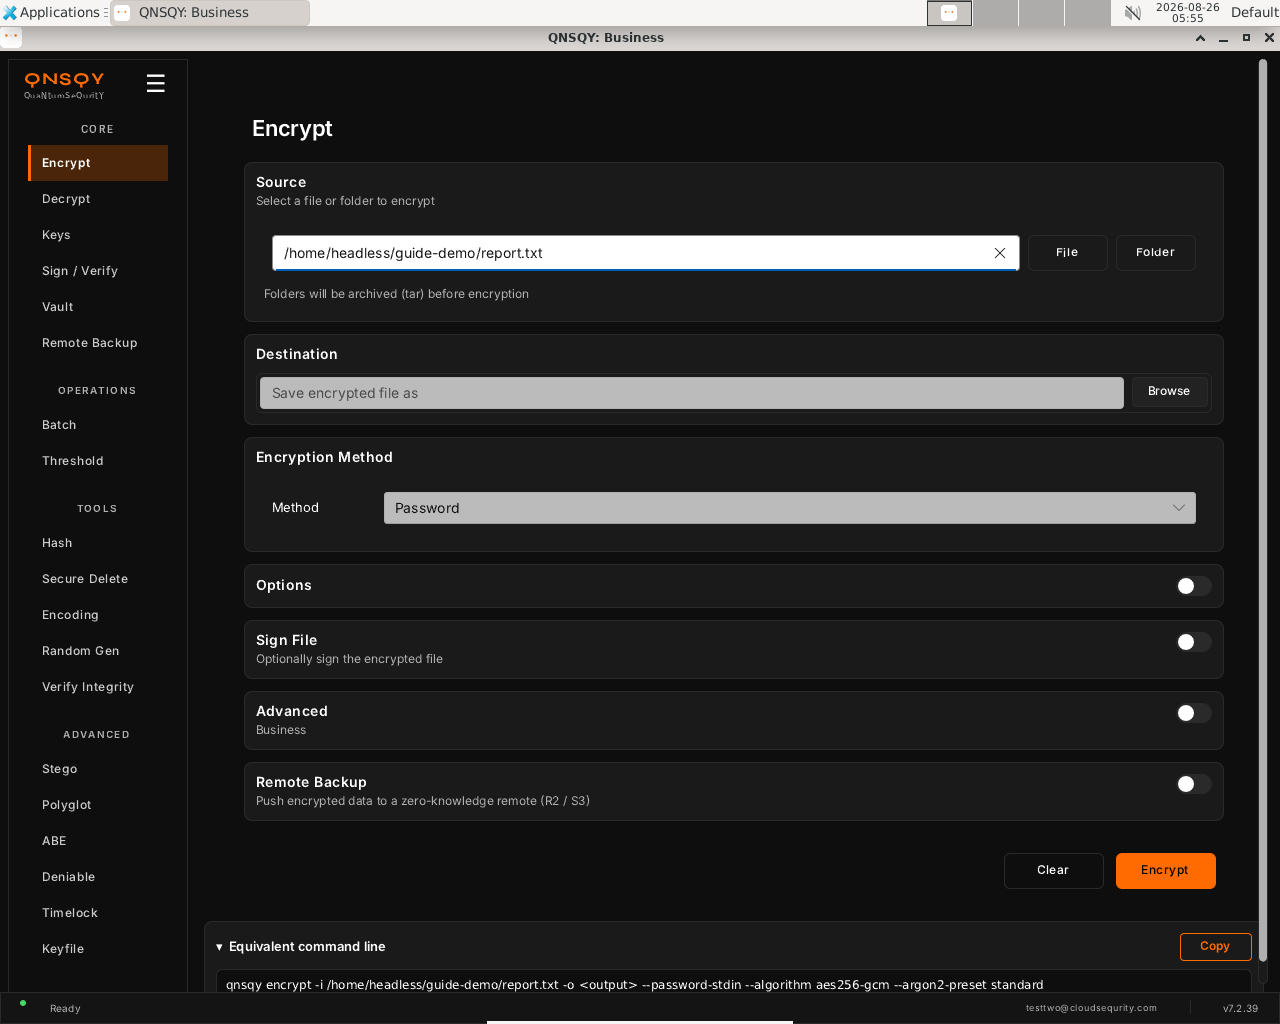
Source set, type the path or use the File / Folder buttons Under Destination, set where the encrypted
.qsfile is saved (defaults to the input name +.qs).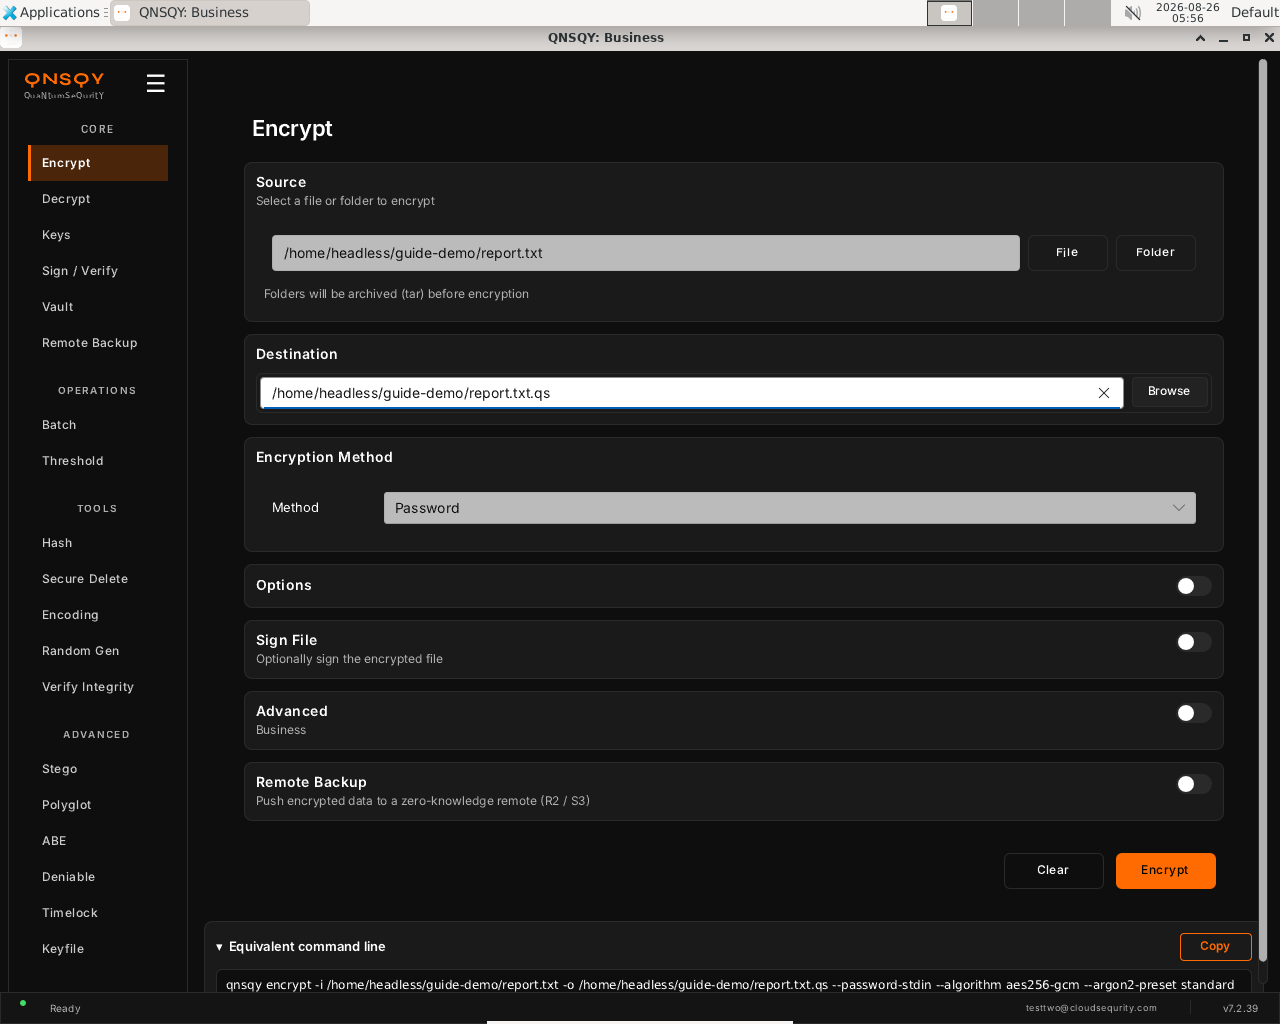
Destination set, the Encrypt button activates and the live command updates, with a Copy button to grab it Under Encryption Method, pick Password (default), Public Key (recipient), or Password + Key (hybrid). Optionally expand Options / Advanced for compression, paranoid padding, algorithm, and Argon2 strength.
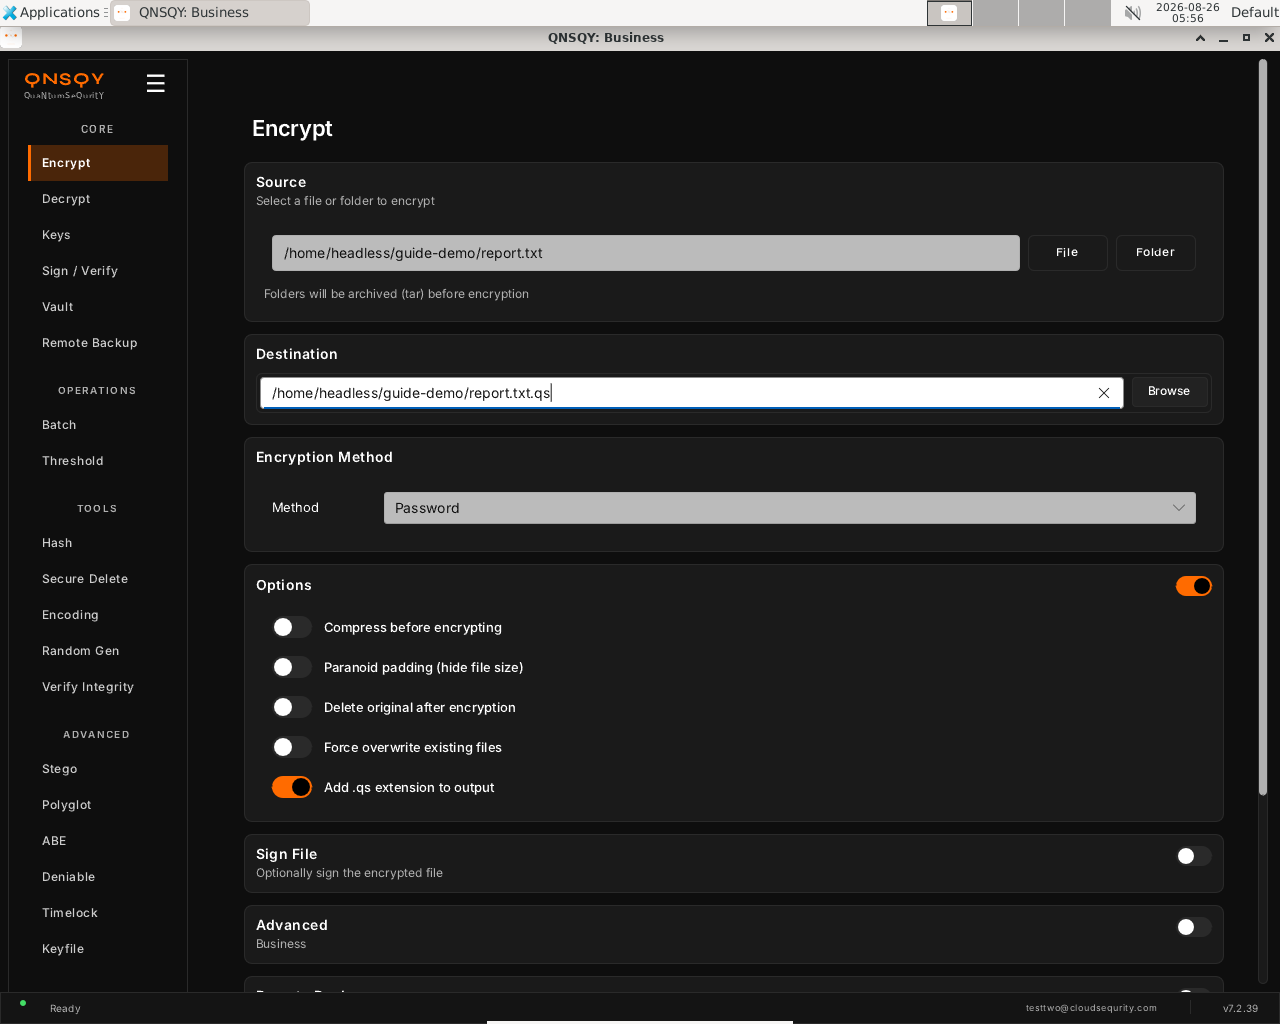
Method stays Password; the expanded Options panel (compression, paranoid padding, …) Click Encrypt. A secure prompt opens for your password (entered twice); it is never shown on screen and is passed to the engine over stdin. The result is a quantum-resistant
.qsfile, confirm it round-trips with Decrypt (or the CLI tab below, which we verified produces a byte-identical file).
Prefer the terminal? This screen runs
qnsqy encrypt -i <input> -o <output> --password-stdin --algorithm aes256-gcm --argon2-preset standard
Watch (Linux GUI)
Watch (Windows GUI)
On Windows 11 (Business tier): the same screen and inputs. The completed operation and its result are shown in the Linux clip above.
Launch the TUI with qnsqy --tui (or the qnsqy-tui launcher). The menu is grouped by category. Under Core, use j/k to highlight Encrypt and press Enter. The right pane describes the operation and its fields.
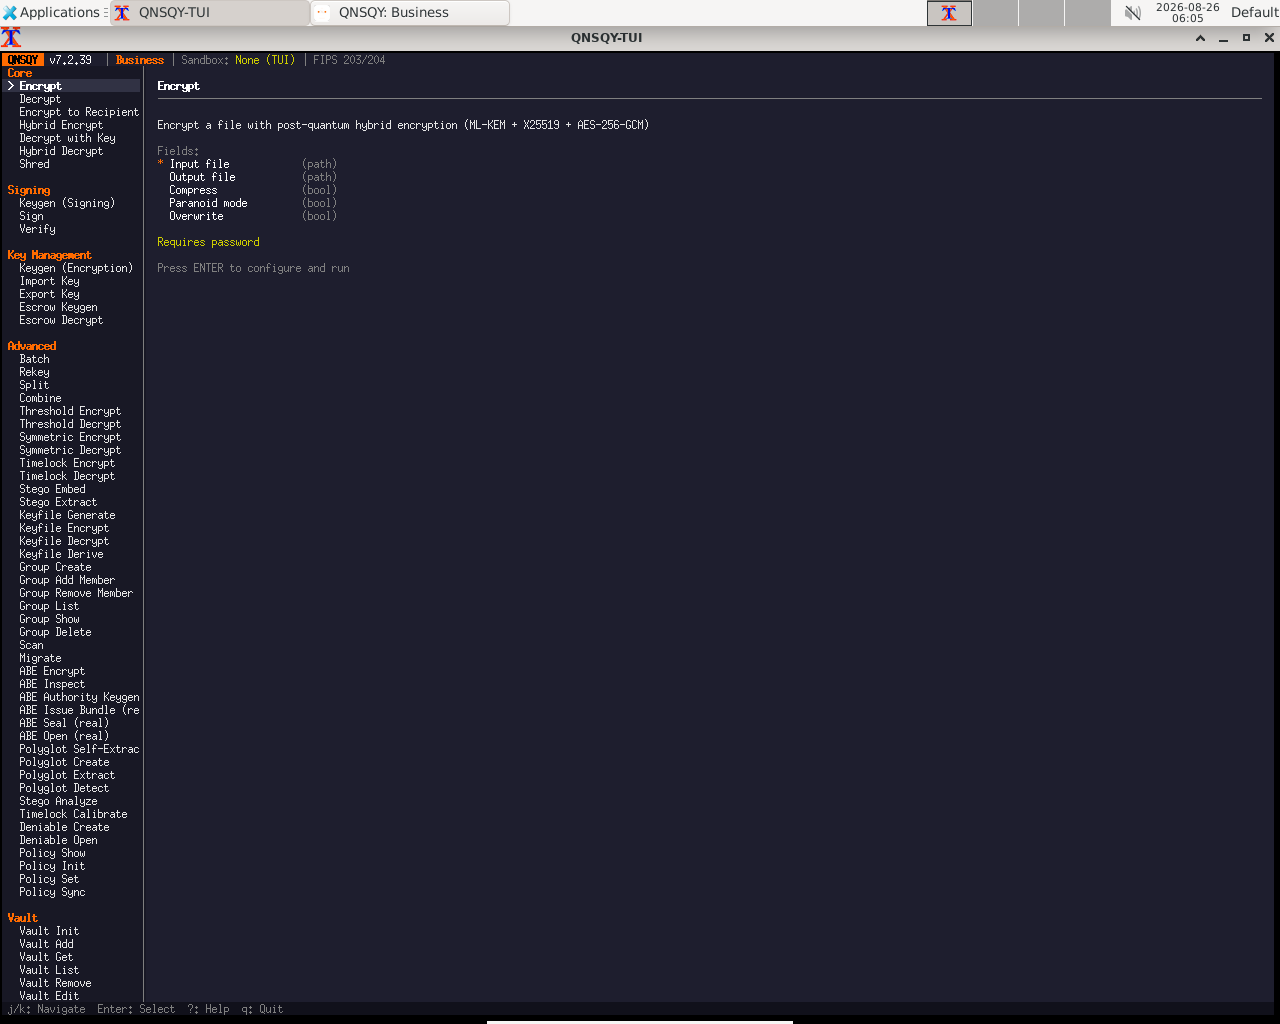
Fill the fields (Tab moves between them, Enter toggles a checkbox), then press F5 to execute. A secure password prompt appears; the password is never echoed. The Equivalent command line updates live as you type.
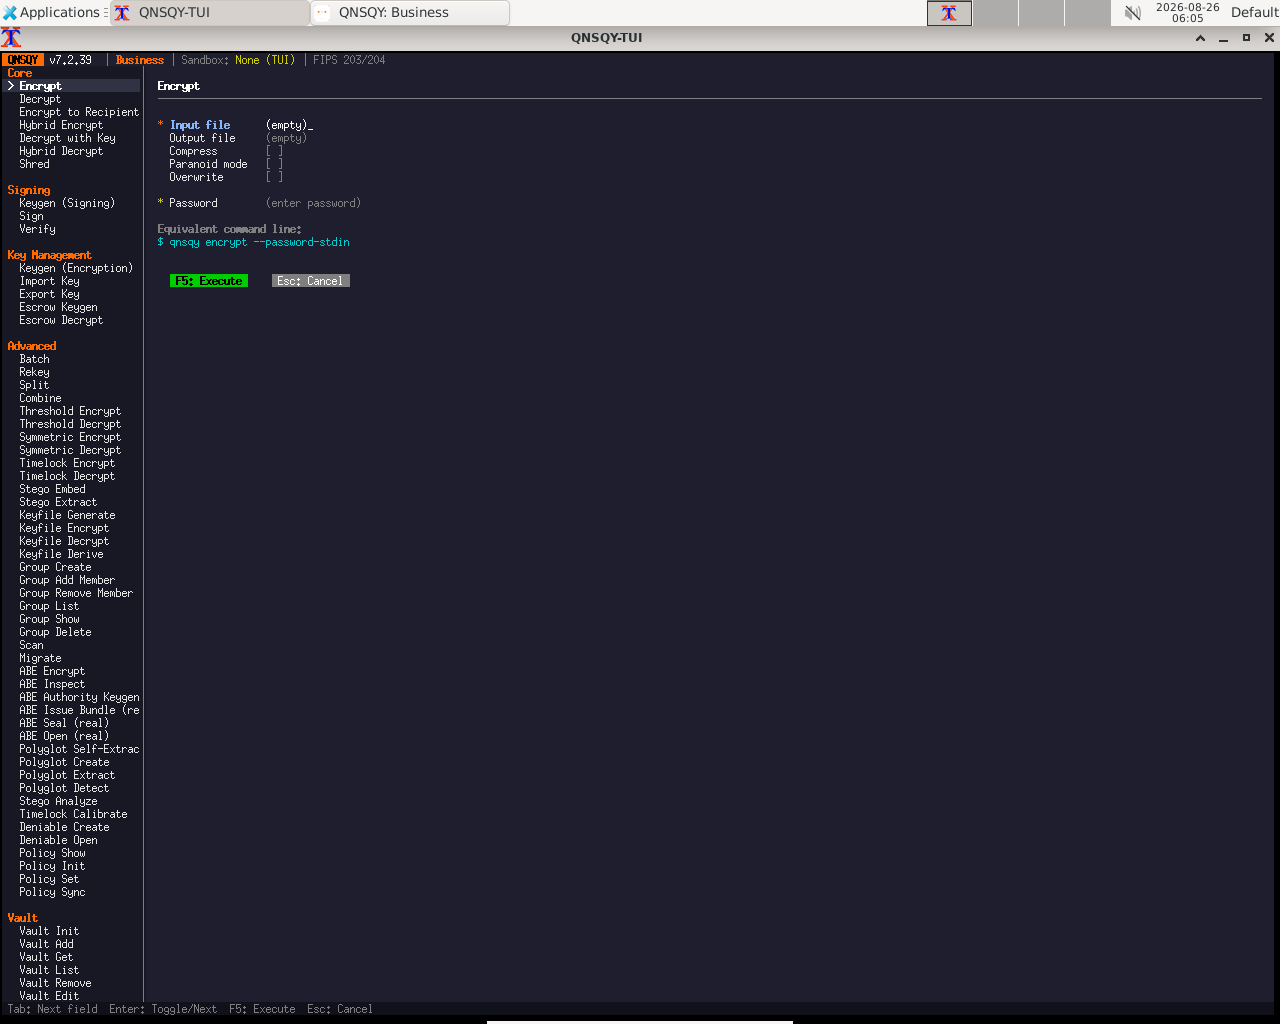
Equivalent command line (shown in the TUI too)
qnsqy encrypt --password-stdin
Keys: j/k navigate · Enter select/toggle · Tab next field · F5 execute · Esc cancel · q quit. The TUI and CLI omit the default --algorithm/--argon2-preset flags the GUI spells out, the commands are equivalent.
qnsqy encrypt [OPTIONS] --input <INPUT>
Linux
# password entered twice, piped over stdin (never shown in ps)
echo -e "your-passphrase\nyour-passphrase" | qnsqy encrypt --password-stdin -i report.txt -o report.txt.qs
Windows (PowerShell)
# --acknowledge-no-sandbox is required on Windows for credit-consuming ops
"your-passphrase`nyour-passphrase" | qnsqy.exe encrypt --password-stdin -i report.txt -o report.txt.qs --acknowledge-no-sandbox
| Flag | Value | What it does |
|---|---|---|
| -i, --input | <INPUT> | File to encrypt (required). |
| -o, --output | <OUTPUT> | Output file (default: input + .qs). |
| --password-stdin | flag | Read the password from stdin (entered twice for confirmation). |
| --recipient | <PUBKEY> | Encrypt to a recipient's public key (no password). Repeat for multi-recipient (Pro/Business, up to 64). |
| --hybrid | flag | Require BOTH the private key AND a password to decrypt. |
| --sign-key | <PRIV> | Also sign the encrypted file (Pro/Business). |
| -z, --compress | flag | Compress before encrypting. |
| --paranoid | flag | Add 5–15% random padding to hide the file size. |
| -f, --force | flag | Overwrite an existing output file. |
| --algorithm | <AEAD> | Pro/Business: aes256-gcm (default) or x-cha-cha20-poly1305. |
| --kem | <KEM> | Pro/Business: ml-kem512/768/1024, hqc-*, and pure variants (see reference). |
| --dsa | <DSA> | Signature strength when signing: ml-dsa44/65/87. |
| --argon2-preset | <PRESET> | standard (default) / high (Pro+) / maximum (Business). Override with --argon2-memory/-iterations/-parallelism (Business). |
Output
[Subscription] Plan: business_yearly | Tier: Business
SECURITY|sandbox_applied|phase=1|enforced=true|arch=x86_64|mode=kill|thread_mode=tsync
SECURITY|network_dropped|phase=2|enforced=true|blocked_syscalls=18|thread_mode=tsync
Encrypted to: report.txt.qs
The 105-byte demo file becomes a 33,053-byte .qs (QNSQY reserves a fixed ~32 KB header, so small files round up). Decrypting reproduces the original byte-for-byte (same SHA-256). The two SECURITY| lines are the Linux seccomp sandbox dropping network access before any file data is touched. On this unsigned dev build the output also prints a “binary integrity verification unavailable” notice; the signed release does not.
Common combinations
Each of these was run and round-tripped (decrypt reproduces the original byte-for-byte) on the 7.2.40 binary.
To a recipient's public key, no password needed (Pro/Business):
qnsqy encrypt -i report.txt -o report.txt.qs --recipient recipient.pub
Hybrid, needs both the private key and a password to open:
echo -e "pw\npw" | qnsqy encrypt -i report.txt -o report.txt.qs --recipient recipient.pub --hybrid --password-stdin
Size-hidden with XChaCha20-Poly1305 (Business):
echo -e "pw\npw" | qnsqy encrypt -i report.txt -o report.txt.qs --password-stdin --paranoid --algorithm x-cha-cha20-poly1305
Watch (Linux CLI)
A real command-line round-trip captured on Linux. The unsigned dev-build integrity banner is filtered out; the sandbox lines are the seccomp network lockdown.
Watch (Windows CLI)
A real command-line round-trip on Windows 11 (PowerShell, Business tier). The unsigned dev-build integrity notice is filtered out.
Decrypt
Free & upRecover the original data from a QNSQY .qs file. Supply the passphrase (or your private key for a recipient-encrypted file) and, optionally, a signer's public key to verify authenticity at the same time.
Open Decrypt from the CORE section of the left rail. The screen has an Encrypted File picker, a Destination path, a Decryption Method (Password by default), an optional Signature Verification field, and Options / Remote Restore toggles.
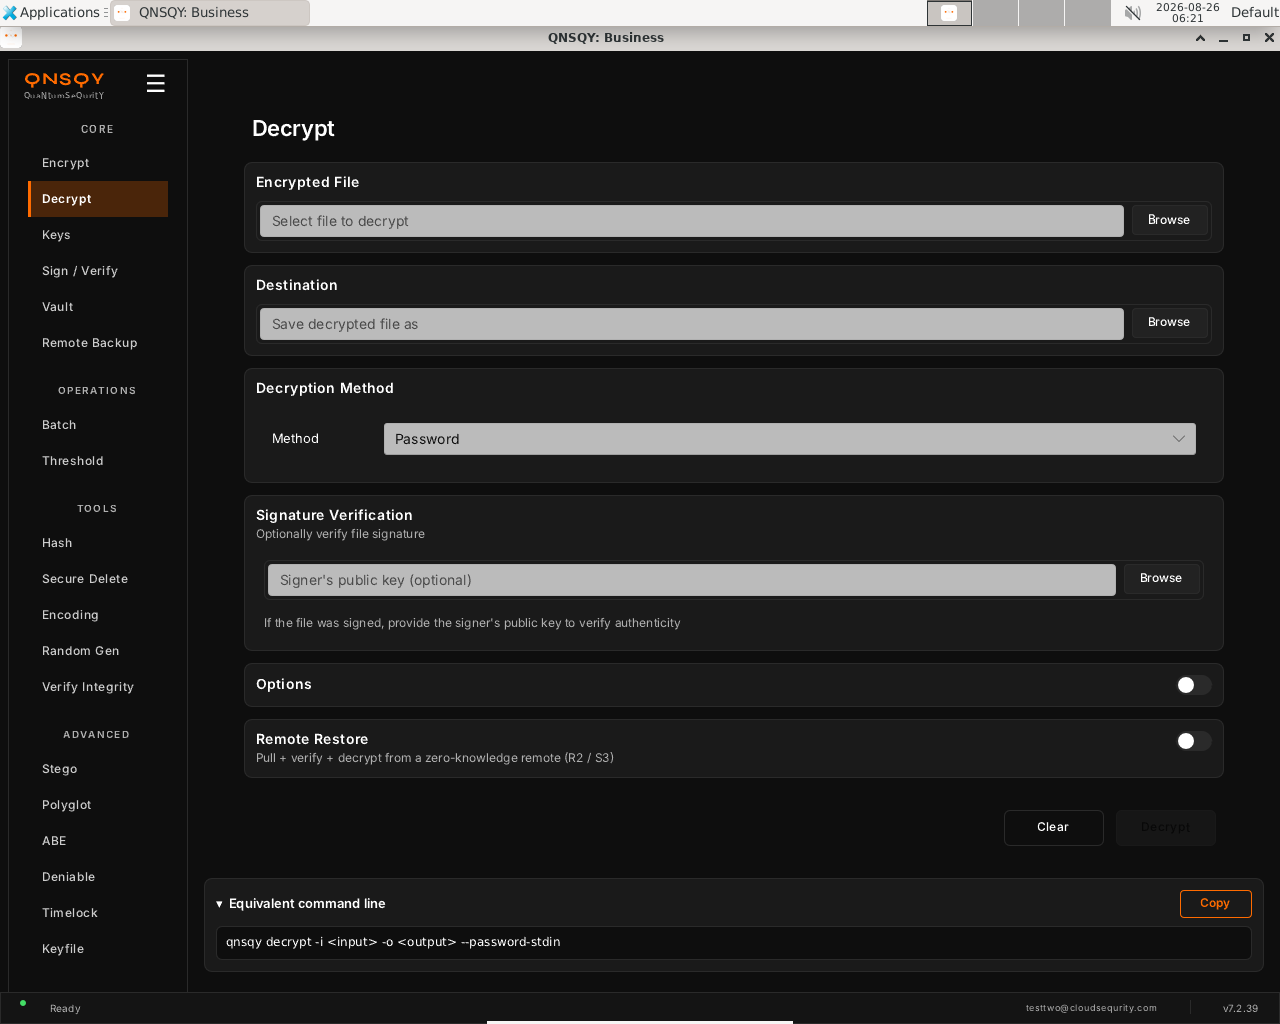
The Decrypt screen: pick the .qs file, choose where to save it, and optionally a signer's public key to verify. Browse to the encrypted .qs file, set the Destination path, and leave Method on Password (or switch to a private key for a recipient-encrypted file). To check a signature, browse to the signer's public key under Signature Verification.
Click Decrypt. You are prompted for the passphrase (never echoed); the original bytes are recovered exactly, byte-for-byte.
Prefer the terminal? This screen runs
qnsqy decrypt -i <input> -o <output> --password-stdin
Watch (Linux GUI)
Watch (Windows GUI)
On Windows 11 (Business tier): the same screen and inputs. The completed operation and its result are shown in the Linux clip above.
Launch the TUI with qnsqy --tui. The whole toolkit lives in one menu, grouped by category. Use j/k to highlight Decrypt and press Enter.
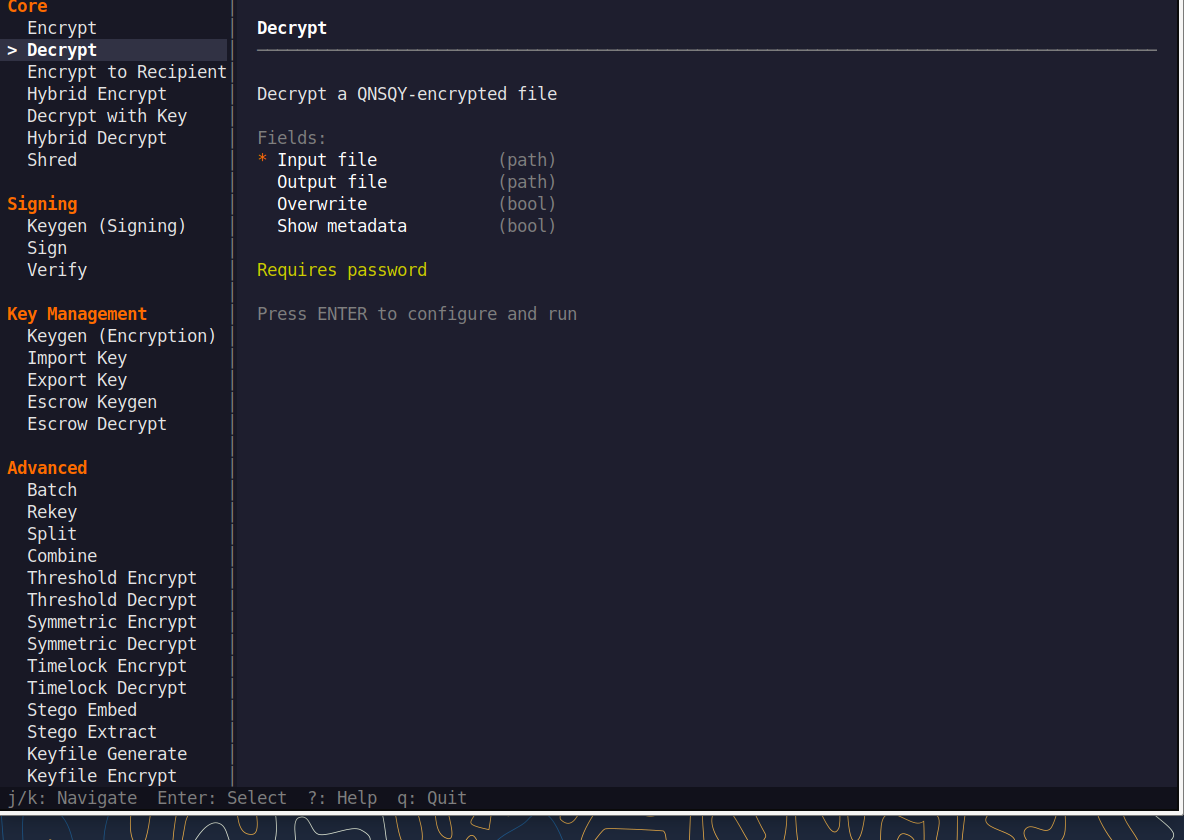
Fill the fields (Tab moves, Enter toggles), then press F5 to run. The password is prompted securely and never echoed, and a live Equivalent command line updates as you type.
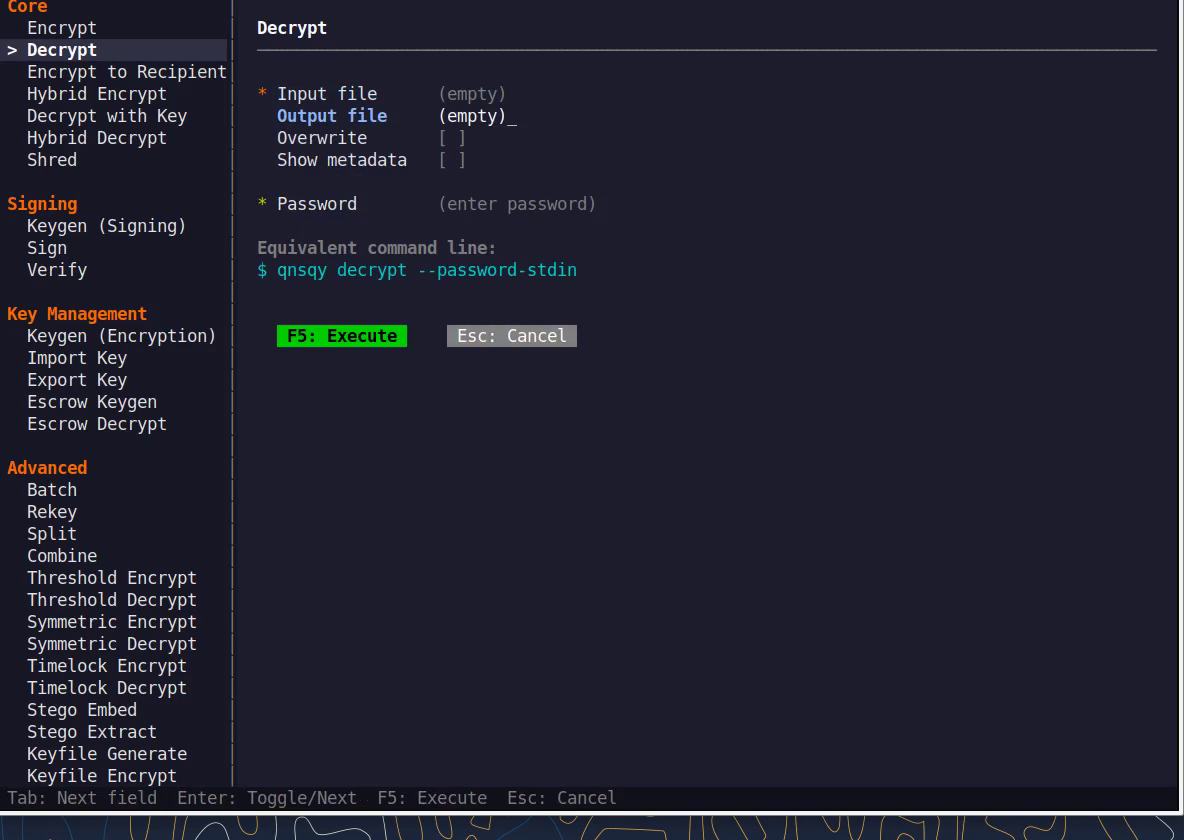
Equivalent command line (shown in the TUI too)
qnsqy decrypt --password-stdinWatch (Linux TUI)
Keys: j/k navigate · Enter select/toggle · Tab next field · F5 execute · Esc cancel · q quit.
qnsqy decrypt [OPTIONS] --input <INPUT>
Linux
echo "your-passphrase" | qnsqy decrypt --password-stdin -i report.txt.qs -o report.txt
Windows (PowerShell)
"your-passphrase" | qnsqy.exe decrypt --password-stdin -i report.txt.qs -o report.txt --acknowledge-no-sandbox
| Flag | Value | What it does |
|---|---|---|
| -i, --input | <INPUT> | Encrypted .qs file to decrypt |
| -o, --output | <OUTPUT> | Where to write the recovered data |
| -f, --force | Overwrite the output if it already exists | |
| --password-stdin | Read the passphrase from stdin (supply once for decrypt) | |
| --key | <PRIV> | Your private key, for recipient-encrypted files |
| --verify-key | <PUB> | Signer's public key, to check an embedded signature |
| --verify-only | Verify the signature without writing decrypted output | |
| --show-metadata | Print the header metadata instead of decrypting | |
| --break-glass-reason | <TEXT> | HIPAA emergency access; logged, does not bypass crypto |
Output
Decrypted to: report.txt
Common combinations
Decrypt a recipient-encrypted file with your private key.
qnsqy decrypt -i secret.qs -o secret --key alice
Verify a signed + encrypted file's signature only, without writing plaintext.
qnsqy decrypt -i report.qs --verify-key sender.pub --verify-only
Watch (Linux CLI)
A real command-line round-trip captured on Linux. The unsigned dev-build integrity banner is filtered out; the sandbox lines are the seccomp network lockdown.
Watch (Windows CLI)
A real command-line round-trip on Windows 11 (PowerShell, Business tier). The unsigned dev-build integrity notice is filtered out.
Keys (keypairs)
Free & upGenerate post-quantum keypairs: an ML-KEM (FIPS 203) encryption keypair or an ML-DSA (FIPS 204) signing keypair. Each produces a private key you keep secret and a .pub public key you share. Keygen is always free (0 credits) on every tier; larger security levels are Pro/Business.
Open Keys from the CORE section. One screen holds two cards: Generate Encryption Keypair (ML-KEM / FIPS 203) and Generate Signing Keypair (ML-DSA / FIPS 204).
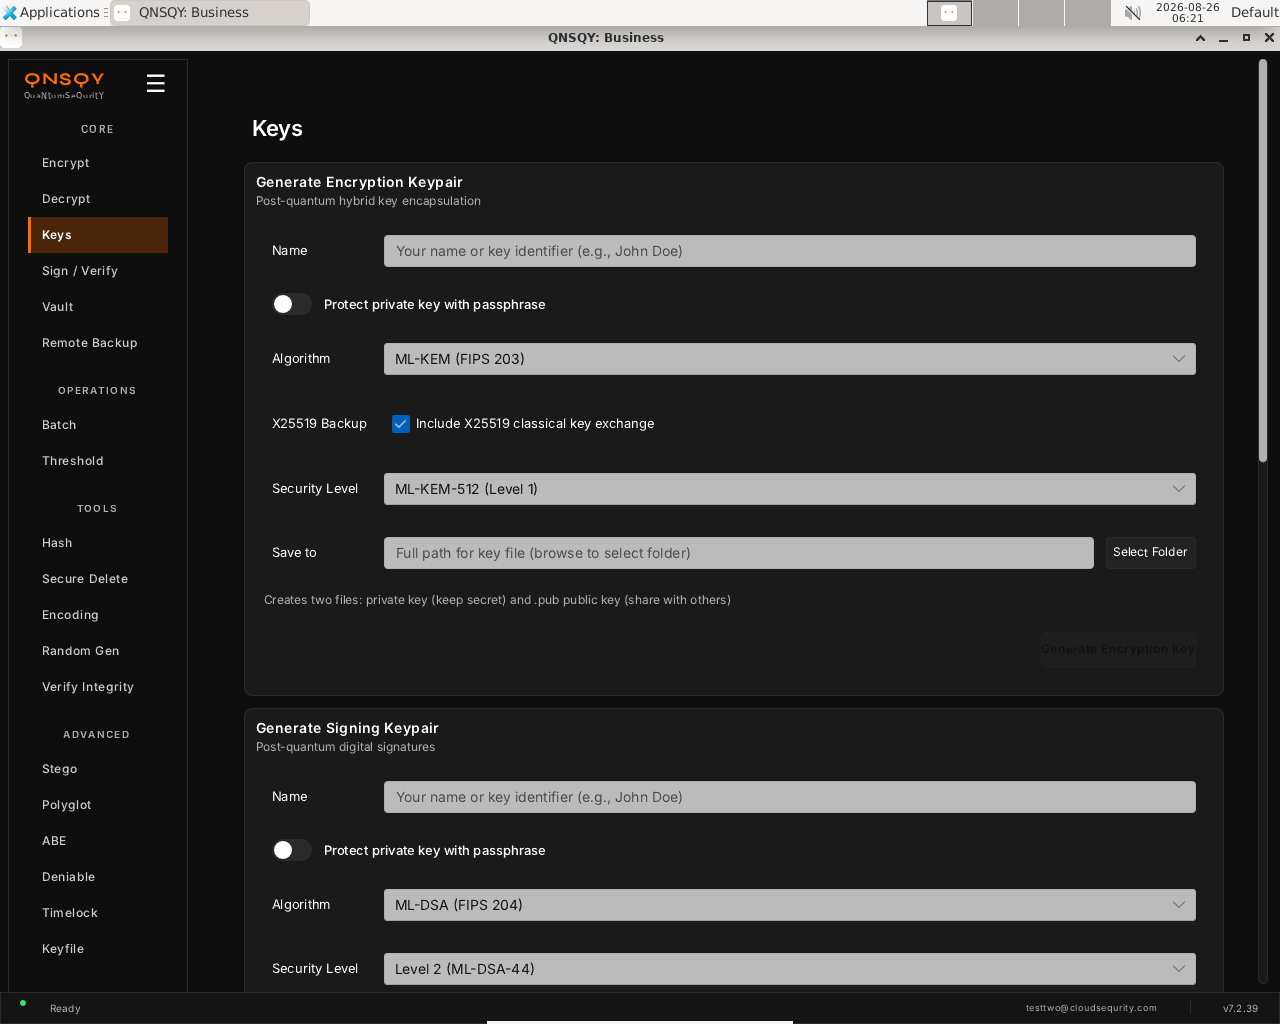
The Keys screen: two cards generate a post-quantum encryption keypair and a signing keypair. Each writes a private key and a .pub public key. In the card you need, enter a Name, optionally toggle Protect private key with passphrase, and pick a Security Level (encryption defaults to ML-KEM-512 with the X25519 backup checkbox on; signing defaults to ML-DSA-44). Choose a Save to folder.
Click Generate Encryption Key (or Generate Signing Key). Two files are written: the private key (keep secret) and the .pub public key (share). The private key is never displayed.
Prefer the terminal? This screen runs
qnsqy keygen-enc -o <output> -n <name> --algorithm ml-kem512 (and keygen-sign equivalent)
Watch (Linux GUI)
Watch (Windows GUI)
On Windows 11 (Business tier): the same screen and inputs. The completed operation and its result are shown in the Linux clip above.
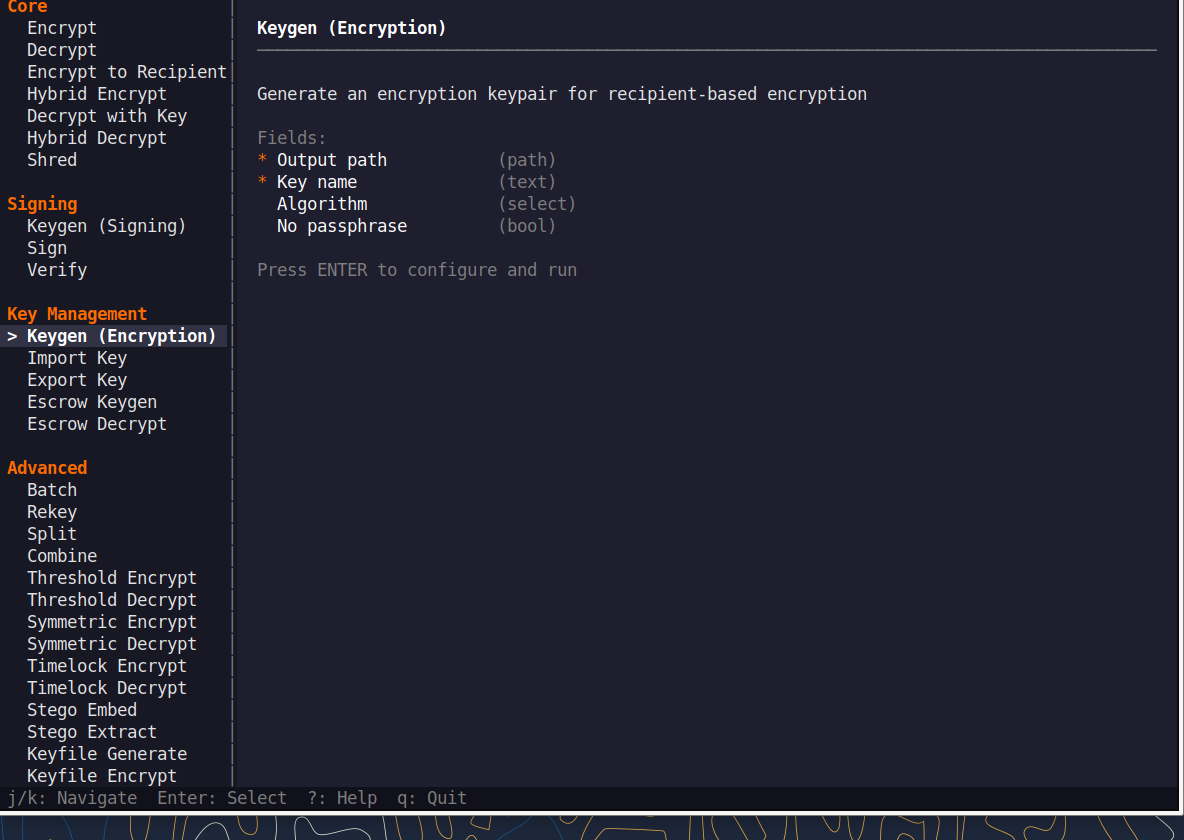
Launch the TUI with qnsqy --tui. The whole toolkit lives in one menu, grouped by category. Use j/k to highlight Keygen (Encryption) and press Enter.
Fill the fields (Tab moves, Enter toggles), then press F5 to run. The password is prompted securely and never echoed, and a live Equivalent command line updates as you type.
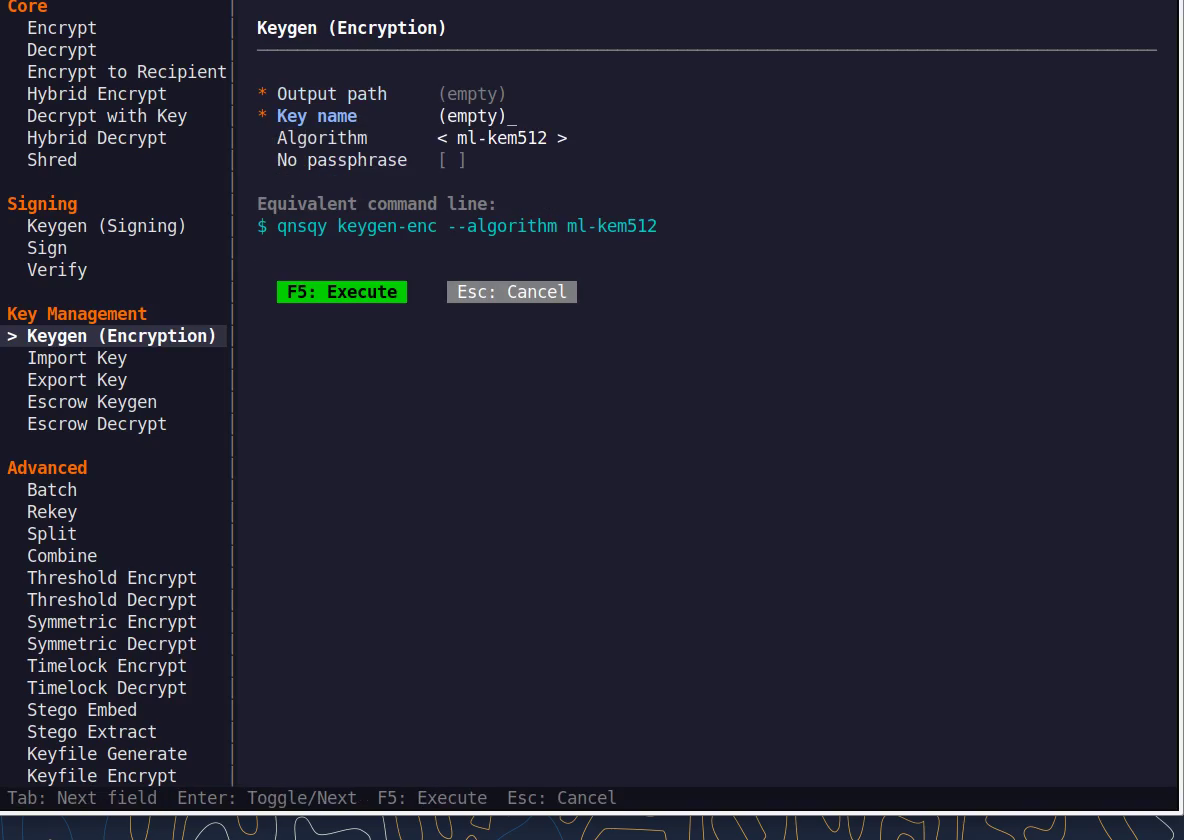
Equivalent command line (shown in the TUI too)
qnsqy keygen-enc -n <name> --algorithm ml-kem512Watch (Linux TUI)
Keys: j/k navigate · Enter select/toggle · Tab next field · F5 execute · Esc cancel · q quit.
qnsqy keygen-enc --output <OUT> --name <NAME> | qnsqy keygen-sign --output <OUT> --name <NAME>
Linux
qnsqy keygen-enc -o alice -n "Alice" --algorithm ml-kem768
qnsqy keygen-sign -o alice-sign -n "Alice" --algorithm ml-dsa65
Windows (PowerShell)
qnsqy.exe keygen-enc -o alice -n "Alice" --algorithm ml-kem768
qnsqy.exe keygen-sign -o alice-sign -n "Alice" --algorithm ml-dsa65
# keygen is 0-credit; --acknowledge-no-sandbox is not needed
| Flag | Value | What it does |
|---|---|---|
| -o, --output | <OUT> | Base path for the keypair (writes <OUT> and <OUT>.pub) |
| -n, --name | <NAME> | Owner name / key identifier stored in the key |
| --algorithm | <ALG> | keygen-enc: ML-KEM level (ml-kem512 free; 512/768 Pro; all incl. hqc-*/*-pure Business). keygen-sign: signature alg (ml-dsa44 free; ml-dsa65/87 + slh-dsa-* Pro/Business; fn-dsa* and lms-* Business). Default ml-dsa44. |
| --no-passphrase | Generate the private key without a passphrase | |
| --password-stdin | Read the key passphrase from stdin instead of prompting |
Output
SUCCESS: Generated encryption keypair for "Alice"
SUCCESS: Generated signing keypair for "Alice"
Common combinations
Generate a Level 5 encryption keypair (ML-KEM-1024).
qnsqy keygen-enc -o vault-key -n "Vault" --algorithm ml-kem1024
Passphrase-protected signing key (you are prompted for the passphrase).
qnsqy keygen-sign -o signer -n "Signer" --algorithm ml-dsa87
Watch (Linux CLI)
A real command-line round-trip captured on Linux. The unsigned dev-build integrity banner is filtered out; the sandbox lines are the seccomp network lockdown.
Watch (Windows CLI)
Command-line usage on Windows 11 (--help). The written examples above show the full invocation; a real run is not shown here (it needs keys/setup or would print secret material).
Sign / Verify
Free & upSign a file in place with your private key so anyone can confirm it came from you and was not altered, or verify a signed file against the signer's public key.
Open Sign / Verify from the CORE section. The screen has a Sign File card (File to sign + Private key) and a Verify Signature card (Signed file + Public key).
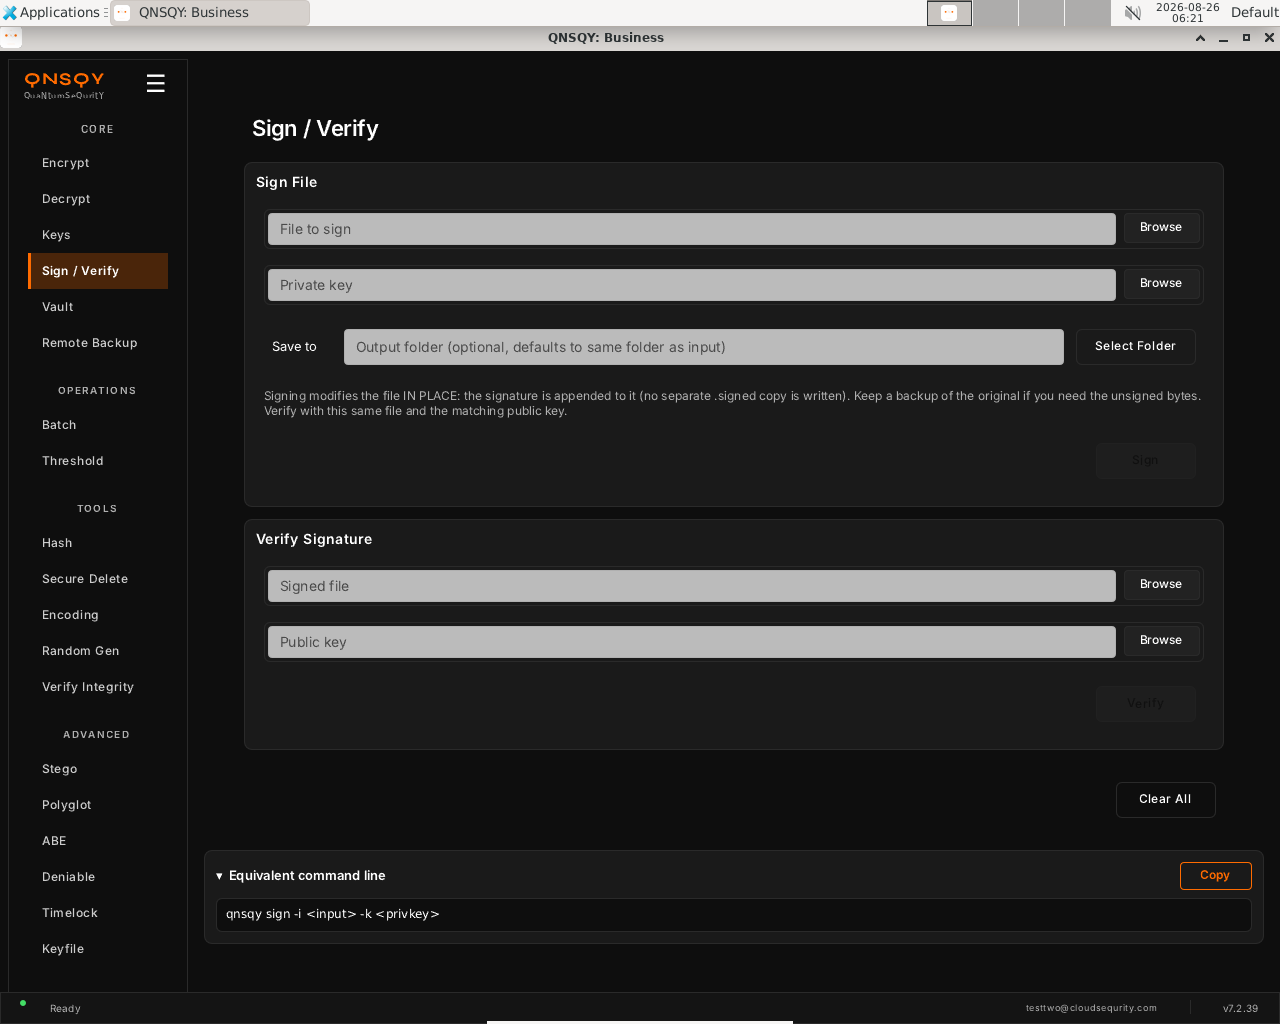
The Sign / Verify screen: sign a file in place with your private key, or verify a signed file against a public key. To sign: browse to the file and your private signing key. The screen warns that signing modifies the file IN PLACE (the signature is appended, no separate .signed copy), so keep a backup if you need the unsigned bytes. To verify: browse to the signed file and the matching public key.
Click Sign (you are prompted for the key passphrase if one is set), or click Verify. Verify reports VALID or INVALID and shows the algorithm and key hash.
Prefer the terminal? This screen runs
qnsqy sign -i <input> -k <key> --password-stdin
Watch (Linux GUI)
Watch (Windows GUI)
On Windows 11 (Business tier): the same screen and inputs. The completed operation and its result are shown in the Linux clip above.
Launch the TUI with qnsqy --tui. The whole toolkit lives in one menu, grouped by category. Use j/k to highlight Sign and press Enter.
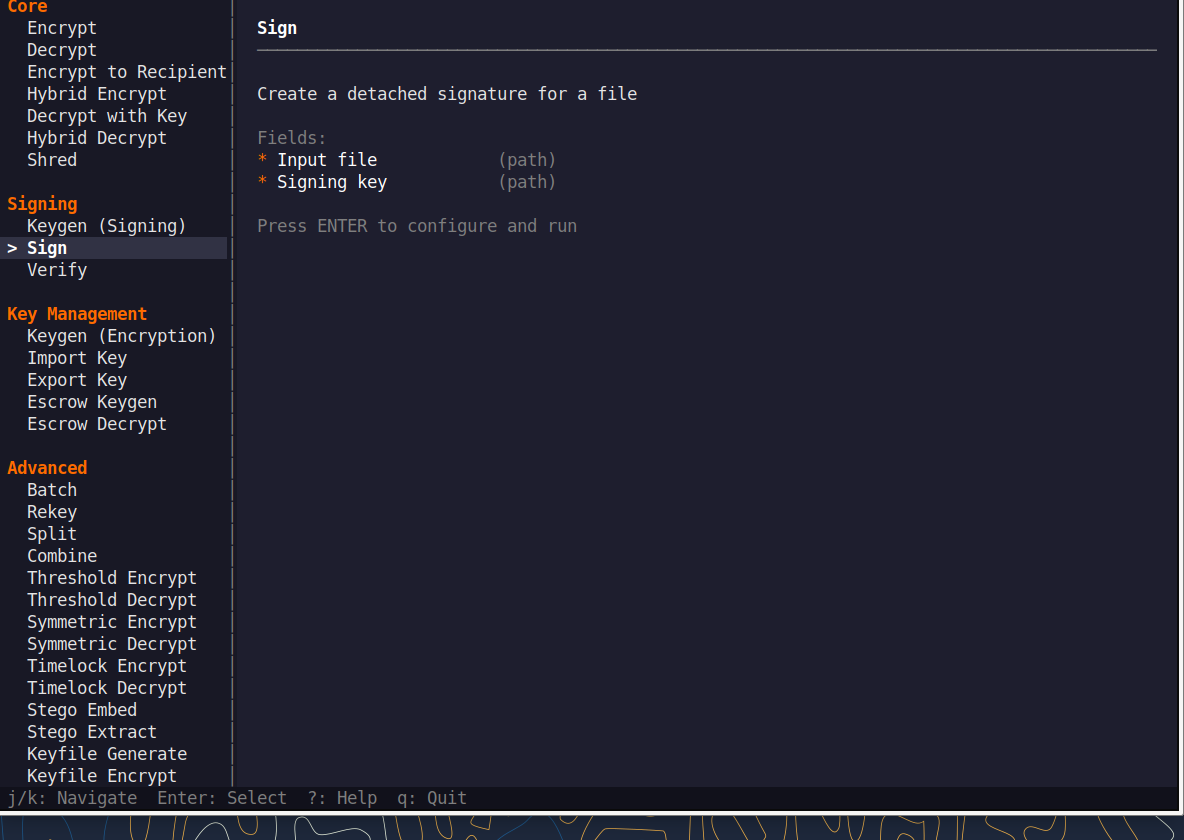
Fill the fields (Tab moves, Enter toggles), then press F5 to run. The password is prompted securely and never echoed, and a live Equivalent command line updates as you type.
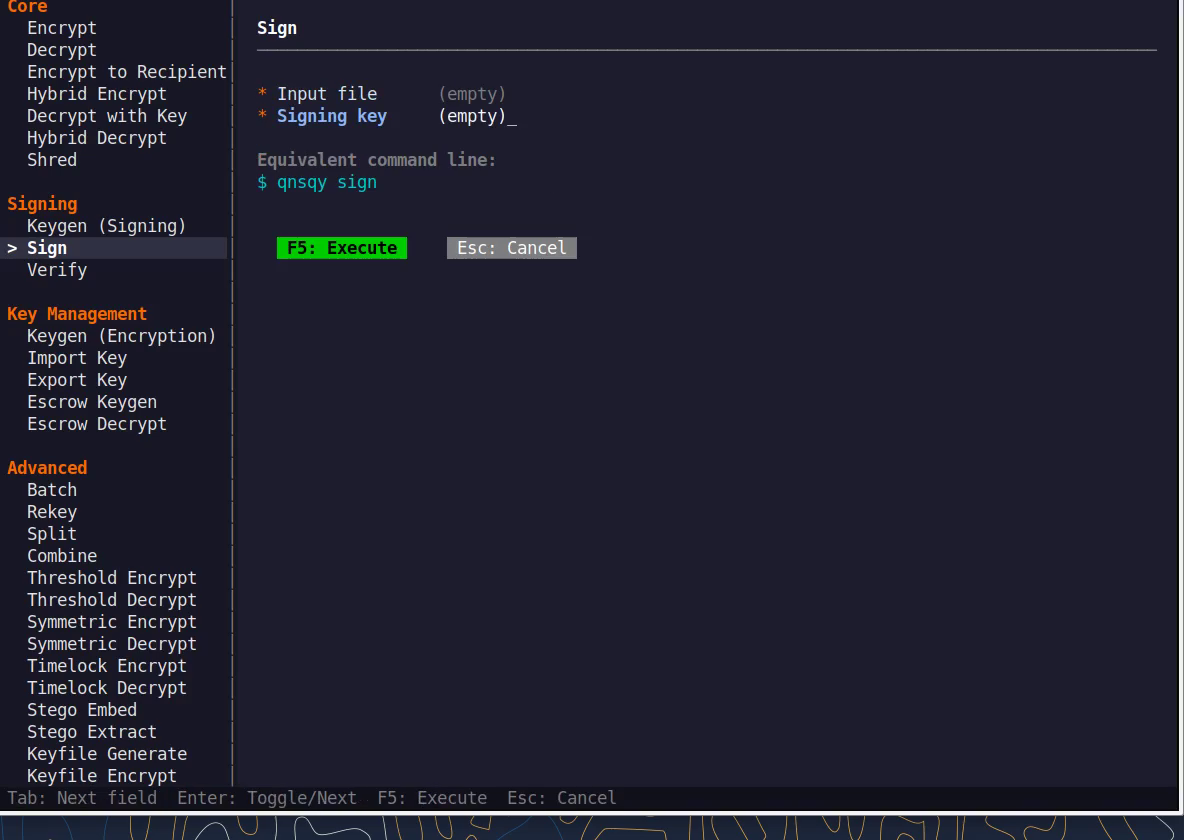
Equivalent command line (shown in the TUI too)
qnsqy sign -k <key> --password-stdinWatch (Linux TUI)
Keys: j/k navigate · Enter select/toggle · Tab next field · F5 execute · Esc cancel · q quit.
qnsqy sign --input <INPUT> --key <KEY> | qnsqy verify --input <INPUT> --key <KEY>
Linux
qnsqy sign -i contract.pdf -k alice-sign
qnsqy verify -i contract.pdf -k alice-sign.pub
Windows (PowerShell)
qnsqy.exe sign -i contract.pdf -k alice-sign --acknowledge-no-sandbox
qnsqy.exe verify -i contract.pdf -k alice-sign.pub --acknowledge-no-sandbox
| Flag | Value | What it does |
|---|---|---|
| -i, --input | <INPUT> | File to sign (in place) or the signed file to verify |
| -k, --key | <KEY> | sign: your private signing key · verify: the signer's public key |
| --password-stdin | Read the signing-key passphrase from stdin (sign) |
Output
Signing: contract.pdf
Using:   ML-DSA-44
File signed successfully.
Signature appended to: contract.pdf

Verifying: contract.pdf
Signature VALID
Algorithm: MlDsa44
Key hash:  ba155c58e29ab315
Common combinations
Verifying with the wrong (untrusted) key fails closed: non-zero exit, prints Signature INVALID.
qnsqy verify -i contract.pdf -k attacker.pub
Sign in place, then encrypt with the signature embedded inside the .qs instead of an in-place trailer.
qnsqy encrypt -i contract.pdf --sign-key alice-sign
Watch (Linux CLI)
A real command-line round-trip captured on Linux. The unsigned dev-build integrity banner is filtered out; the sandbox lines are the seccomp network lockdown.
Watch (Windows CLI)
Command-line usage on Windows 11 (--help). The written examples above show the full invocation; a real run is not shown here (it needs keys/setup or would print secret material).
Vault
ProA local, post-quantum-encrypted password vault. The vault file itself is encrypted; one master password unlocks it to add, list, get, and manage entries, with optional random-password generation.
Open Vault from the CORE section. The Secure Vault screen has three tabs (Browse, Add Entry, Settings) and opens on Browse with an Open Vault panel.
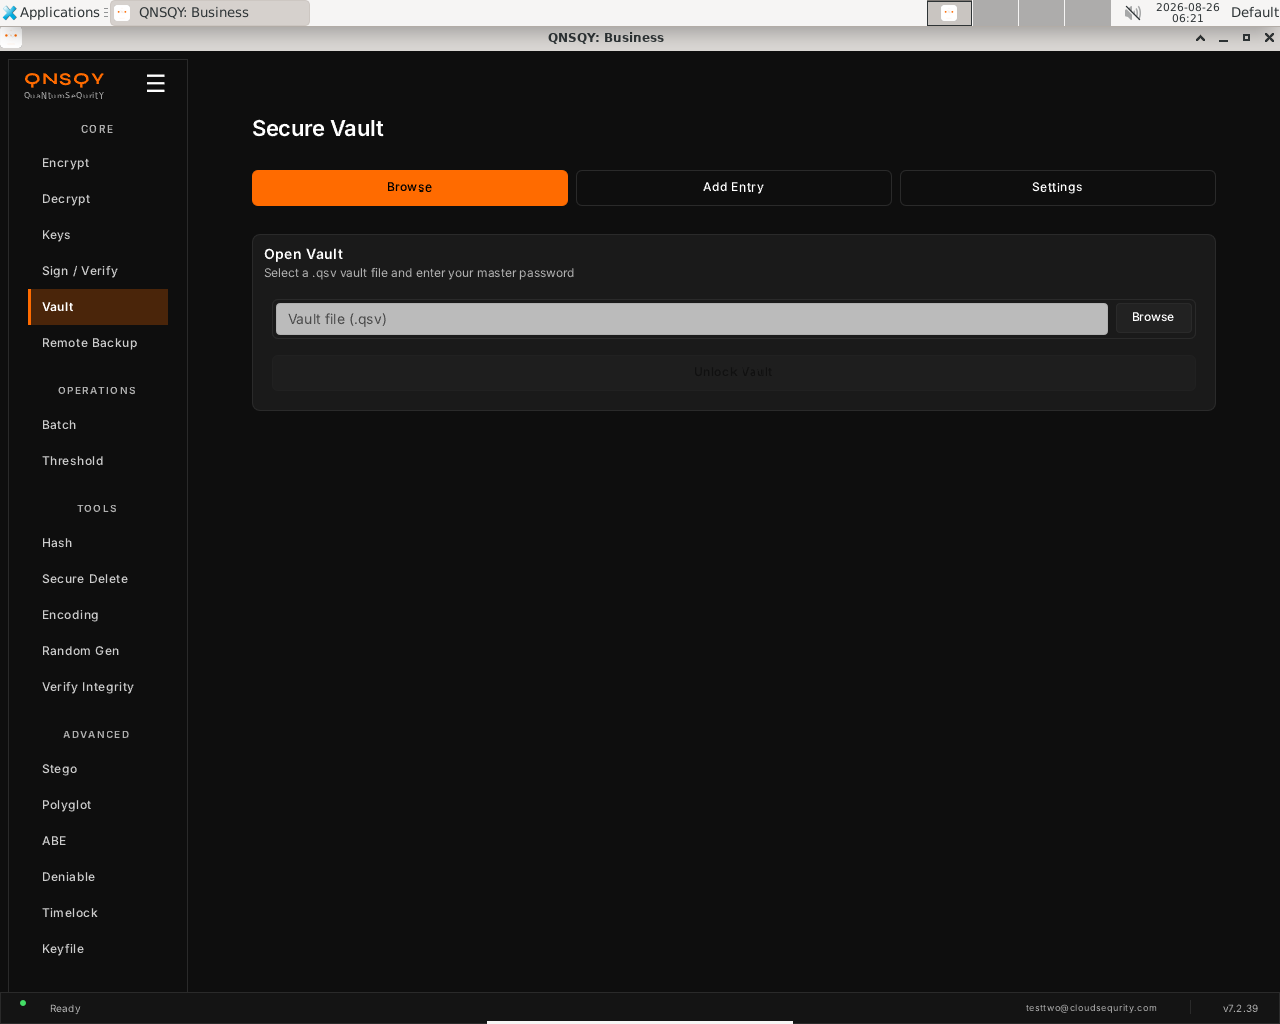
The Secure Vault screen: select a .qsv vault file and enter your master password to unlock it, then browse, add, or manage entries. On the Browse tab, use the .qsv file picker to select your vault (or create one on first use), then enter the master password. Switch to Add Entry to store a new username/password, optionally auto-generating a random password.
Click Unlock Vault. The vault file is itself post-quantum-encrypted; the master password unlocks it and the decrypted entries stay in memory only.
Prefer the terminal? This screen runs
qnsqy vault add --vault <file> --name <name> --password-stdin
Watch (Linux GUI)
Watch (Windows GUI)
On Windows 11 (Business tier): the same screen and inputs. The completed operation and its result are shown in the Linux clip above.
Watch (Windows GUI)
Vault is available in the QNSQY GUI (screen above) and on the command line, but it is not one of the items in the interactive TUI menu. Use the GUI, or run qnsqy vault from a terminal (see the CLI tab).
qnsqy vault <init|add|get|list|remove|edit|export|import|rekey> --vault <FILE> --password-stdin
Linux
printf "vaultpw\n" | qnsqy vault init --vault my.vault --password-stdin
printf "vaultpw\n" | qnsqy vault add --vault my.vault --name github --username me --generate 24 --password-stdin
printf "vaultpw\n" | qnsqy vault list --vault my.vault --password-stdin
Windows (PowerShell)
"vaultpw`n" | qnsqy.exe vault add --vault my.vault --name github --username me --generate 24 --password-stdin --acknowledge-no-sandbox
| Flag | Value | What it does |
|---|---|---|
| <subcommand> | init|add|get|list|remove|edit|export|import|rekey | The vault operation to run |
| --vault | <FILE> | Path to the encrypted .qsv vault file (required by every subcommand) |
| --password-stdin | Read the master password from stdin | |
| --name | <NAME> | Entry name (add / get / remove / edit) |
| --username | <USER> | Username stored on the entry (add) |
| --generate | <N> | Generate an N-character random password for the entry (add) |
| --url, --notes, --tags | <TEXT> | Optional metadata on an entry (add) |
| --show-password | Reveal the secret on get (masked by default) | |
| --json | Machine-readable output (get / list) | |
| --show-secrets | Include secret values in a list | |
| -f, --force | Skip the confirmation on remove |
Output (real run: init → add → list)
SUCCESS: Vault created at team.qsv
SUCCESS: Entry 'db-password' added to vault
Vault entries (1):
  db-password
  (Use --show-secrets for details, or `vault get --show-password` for passwords)
Common combinations
Store an entry with an auto-generated 32-character password.
qnsqy vault add --vault my.vault --name db --generate 32 --password-stdin
Export the vault to a portable backup, then import it elsewhere.
qnsqy vault export --vault my.vault -o backup.json --password-stdin
qnsqy vault import --vault my.vault -i backup.json --password-stdin
Watch (Linux CLI)
A real vault run on Linux: init → add --generate 24 → list. The generated password is never printed; list shows entry names only.
Watch (Windows CLI)
Command-line usage on Windows 11 (--help). The written examples above show the full invocation; a real run is not shown here (it needs keys/setup or would print secret material).
Watch (Windows CLI)
Remote Backup
All tiersZero-knowledge encrypted backup to S3, R2, MinIO, or your own server. Data is encrypted locally before upload, so only ciphertext leaves the machine. Push, pull, or two-way sync.
Open Remote Backup from the CORE section. The Destination panel configures where encrypted data is stored (R2 / S3 / MinIO / your own server). The Enter endpoint directly toggle is on, exposing Provider, Endpoint, Bucket, Region, Access key, Secret, and an optional ML-DSA-87 Signature pin.
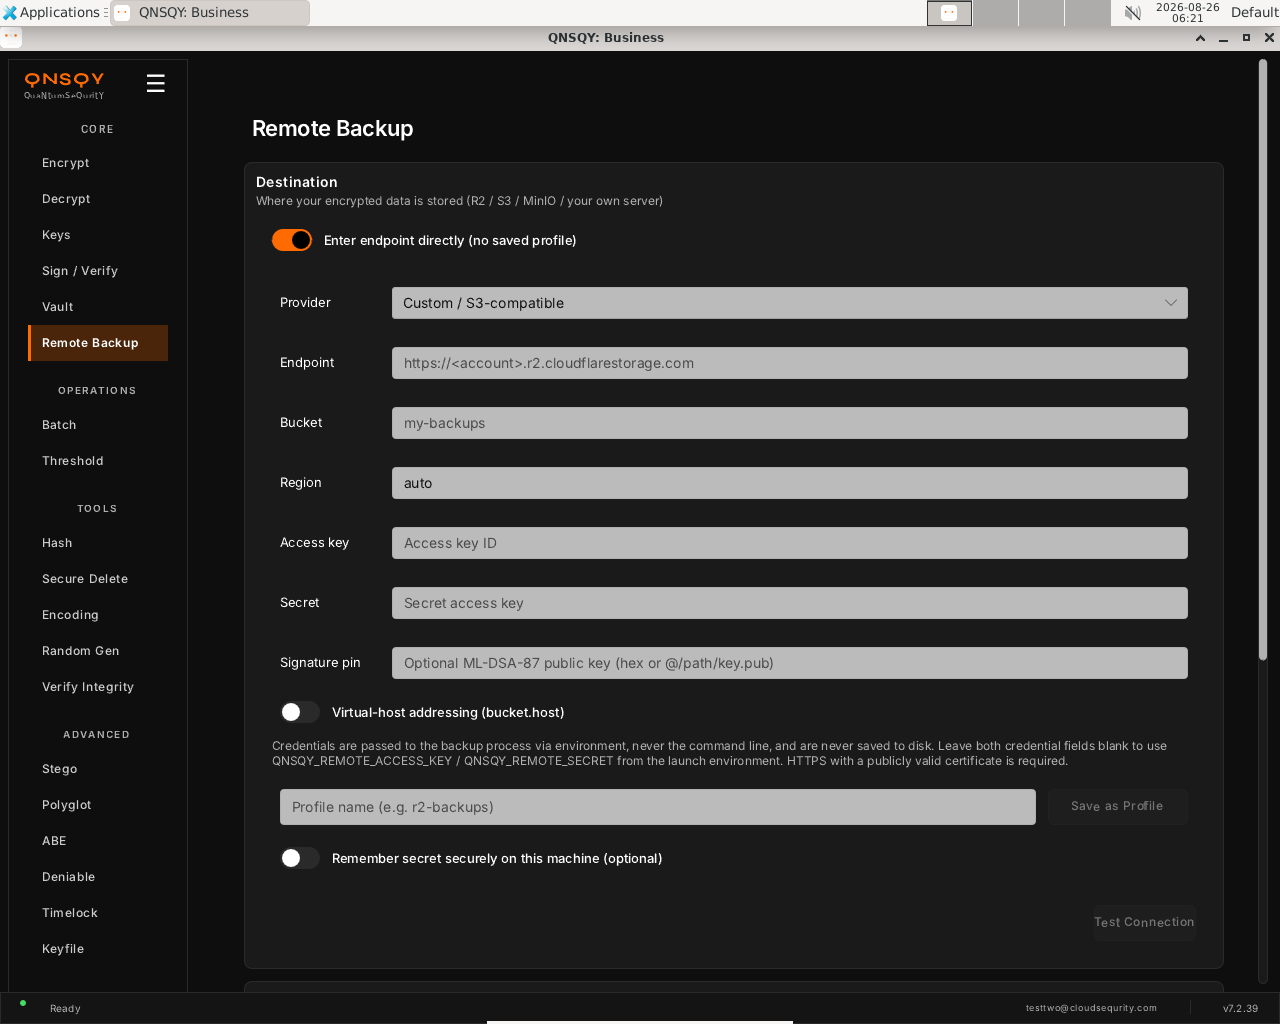
The Remote Backup screen: point at an S3/R2 endpoint and bucket (or a saved profile). Credentials are passed via environment, never the command line, and never saved to disk. Choose a Provider, fill in the Endpoint and Bucket (Region defaults to auto). Enter the Access key / Secret, or leave both blank to use QNSQY_REMOTE_ACCESS_KEY / QNSQY_REMOTE_SECRET from the launch environment. Optionally pin a signing public key and save it as a named profile.
Click Test Connection to confirm the remote, then push, pull, or sync. Data is encrypted locally before upload, so only ciphertext leaves the machine (zero-knowledge).
Prefer the terminal? This screen runs
qnsqy push -i <input> --remote <profile> --password-stdin
Watch (Linux GUI)
Watch (Windows GUI)
On Windows 11 (Business tier): the same configuration screen and inputs. A live upload needs a configured R2/S3 remote and credentials, so it is not run here on either OS.
Watch (Windows GUI)
Remote Backup is available in the GUI and on the command line, but it is not in the TUI menu. Use the Remote Backup screen in the desktop app, or run qnsqy push / qnsqy pull / qnsqy sync from a terminal.
qnsqy push -i <DIR/FILE> --remote <PROFILE> | qnsqy pull -o <DIR> --remote <PROFILE> | qnsqy sync -i <DIR> --remote <PROFILE>
Linux
qnsqy remote add r2 --endpoint https://<acct>.r2.cloudflarestorage.com --bucket backups
qnsqy push -i ~/Documents --remote r2 --password-stdin
qnsqy pull -o ./restore --remote r2 --password-stdin
Windows (PowerShell)
qnsqy.exe push -i C:\Docs --remote r2 --password-stdin --acknowledge-no-sandbox
| Flag | Value | What it does |
|---|---|---|
| <subcommand> | push | pull | sync | Upload, download, or two-way sync encrypted data |
| --remote | <PROFILE> | Use a saved remote profile (created with remote add) |
| --endpoint | <URL> | S3/R2 endpoint, when not using a saved profile |
| --bucket | <NAME> | Destination bucket |
| -i, --input | <DIR/FILE> | Source to push or sync (required for push and sync) |
| -o, --output | <DIR> | Restore destination for pull (default ".") |
| --password-stdin | Read the encryption passphrase from stdin | |
| --recipient | <PUB> | Encrypt to a recipient public key (push / sync only) |
| --hybrid | Add classical X25519 alongside ML-KEM (push / sync only) | |
| -z, --compress | Compress before encrypting (push / sync only) | |
| --generation | <N> | Pull a specific backup generation |
| --dry-run | Preview a sync without transferring (sync) | |
| --creds-vault, --creds-entry | Read the S3 secret from a vault instead of the environment |
Output
[NETWORKED, documented from §7; not run live. The S3 secret is NEVER on argv, it comes from QNSQY_REMOTE_SECRET, --creds-vault, or an interactive prompt. Data is encrypted locally; only ciphertext leaves the machine (zero-knowledge).]
Documented from the verified --help; not run live here.
Common combinations
Dry-run a sync to preview what would transfer, changing nothing.
qnsqy sync -i ~/Docs --remote r2 --dry-run
Restore a specific backup generation.
qnsqy pull -o ./restore --remote r2 --generation 3
Watch (Linux CLI)
Shows the command-line usage (qnsqy remote --help). A real run needs a configured R2/S3 profile and credentials.
Watch (Windows CLI)
Command-line usage on Windows 11 (--help). The written examples above show the full invocation; a real run is not shown here (it needs keys/setup or would print secret material).
Watch (Windows CLI)
Batch
ProEncrypt, decrypt, or verify many files in one run, in parallel, with a single password prompt.
Open the QNSQY desktop app and choose Batch under OPERATIONS in the left rail. The Batch Operation panel opens.
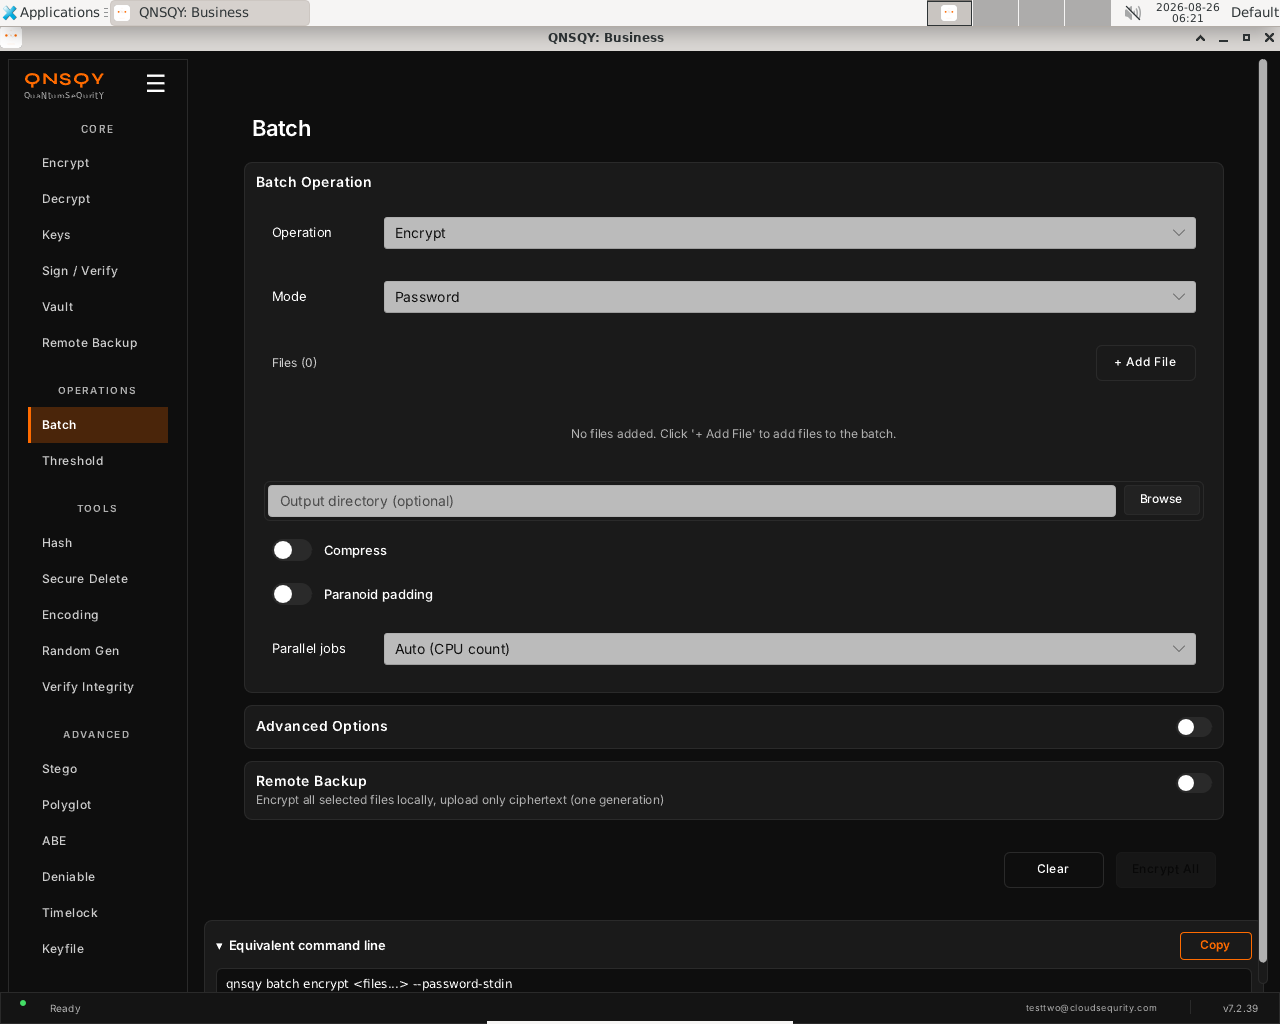
The Batch screen, pick the operation and mode, add files, then Encrypt All. Pick the Operation (Encrypt, Decrypt, or Verify) and the Mode (Password is shown here). Click + Add File to build the list, set an optional Output directory, and flip Compress or Paranoid padding if you want them. Parallel jobs defaults to Auto (CPU count).
Click Encrypt All. QNSQY prompts for the password once, then processes every file and writes one
.qsper input into the output directory.
Prefer the terminal? This screen runs
qnsqy batch encrypt <files...> --password-stdin
Watch (Linux GUI)
Watch (Windows GUI)
On Windows 11 (Business tier): the same screen and inputs. The completed operation and its result are shown in the Linux clip above.
Watch (Windows GUI)
Launch the TUI with qnsqy --tui. The whole toolkit lives in one menu, grouped by category. Use j/k to highlight Batch and press Enter.
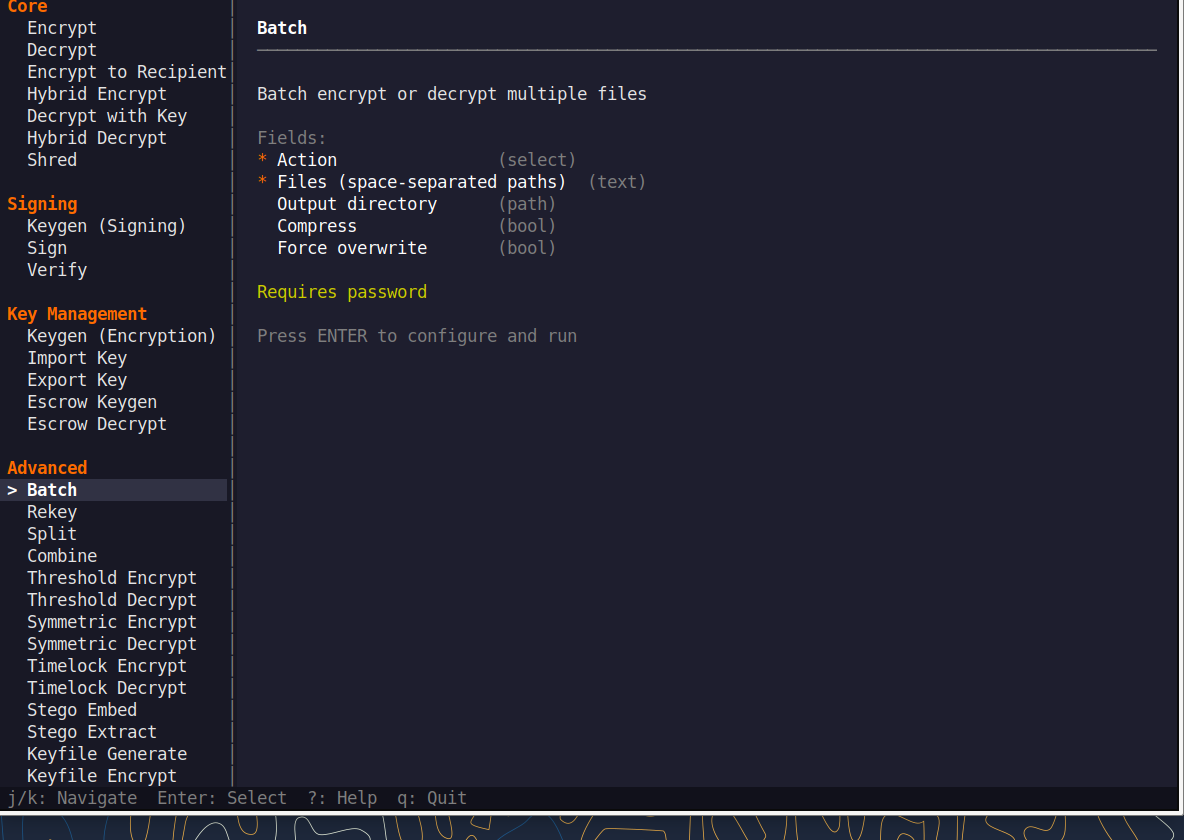
Fill the fields (Tab moves, Enter toggles), then press F5 to run. The password is prompted securely and never echoed, and a live Equivalent command line updates as you type.
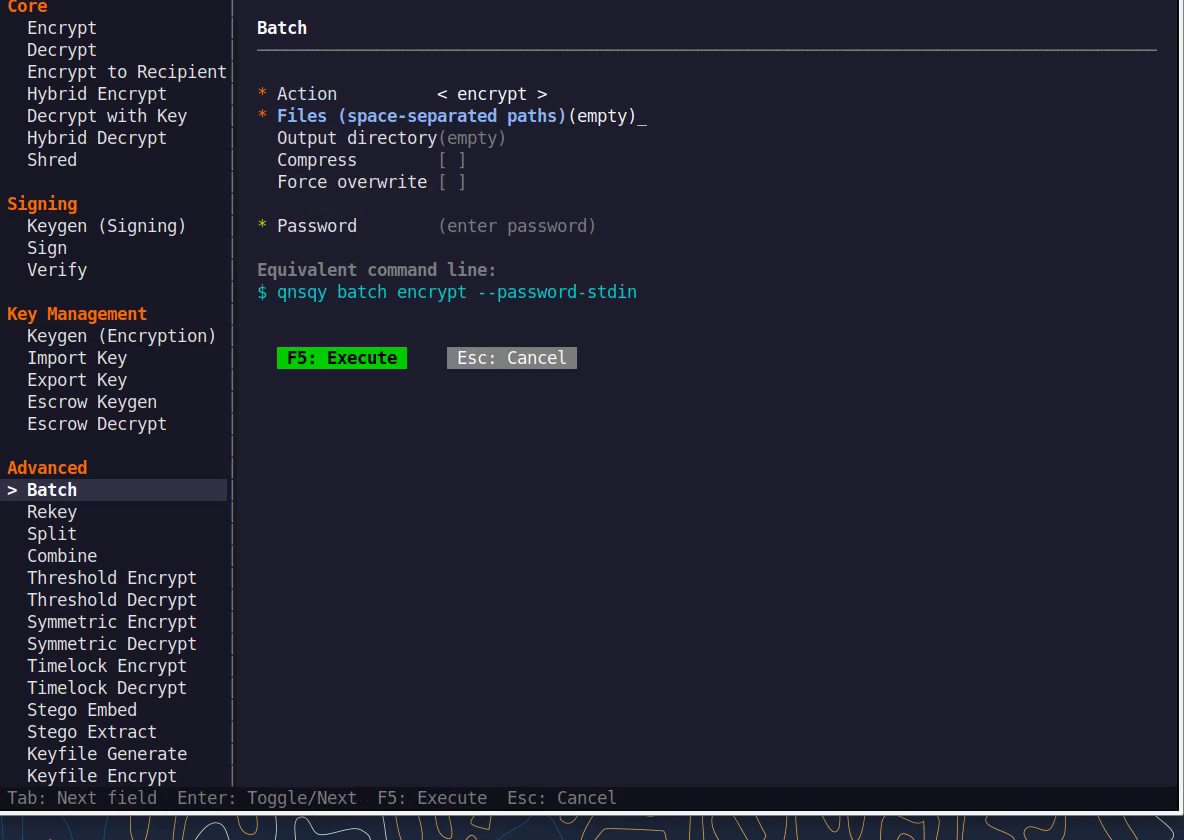
Equivalent command line (shown in the TUI too)
qnsqy batch encrypt --password-stdinWatch (Linux TUI)
Watch (Windows TUI)
Keys: j/k navigate · Enter select/toggle · Tab next field · F5 execute · Esc cancel · q quit.
qnsqy batch <encrypt|decrypt|verify> <FILES>...
Linux
printf "pw\npw\n" | qnsqy batch encrypt a.txt b.txt c.txt -o out/ --password-stdin
Windows (PowerShell)
"pw`npw" | qnsqy.exe batch encrypt a.txt b.txt c.txt -o out\ --password-stdin --acknowledge-no-sandbox
| Flag | Value | What it does |
|---|---|---|
| -o, --output-dir | <DIR> | Directory to write results into |
| -z, --compress | Compress each file before encrypting | |
| -f, --force | Overwrite existing output files | |
| --recipient | <PUB> | Encrypt to a recipient public key (repeat for several recipients) |
| --key | <PRIV> | Private key for batch decrypt |
| --sign-key | <PRIV> | Sign each output with this signing key |
| --verify-key | <PUB> | Public key to verify signatures (batch verify) |
| --algorithm | <ALG> | Symmetric/signature algorithm override |
| --kem | <KEM> | KEM to use for recipient encryption |
| --dsa | <SIG> | Signature algorithm for --sign-key |
| --argon2-preset | <PRESET> | Password-hardening cost preset |
| --paranoid | Add paranoid padding to hide the plaintext size | |
| --password-stdin | Read the password from stdin | |
| --progress | Show per-file progress |
Output
Processing 3 files...
[1/3] Processing: a.txt  OK
[2/3] Processing: b.txt  OK
[3/3] Processing: c.txt  OK
Completed: 3/3 succeeded
Common combinations
Encrypt to a recipient’s public key instead of a password
qnsqy batch encrypt *.pdf -o out/ --recipient team.pub
Batch-decrypt a folder of .qs files
printf pw | qnsqy batch decrypt out/*.qs -o plain/ --password-stdin
Watch (Linux CLI)
A real command-line round-trip captured on Linux. The unsigned dev-build integrity banner is filtered out; the sandbox lines are the seccomp network lockdown.
Watch (Windows CLI)
Command-line usage on Windows 11 (--help). The written examples above show the full invocation; a real run is not shown here (it needs keys/setup or would print secret material).
Watch (Windows CLI)
Threshold & Split
BusinessM-of-N recipient encryption and Shamir secret split/combine, so no single key holder can unlock the data alone.
Open the app and choose Threshold under OPERATIONS. The screen stacks three tools: Split Secret (Shamir M-of-N), Combine Shares, and (scroll down) Threshold Encrypt.
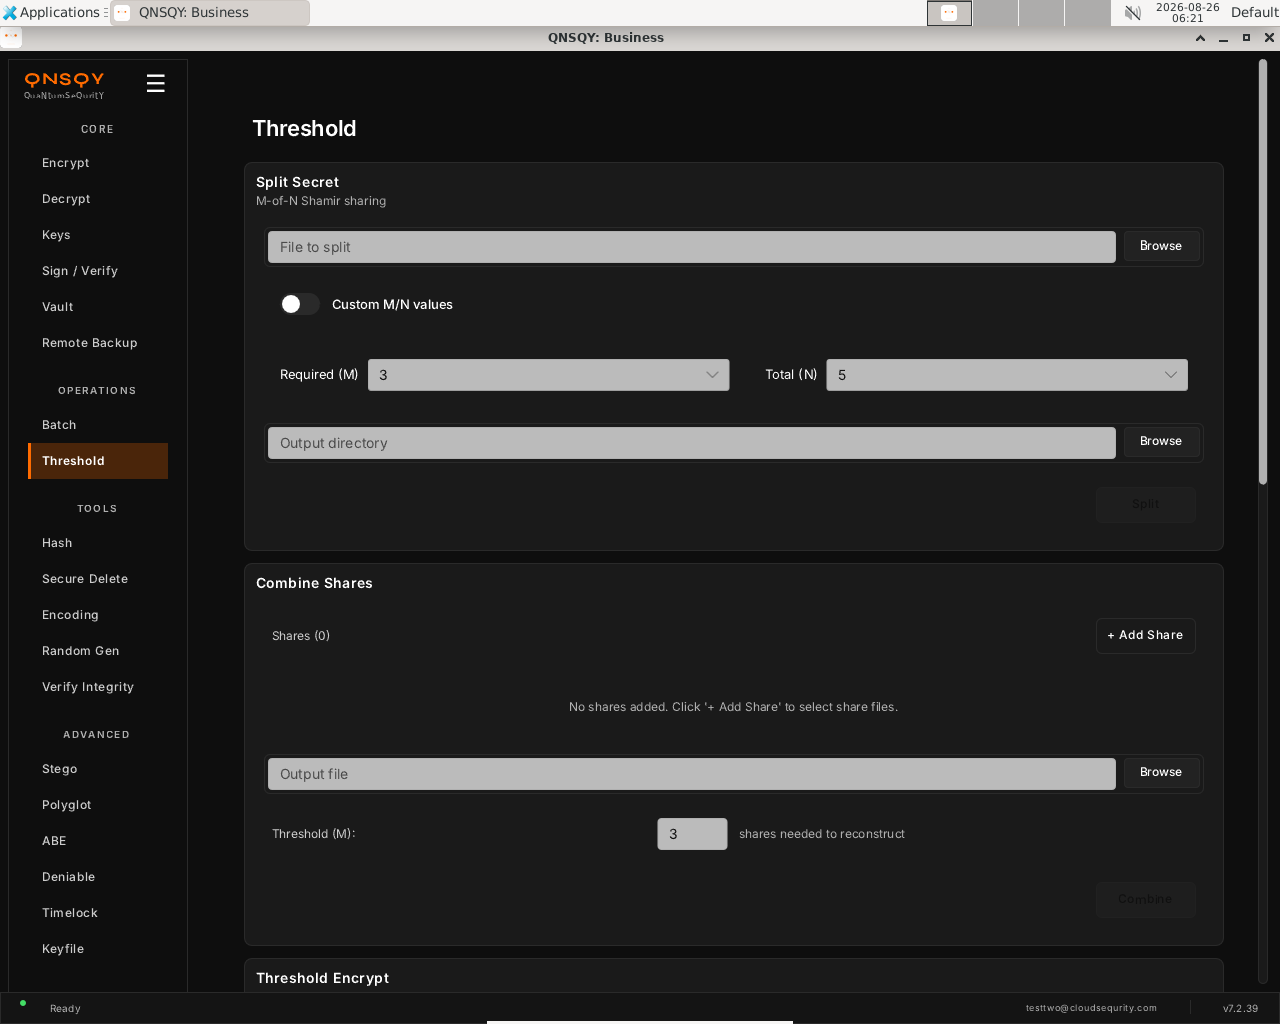
The Threshold screen, Split Secret (M-of-N Shamir), Combine Shares, and Threshold Encrypt. To split a secret, browse to the file, set Required (M) and Total (N) (defaults 3-of-5; flip Custom M/N values to change them), choose an output directory, and click Split. To reconstruct, add the share files under Combine Shares, set the threshold, and click Combine.
To encrypt to a set of recipients instead, scroll to Threshold Encrypt, add each recipient’s public key and the number required (M), then encrypt, any M of the N key holders can later decrypt together.
Prefer the terminal? This screen runs
qnsqy threshold-encrypt -i <input> -m 2 -r <key1> -r <key2> -r <key3>
Watch (Linux GUI)
Watch (Windows GUI)
On Windows 11 (Business tier): the same split, shown here completing end-to-end (5 shares, any 3 reconstruct).
Watch (Windows GUI)
Launch the TUI with qnsqy --tui. The whole toolkit lives in one menu, grouped by category. Use j/k to highlight Threshold Encrypt and press Enter.
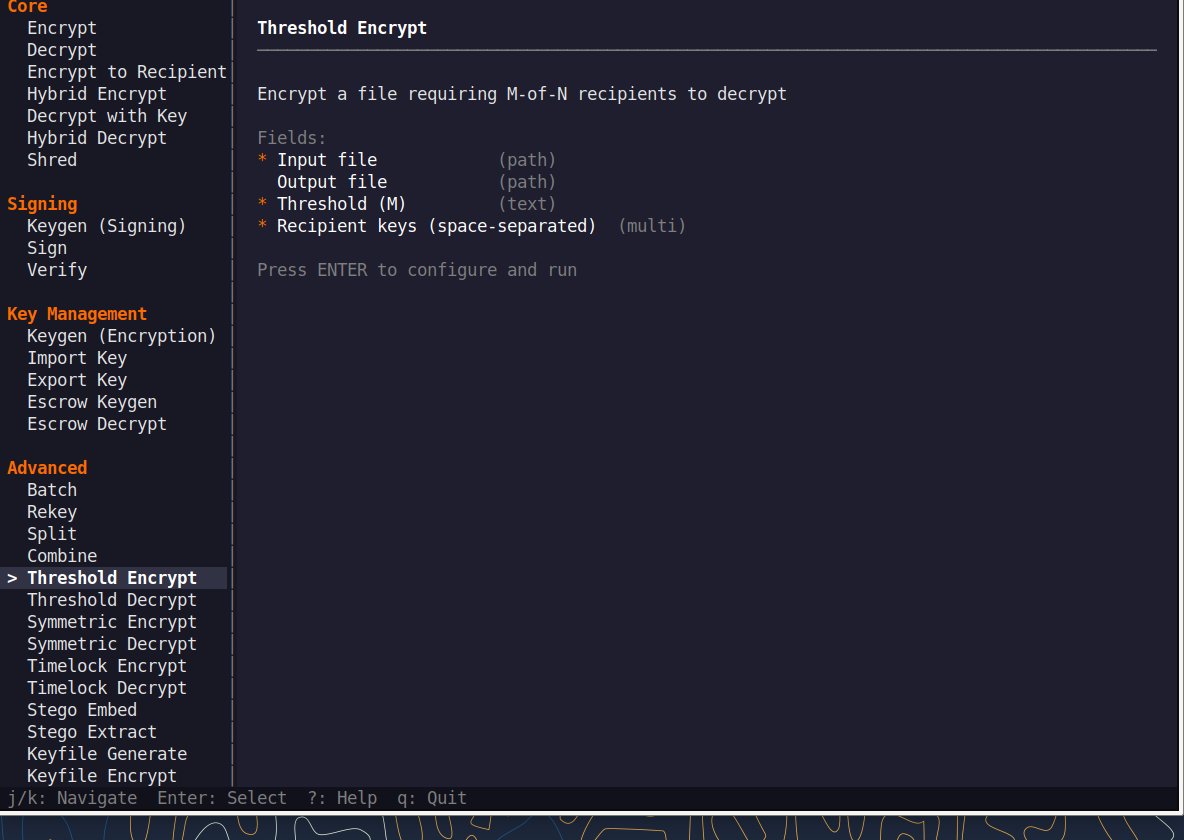
Fill the fields (Tab moves, Enter toggles), then press F5 to run. The password is prompted securely and never echoed, and a live Equivalent command line updates as you type.
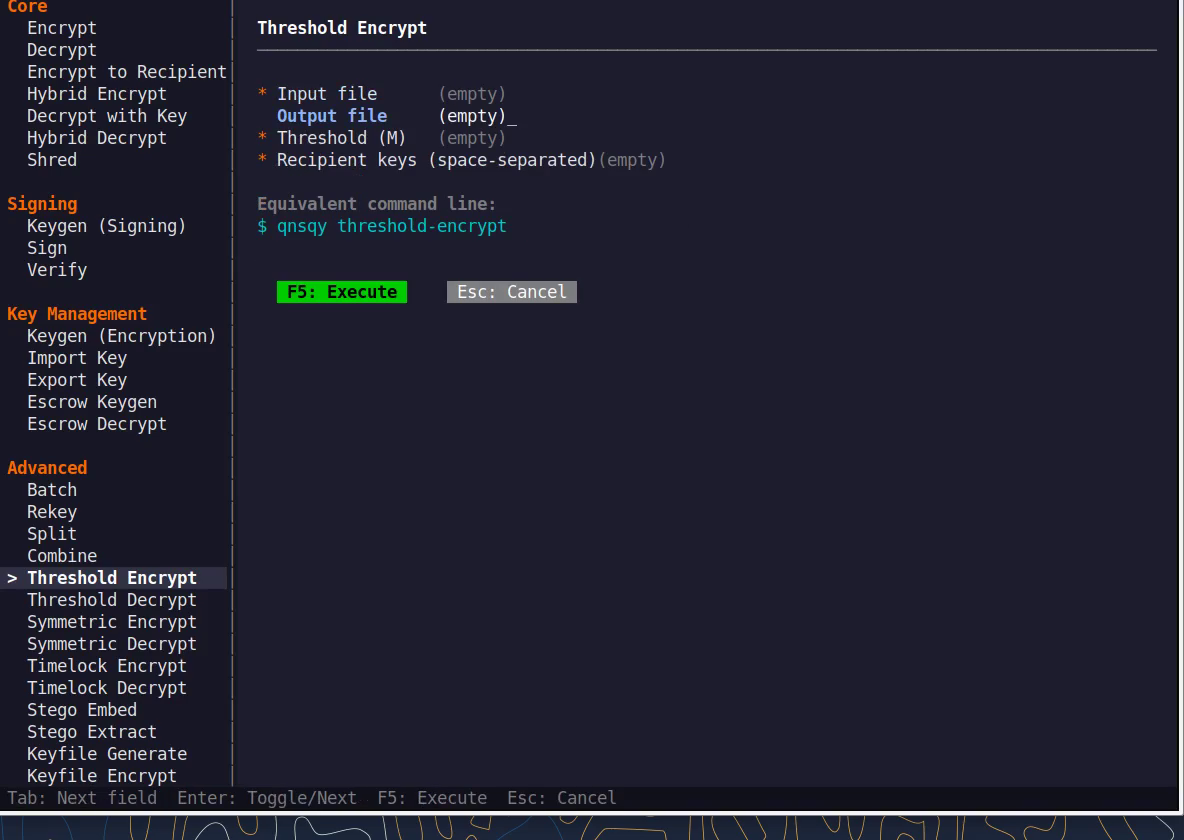
Equivalent command line (shown in the TUI too)
qnsqy threshold-encryptWatch (Linux TUI)
Watch (Windows TUI)
Keys: j/k navigate · Enter select/toggle · Tab next field · F5 execute · Esc cancel · q quit.
qnsqy threshold-encrypt --input <IN> ; qnsqy threshold-decrypt --input <IN> ; qnsqy split --input <IN> ; qnsqy combine --threshold <M> <SHARES>...
Linux
qnsqy threshold-encrypt -i report.txt -o report.thresh -m 2 -r k1.pub -r k2.pub -r k3.pub
qnsqy threshold-decrypt -i report.thresh -o report.out -k k1 -k k2
qnsqy split -i master.key -o shares/ -m 2 -n 3
qnsqy combine --threshold 2 shares/* -o master.key
Windows (PowerShell)
qnsqy.exe threshold-encrypt -i report.txt -o report.thresh -m 2 -r k1.pub -r k2.pub -r k3.pub --acknowledge-no-sandbox
qnsqy.exe threshold-decrypt -i report.thresh -o report.out -k k1 -k k2 --acknowledge-no-sandbox
qnsqy.exe split -i master.key -o shares\ -m 2 -n 3 --acknowledge-no-sandbox
qnsqy.exe combine --threshold 2 shares\* -o master.key --acknowledge-no-sandbox
| Flag | Value | What it does |
|---|---|---|
| -o, --output-dir | <PATH> | Output path (threshold-encrypt defaults to .qs.thresh; split writes a share directory; decrypt/combine write the output file) |
| -m, --threshold | <M> | Shares/keys required to reconstruct (default 3; combine uses --threshold) |
| -r, --recipient | <PUB> | Recipient public key for threshold-encrypt (repeat, one per party) |
| --group | <NAME> | Use a saved recipient group instead of listing keys |
| -a, --algorithm | <ALG> | KEM/algorithm for threshold-encrypt |
| -k, --key | <PRIV> | Private key for threshold-decrypt (repeat, at least M) |
| -n, --shares | <N> | Total shares to create with split (default 5) |
| --password-stdin | Read a key passphrase from stdin (threshold-decrypt) | |
| -f, --force | Overwrite existing output | |
| <SHARE_FILES>... | (positional) | Share files to reconstruct from (combine subcommand) |
Output
Threshold encrypting with 2-of-3 scheme...
Threshold encrypted (2-of-3) to: report.thresh

Threshold decrypted to: report.out

Splitting report.txt into 2-of-3 shares...
Created: shares/report.share.1..3
Split complete. Any 2 shares can reconstruct the secret.

Reconstructing secret from 3 shares (threshold: 2)...
Secret reconstructed to: master.key
Common combinations
3-of-5 board keys
qnsqy threshold-encrypt -i deal.pdf -m 3 -r a.pub -r b.pub -r c.pub -r d.pub -r e.pub
Split a master secret 2-of-3
qnsqy split -i master.key -m 2 -n 3 -o shares/
Watch (Linux CLI)
A real command-line round-trip captured on Linux. The unsigned dev-build integrity banner is filtered out; the sandbox lines are the seccomp network lockdown.
Watch (Windows CLI)
Command-line usage on Windows 11 (--help). The written examples above show the full invocation; a real run is not shown here (it needs keys/setup or would print secret material).
Watch (Windows CLI)
Hash
Free & upCompute or verify a cryptographic digest of a file (BLAKE3, SHA-2, SHA-3, and SHAKE).
Open the app and choose Hash under TOOLS. QNSQY computes the digest in-process (no subprocess).
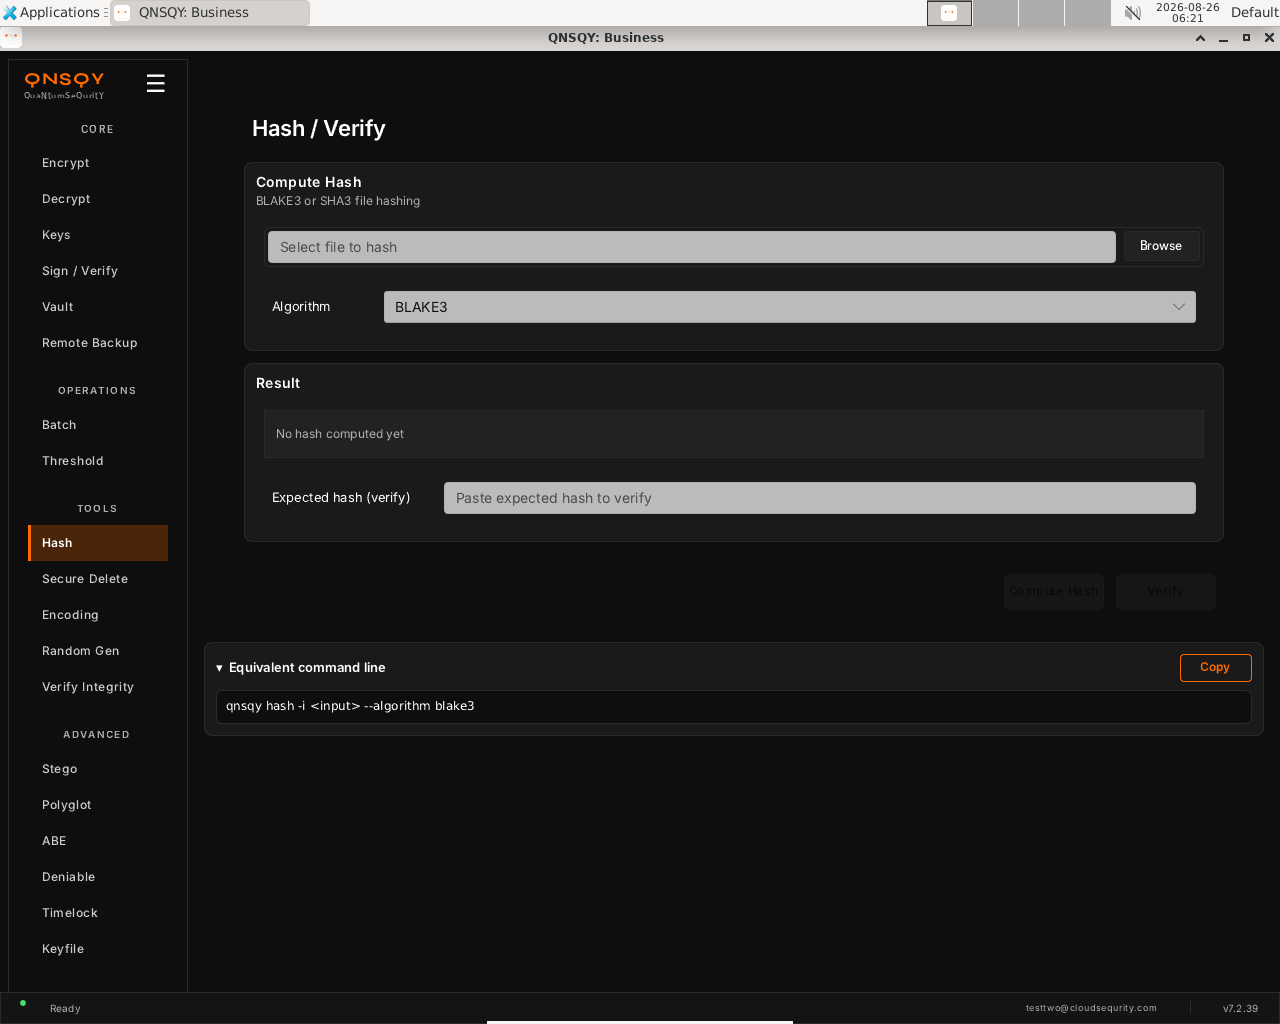
The Hash / Verify screen, choose a file and algorithm; the digest appears under Result. Browse to the file and pick the Algorithm (BLAKE3 by default; SHA-2, SHA-3, and SHAKE are in the list). Click Compute Hash and the digest shows under Result.
To check a file against a known digest, paste it into Expected hash (verify) and click Verify, QNSQY reports whether it matches.
Prefer the terminal? This screen runs
qnsqy hash -i <input> -a blake3
Watch (Linux GUI)
Watch (Windows GUI)
On Windows 11 (Business tier): the same screen and inputs. The completed operation and its result are shown in the Linux clip above.
Hash is available in the QNSQY GUI (under TOOLS) and on the command line, but it is not one of the items in the interactive TUI menu. Use the GUI screen above, or run qnsqy hash from a terminal.
qnsqy hash [FILE] | qnsqy hash-verify --hash <HASH> [FILE]
Linux
qnsqy hash -i report.txt -a blake3
qnsqy hash-verify -i report.txt -H 6e72b274aceee428eb74cfcdc76e501ff834fc19eb24ca2d888523101b3ebb02 -a blake3
Windows (PowerShell)
qnsqy.exe hash -i report.txt -a blake3 (hash/verify are free; no sandbox flag needed)
| Flag | Value | What it does |
|---|---|---|
| -i, --input | <FILE> | File (or directory) to hash / verify |
| -a, --algorithm | <ALG> | Digest algorithm: blake3 (default), blake2b/2s, sha256/512, sha3-256/512, shake256, sha224/384, sha512-224/256, sha3-224/384, shake128 |
| -r, --recursive | Hash every file in a directory tree | |
| --format | hex|base64 | Output encoding of the digest |
| --out-len | <N> | Output length in bytes (XOF/SHAKE only) |
| -H, --hash | <HASH> | hash-verify: expected digest to compare against (exit 0 match / 1 mismatch) |
Output
6e72b274aceee428eb74cfcdc76e501ff834fc19eb24ca2d888523101b3ebb02  report.txt
✓ MATCH: report.txt verified successfully
Common combinations
SHA3-512 instead of BLAKE3
qnsqy hash -i iso.img -a sha3-512
Recursive tree hash of a directory
qnsqy hash -i ./release -r -a blake3
Watch (Linux CLI)
A real command-line round-trip captured on Linux. The unsigned dev-build integrity banner is filtered out; the sandbox lines are the seccomp network lockdown.
Watch (Windows CLI)
A real command-line round-trip on Windows 11 (PowerShell, Business tier). The unsigned dev-build integrity notice is filtered out.
Secure Delete
Free & upOverwrite a file’s contents, then unlink it, so the data is not left recoverable on disk.
Open the app and choose Secure Delete under TOOLS. It overwrites the file’s bytes, then unlinks it.
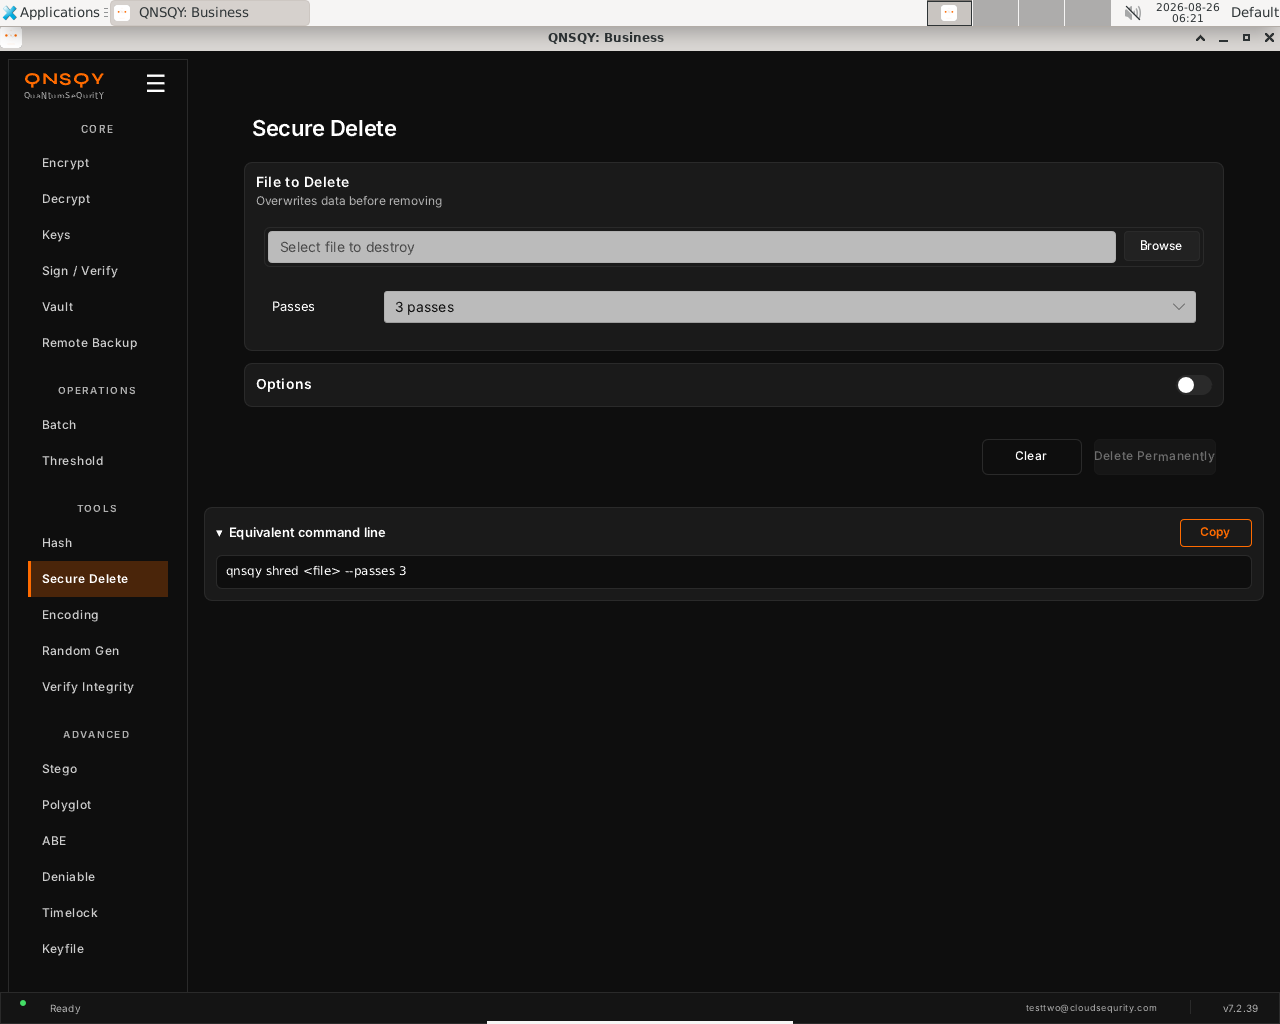
The Secure Delete screen, pick a file, choose the number of passes, then Delete Permanently. Browse to the file you want destroyed and set Passes (3 by default; more passes overwrite the data more times).
Click Delete Permanently. QNSQY overwrites the file the chosen number of times, then removes it. This cannot be undone.
Prefer the terminal? This screen runs
qnsqy shred <file> -p 3
Watch (Linux GUI)
Watch (Windows GUI)
On Windows 11 (Business tier): the same shredder, shown here completing end-to-end (green “Successful”).
Watch (Windows GUI)
Launch the TUI with qnsqy --tui. The whole toolkit lives in one menu, grouped by category. Use j/k to highlight Shred and press Enter.
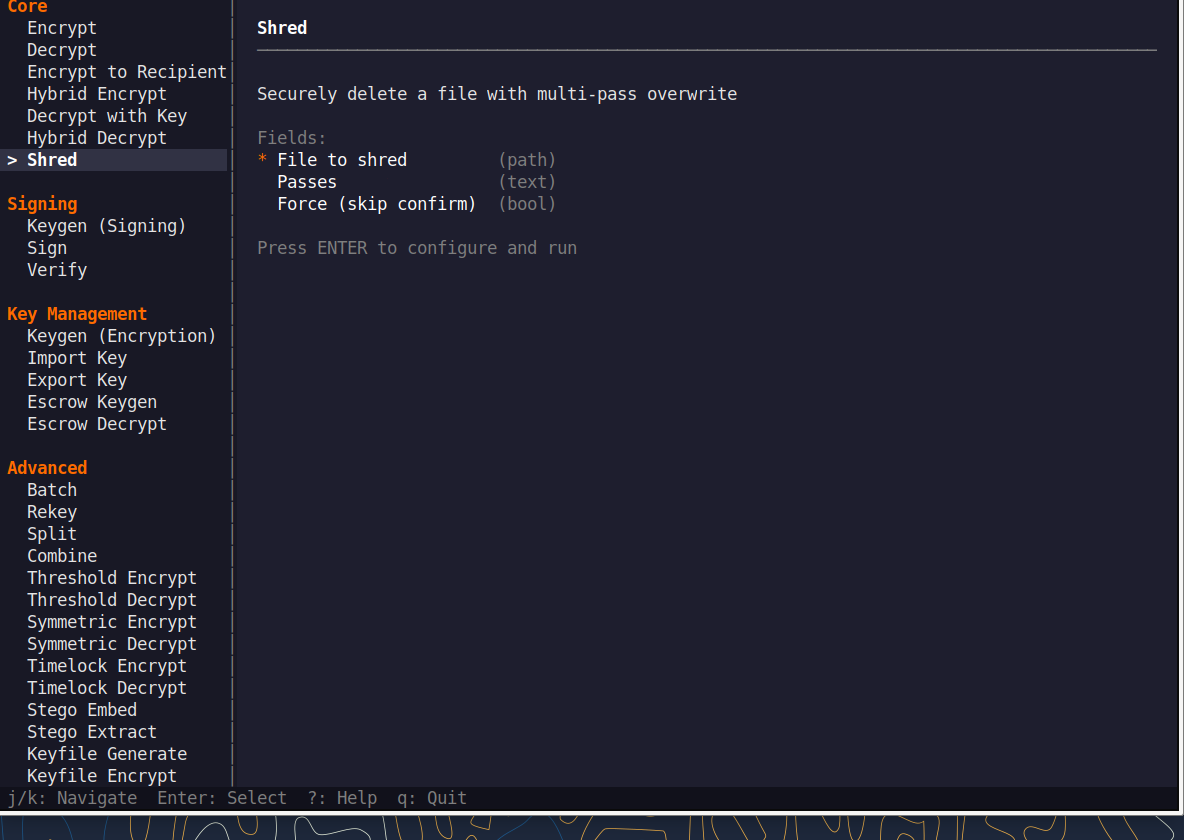
Fill the fields (Tab moves, Enter toggles), then press F5 to run. The password is prompted securely and never echoed, and a live Equivalent command line updates as you type.
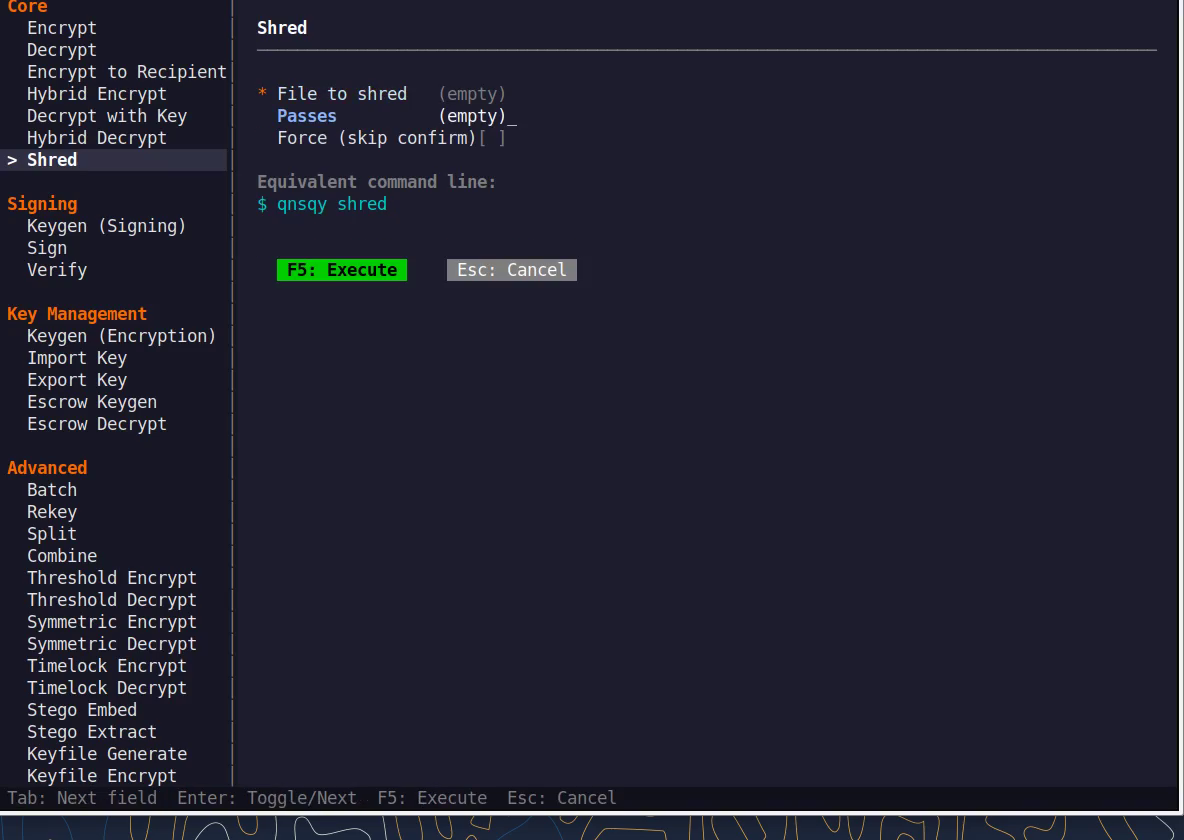
Equivalent command line (shown in the TUI too)
qnsqy shred -p 3Watch (Linux TUI)
Keys: j/k navigate · Enter select/toggle · Tab next field · F5 execute · Esc cancel · q quit.
qnsqy shred <FILE>
Linux
qnsqy shred old-secret.txt -f (3-pass overwrite, then delete)
Windows (PowerShell)
qnsqy.exe shred old-secret.txt -f
| Flag | Value | What it does |
|---|---|---|
| <FILE> | (positional) | The file to overwrite and delete |
| -p, --passes | <N> | Overwrite passes (default 3, range 1-100) |
| -f, --force | Skip the destructive-action confirmation | |
| --no-warning | Suppress the destructive-action warning (for scripts) |
Output
Warning: Could not determine storage type. Secure deletion effectiveness cannot be guaranteed.
Shredding with 3 passes...
Securely deleted: old-secret.txt
Common combinations
7-pass overwrite, no confirmation prompt
qnsqy shred secret.key -p 7 -f
Shred without the destructive-action warning (for scripts)
qnsqy shred tmp.bin -f --no-warning
Watch (Linux CLI)
A real command-line round-trip captured on Linux. The unsigned dev-build integrity banner is filtered out; the sandbox lines are the seccomp network lockdown.
Watch (Windows CLI)
A real command-line round-trip on Windows 11 (PowerShell, Business tier). The unsigned dev-build integrity notice is filtered out.
Watch (Windows CLI)
Encoding
Free & upConvert data between text encodings (Base64, Base64URL, Hex, Base32, Base58, URL, Binary, Octal, and Decimal).
Open the app and choose Encoding under TOOLS. Conversions run in-process.
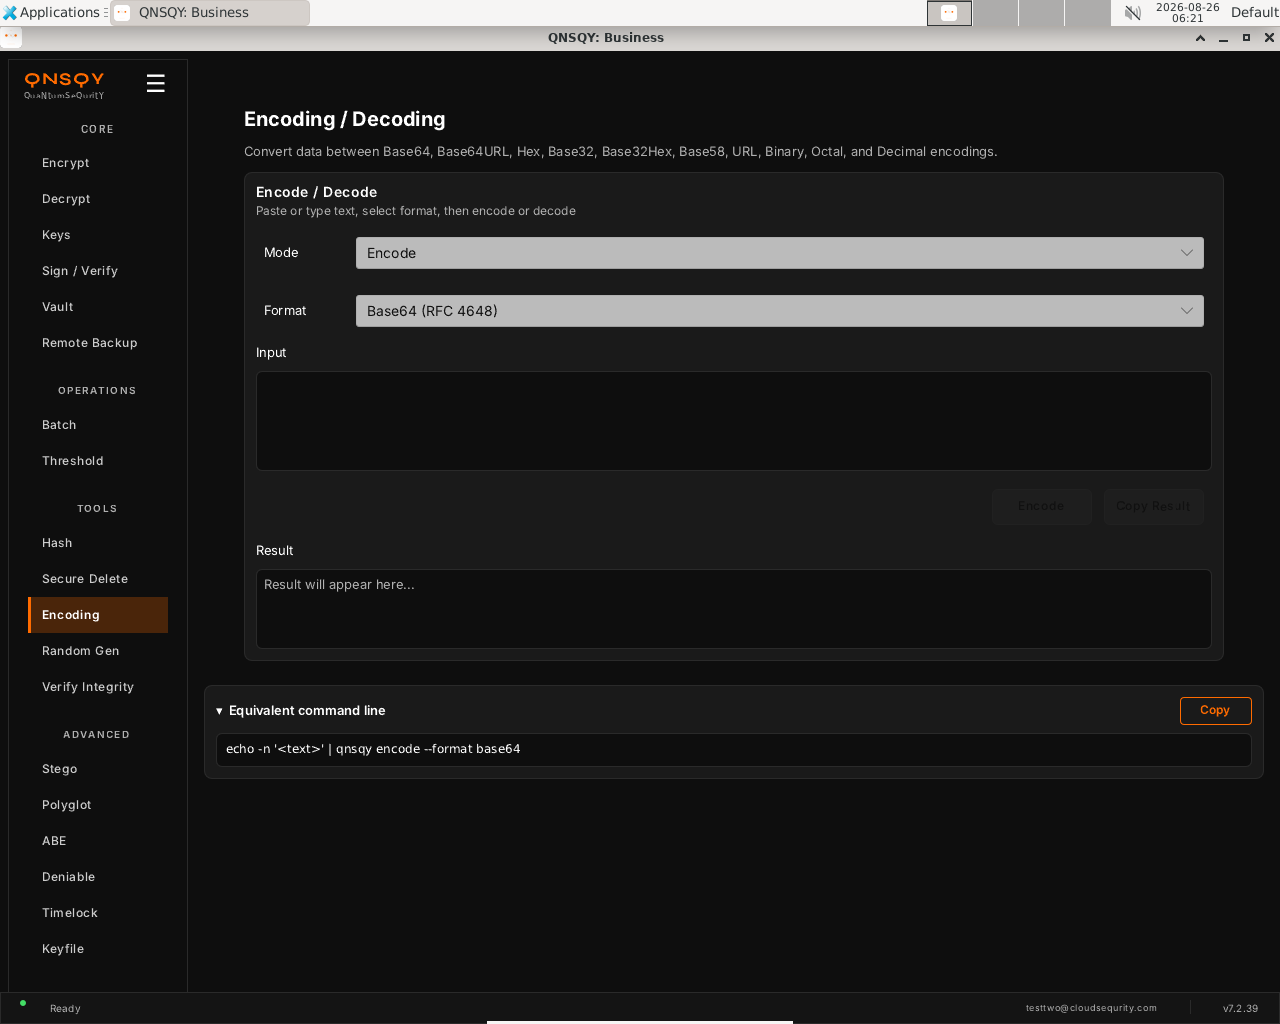
The Encoding / Decoding screen, set Mode and Format, paste your data, then Encode or Decode. Set Mode to Encode or Decode and pick the Format (Base64, Base64URL, Hex, Base32, Base32Hex, Base58, URL, Binary, Octal, or Decimal). Paste or type your data into Input.
Click Encode (or Decode). The converted data appears under Result, and Copy Result puts it on the clipboard.
Prefer the terminal? This screen runs
qnsqy encode -i <input> -f base64
Watch (Linux GUI)
Watch (Windows GUI)
On Windows 11 (Business tier): the same converter, shown here encoding end-to-end (Base64 result).
Encoding is available in the QNSQY GUI (under TOOLS) and on the command line, but it is not one of the items in the interactive TUI menu. Use the GUI screen above, or run qnsqy encode / qnsqy decode from a terminal.
qnsqy encode [FILE] | qnsqy decode [FILE]
Linux
qnsqy encode -i report.txt -f base64 -o report.b64
qnsqy decode -i report.b64 -f base64 -o report.txt
Windows (PowerShell)
qnsqy.exe encode -i report.txt -f base64 -o report.b64 (free; no sandbox flag)
| Flag | Value | What it does |
|---|---|---|
| [FILE], -i, --input | <FILE> | Input data (reads stdin if omitted) |
| -f, --format | <FMT> | Encoding: base64 (default), base64-url, hex, hex-upper, base32, base32-hex, base58, url, binary, octal, decimal |
| -o, --output | <FILE> | Write the result to a file (stdout if omitted) |
Output
SUCCESS: Encoded 105 bytes → report.b64 (144 chars)
SUCCESS: Decoded 144 chars → 105 bytes (report.txt)
Common combinations
Base58 (crypto-address style)
qnsqy encode -i key.bin -f base58
Decode a hex dump back to bytes
qnsqy decode -i data.hex -f hex -o data.bin
Watch (Linux CLI)
A real command-line round-trip captured on Linux. The unsigned dev-build integrity banner is filtered out; the sandbox lines are the seccomp network lockdown.
Watch (Windows CLI)
A real command-line round-trip on Windows 11 (PowerShell, Business tier). The unsigned dev-build integrity notice is filtered out.
Random Gen
Free & upGenerate cryptographically secure random values straight from the operating system CSPRNG. Nothing is ever stored or logged.
Open the app and pick Random Gen from the TOOLS group in the left rail. The Random Generator screen appears with a Generate panel above an empty Result panel.
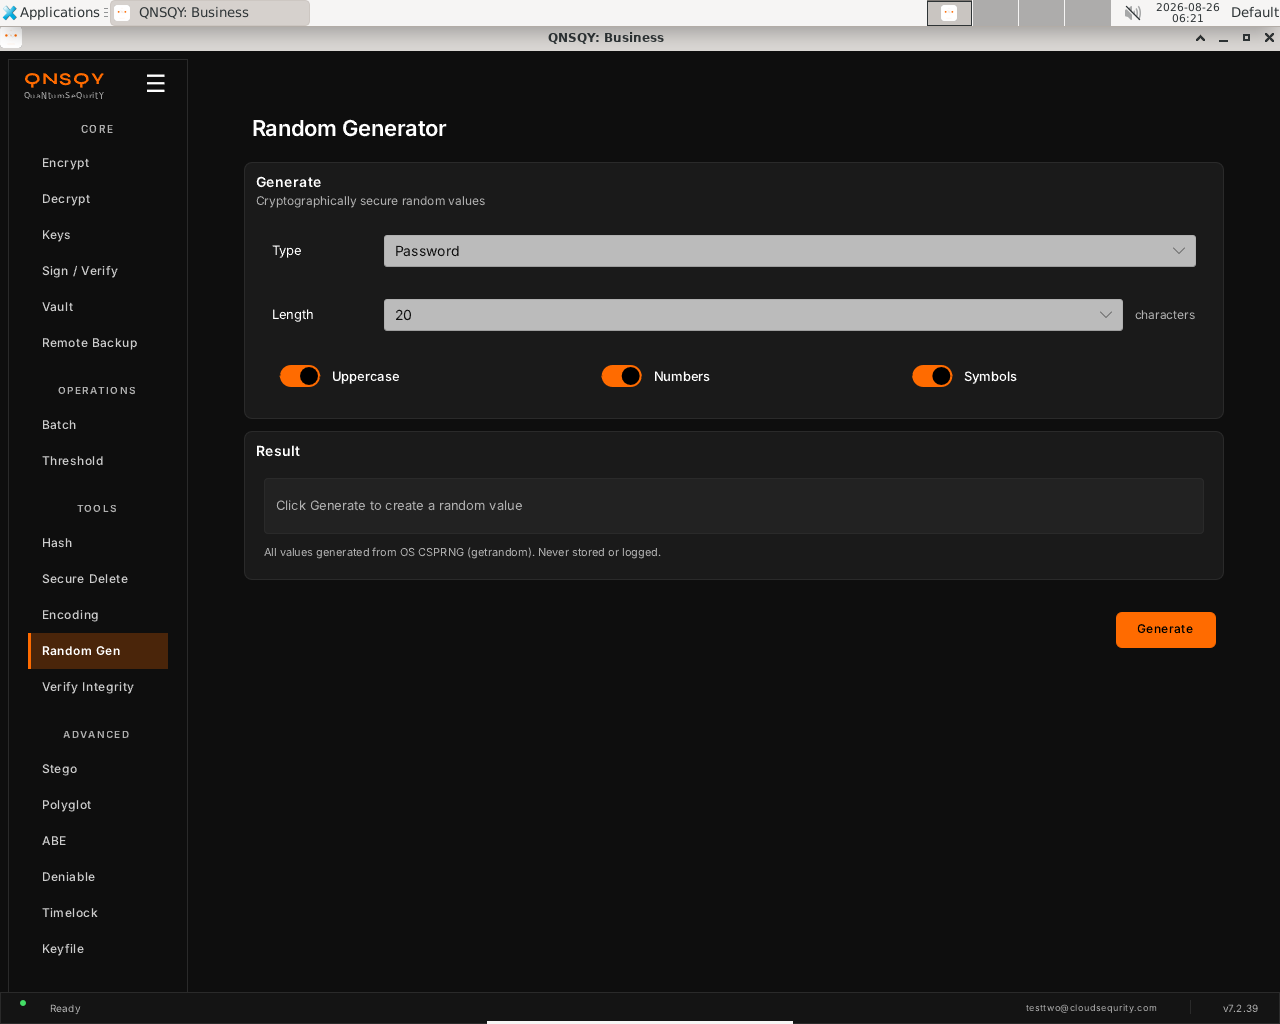
The Random Generator screen: Type, Length, and character-set toggles, plus the note that all values come from the OS CSPRNG (getrandom) and are never stored or logged. Choose a Type (Password is shown) and a Length in characters (20), then set the Uppercase, Numbers, and Symbols toggles. All three are on by default.
Click Generate (bottom right). The value appears in the Result panel. Every value is drawn from the OS CSPRNG (getrandom) and is never stored or logged.
Prefer the terminal? This screen runs
qnsqy generate-secret
Watch (Linux GUI)
Watch (Windows GUI)
On Windows 11 (Business tier): the same generator, shown here producing a value end-to-end.
Watch (Windows GUI)
Random Gen is available in the GUI and on the command line, but it is not a separate item in the TUI menu. Use the GUI screen above, or run qnsqy generate-secret in a terminal.
qnsqy generate-secret
Linux
qnsqy generate-secret # prints 32 random bytes as hex
Windows (PowerShell)
qnsqy.exe generate-secret
| Flag | Value | What it does |
|---|---|---|
| (none) | flag | This command takes no flags. It prints 32 fresh bytes from the OS CSPRNG, hex-encoded (64 characters). |
Output
a 64-char hex string (32 bytes) from the OS CSPRNG. [Illustrative example ONLY, never copy a real generated secret; each run is unique: e.g. `d4f1...` (64 hex chars). We do not print a real value in the guide, since it is a live secret.]
Common combinations
Generate a key for a keyfile workflow, then create the keyfile.
qnsqy keyfile generate -o my.key
Use it in scripts to seed a token.
qnsqy generate-secret
Watch (Linux CLI)
A real command-line round-trip captured on Linux. The unsigned dev-build integrity banner is filtered out; the sandbox lines are the seccomp network lockdown.
Watch (Windows CLI)
Command-line usage on Windows 11 (--help). The written examples above show the full invocation; a real run is not shown here (it needs keys/setup or would print secret material).
Watch (Windows CLI)
Verify Integrity
Free & upCheck that a .qs file's encrypted header is authentic and unmodified without needing the password. This is a fast pre-flight check, not full whole-file authentication.
Open the app and choose Verify Integrity from the TOOLS group in the left rail. The File Integrity Check screen appears with a file picker and an empty Result panel.
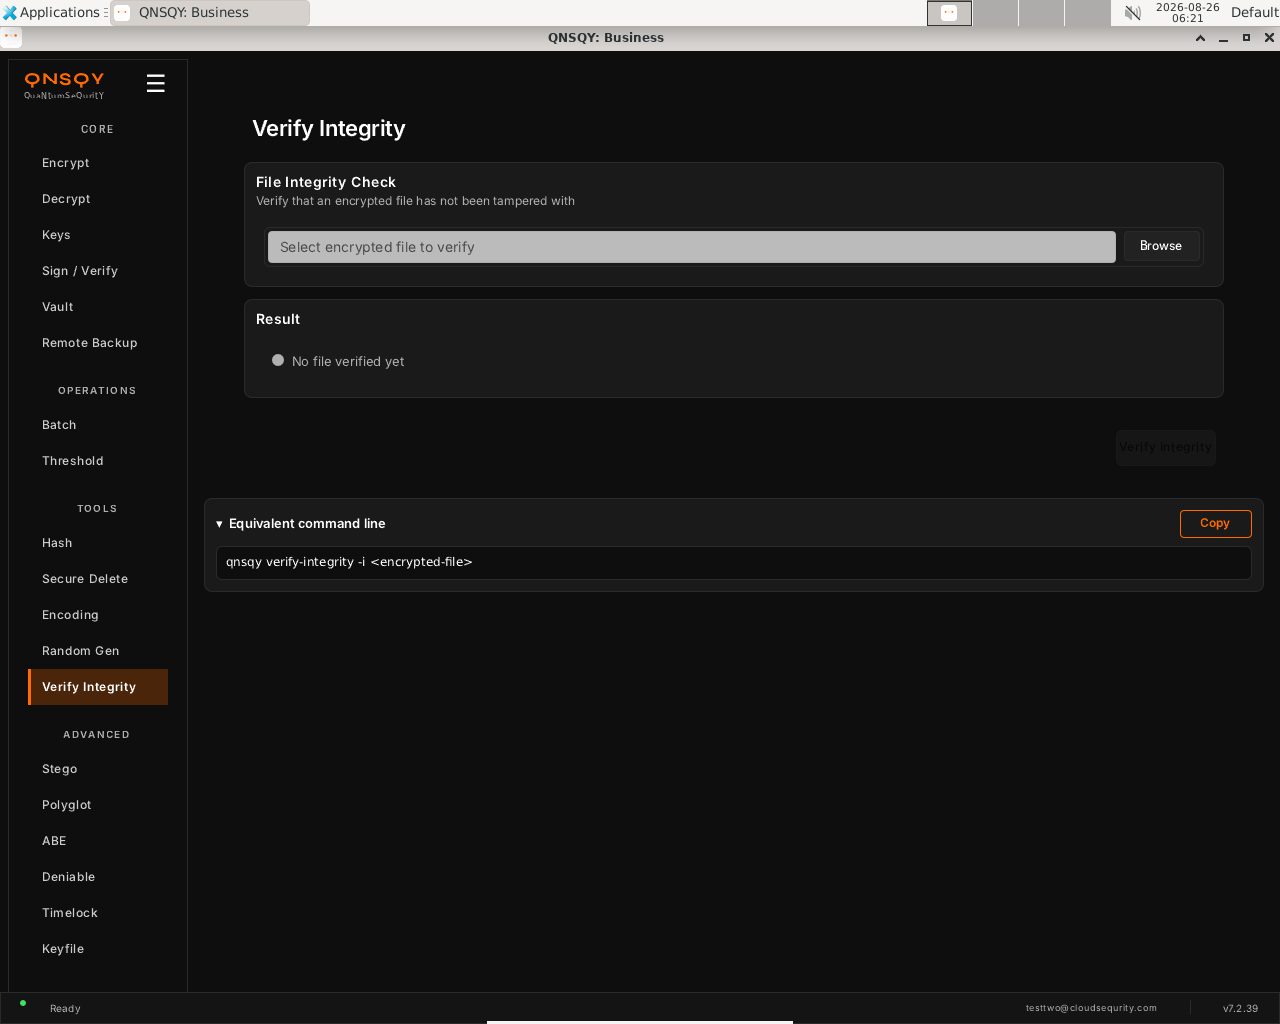
The Verify Integrity screen: pick a .qs file, then Verify Integrity. The live Equivalent command line mirrors the CLI. Click Browse and select the encrypted .qs file you want to check. No password is required; this reads only the header.
Click Verify Integrity. The Result panel reports whether the encrypted header is authentic and unmodified. The screen also shows an Equivalent command line with a Copy button.
Prefer the terminal? This screen runs
qnsqy verify-integrity -i <input>
Watch (Linux GUI)
Watch (Windows GUI)
On Windows 11 (Business tier): the same screen and inputs. The completed operation and its result are shown in the Linux clip above.
Watch (Windows GUI)
Verify Integrity is available in the GUI and on the command line, but it is not a separate item in the TUI menu. Use the GUI screen above, or run qnsqy verify-integrity -i <input> in a terminal.
qnsqy verify-integrity --input <IN>
Linux
qnsqy verify-integrity -i report.txt.qs
Windows (PowerShell)
qnsqy.exe verify-integrity -i report.txt.qs
| Flag | Value | What it does |
|---|---|---|
| -i, --input | <IN> | The encrypted .qs file to check. Verifies header integrity only: no password, for v7+ files. |
Output
Integrity OK: encrypted header is authentic and unmodified. (Fast header check, not whole-file authentication; run `decrypt` for full AEAD verification of the entire ciphertext.)
Common combinations
Quick pre-flight before shipping a .qs file.
qnsqy verify-integrity -i archive.qs
Scripted CI gate: the exit code is non-zero on tamper, so it fails the pipeline.
qnsqy verify-integrity -i build.qs
Watch (Linux CLI)
A real command-line round-trip captured on Linux. The unsigned dev-build integrity banner is filtered out; the sandbox lines are the seccomp network lockdown.
Watch (Windows CLI)
A real command-line round-trip on Windows 11 (PowerShell, Business tier). The unsigned dev-build integrity notice is filtered out.
Watch (Windows CLI)
Stego
BusinessHide encrypted data inside an ordinary-looking carrier (image, audio, PDF, or video) so the very existence of the message is concealed. Extract it later, or check a carrier's capacity first.
Open the app and choose Stego from the ADVANCED group in the left rail. The Steganography screen opens on the Hide tab, with an Extract tab beside it.
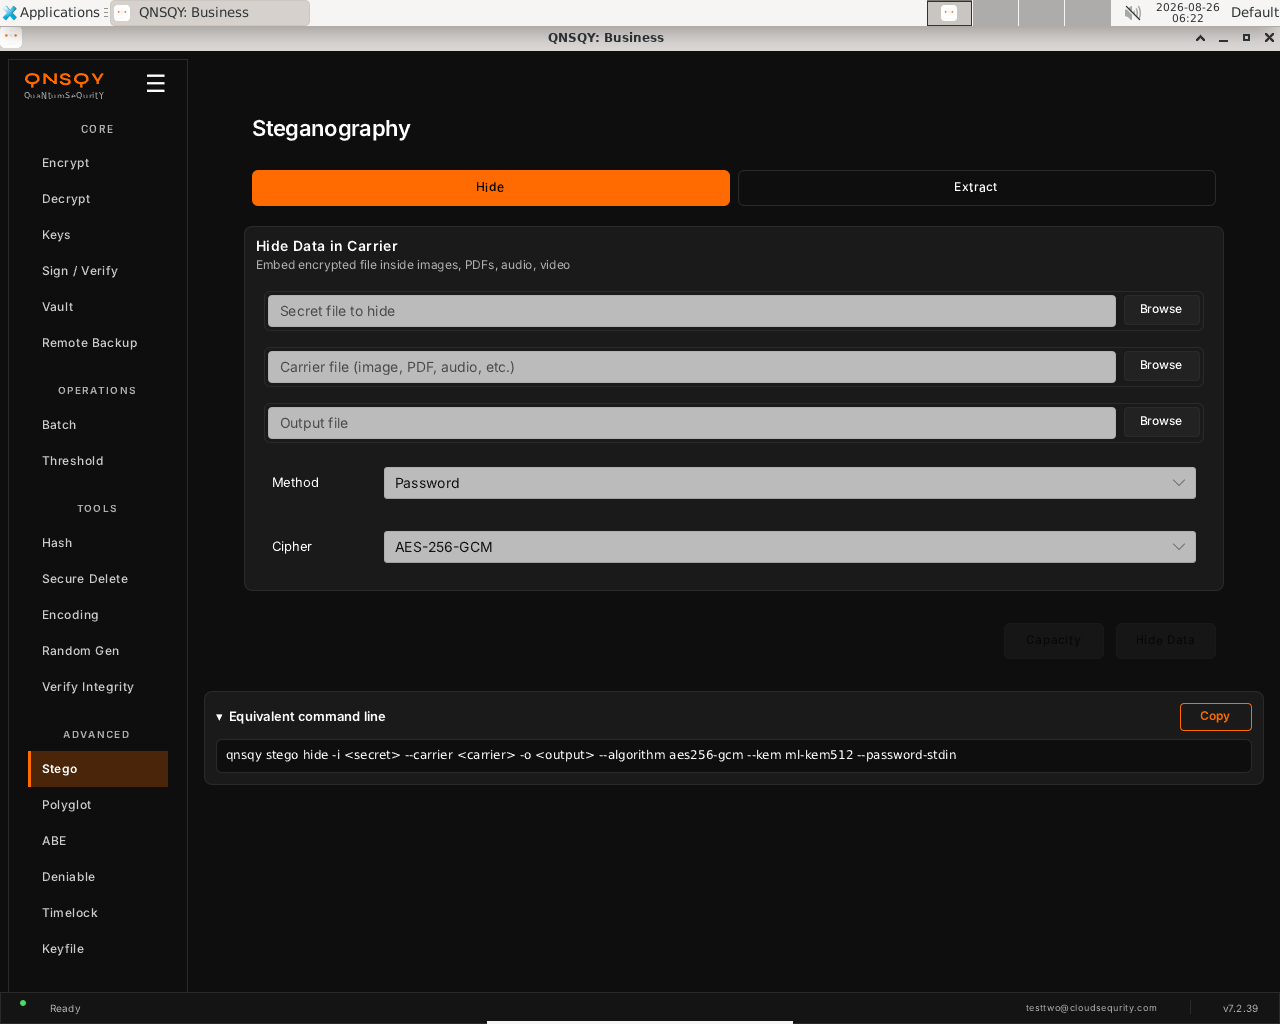
The Steganography Hide screen: secret, carrier, and output pickers with Method and Cipher, plus a live equivalent command line. Fill the three file fields with Browse: the Secret file to hide, the Carrier file (image, PDF, audio, or video), and the Output file. Then choose a Method (Password is shown) and a Cipher (AES-256-GCM).
Click Hide Data to embed the encrypted secret into the carrier, or Capacity first to check how much the carrier can hold. The live Equivalent command line mirrors your choices, with a Copy button to grab it.
Prefer the terminal? This screen runs
qnsqy stego hide -i <secret> --carrier <carrier> --recipient <key>
Watch (Linux GUI)
Watch (Windows GUI)
On Windows 11 (Business tier): the same screen and inputs. The completed operation and its result are shown in the Linux clip above.
Watch (Windows GUI)
Launch the TUI with qnsqy --tui. The whole toolkit lives in one menu, grouped by category. Use j/k to highlight Stego Embed and press Enter.
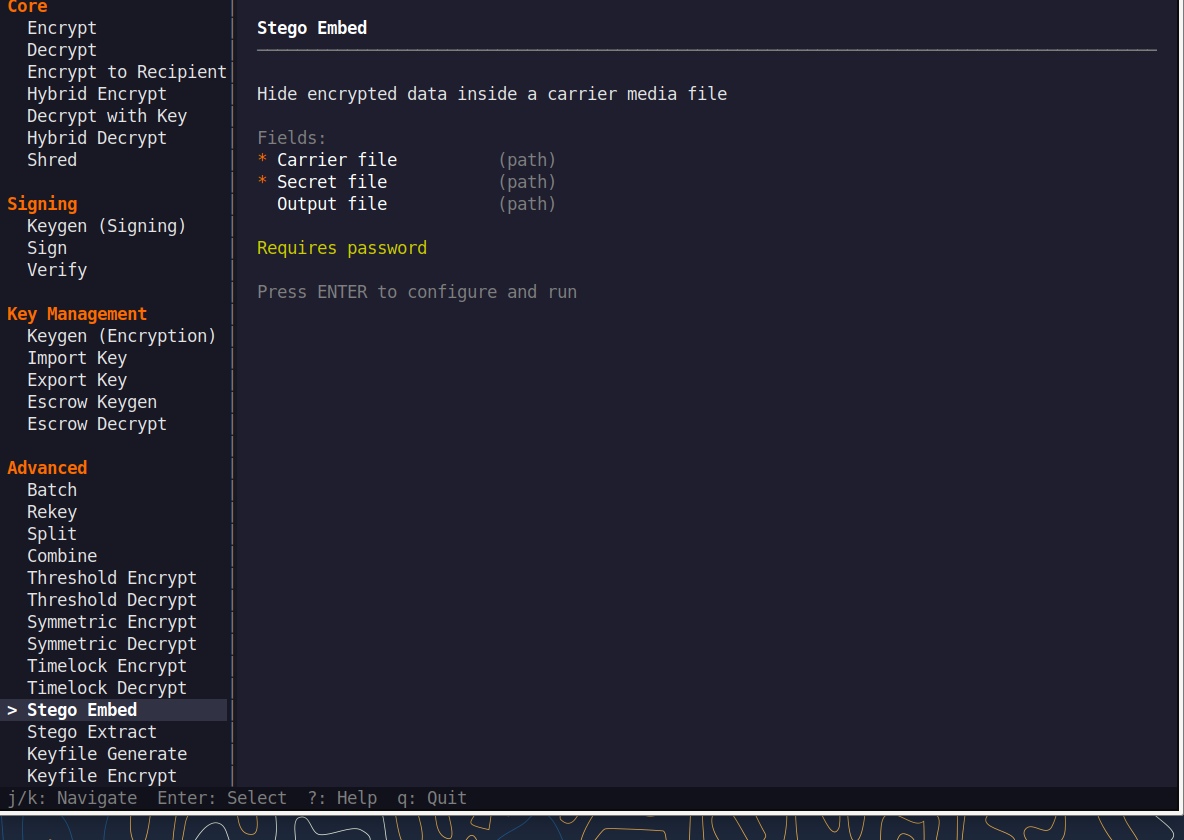
Fill the fields (Tab moves, Enter toggles), then press F5 to run. The password is prompted securely and never echoed, and a live Equivalent command line updates as you type.
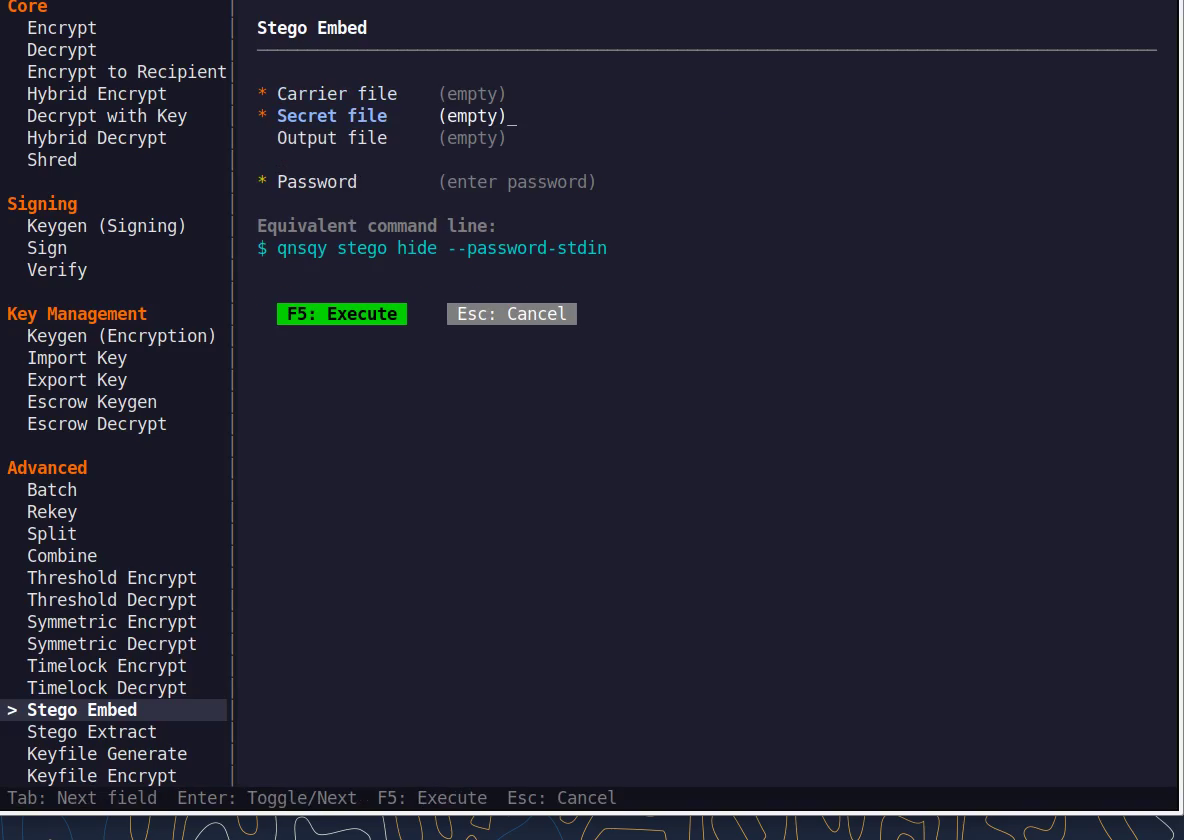
Equivalent command line (shown in the TUI too)
qnsqy stego hide --carrier <carrier> --recipient <key>Watch (Linux TUI)
Watch (Windows TUI)
Keys: j/k navigate · Enter select/toggle · Tab next field · F5 execute · Esc cancel · q quit.
qnsqy stego <hide|extract|capacity>
Linux
qnsqy stego hide -i secret.txt --carrier photo.png -o photo-out.png --recipient bob.pub
qnsqy stego extract -i photo-out.png -o secret.txt --key bob
qnsqy stego capacity -i photo.png
Windows (PowerShell)
qnsqy.exe stego hide -i secret.txt --carrier photo.png -o photo-out.png --recipient bob.pub --acknowledge-no-sandbox
| Flag | Value | What it does |
|---|---|---|
| -i, --input | <FILE> | hide: the secret file to hide; extract & capacity: the carrier file to read. |
| --carrier | <CARRIER> | hide: the cover file (image, audio, PDF, or video) to embed data into. |
| -o, --output | <OUT> | hide: output carrier with the hidden payload; extract: where to write the recovered secret. |
| -k, --key | <PRIV> | extract: recipient private key for KEM-encrypted payloads. |
| --recipient | <PUB> | hide: encrypt to one or more recipient public keys (KEM). Repeatable. |
| --hybrid | flag | hide: hybrid PQC + classical KEM. |
| --algorithm | <ALG> | hide: symmetric cipher (e.g. aes256-gcm). |
| --kem | <KEM> | hide: KEM identifier (informational only). |
| --keyfile | <FILE> | Use a keyfile instead of a password (hide and extract). |
| --password-stdin | flag | Read the password from stdin (hide and extract). |
| --no-encrypt | flag | hide: embed WITHOUT encrypting (discouraged). |
| --progress | flag | Show a progress bar (hide and extract). |
Output
✓ Data hidden in: photo-out.png
Secret size: 105 bytes
Carrier type: png
Format: v2 (method=0x03, algorithm=0x20)

# stego extract →
✓ Hidden data extracted: secret.txt
Common combinations
Password-protected hide (no recipient key needed).
printf 'pw\npw\n' | qnsqy stego hide -i note.txt --carrier cat.png --password-stdin
Check the carrier's capacity first.
qnsqy stego capacity -i cat.png
Watch (Linux CLI)
A real command-line round-trip captured on Linux. The unsigned dev-build integrity banner is filtered out; the sandbox lines are the seccomp network lockdown.
Watch (Windows CLI)
Command-line usage on Windows 11 (--help). The written examples above show the full invocation; a real run is not shown here (it needs keys/setup or would print secret material).
Watch (Windows CLI)
Polyglot
Pro+Build a single file that is simultaneously a valid PDF, ZIP, PNG, or JPEG and also carries an encrypted payload. It opens normally in its host application while your data stays hidden inside.
Open the app and choose Polyglot from the ADVANCED group in the left rail. The Polyglot Files screen opens on the Create tab, with Extract and Detect tabs beside it.
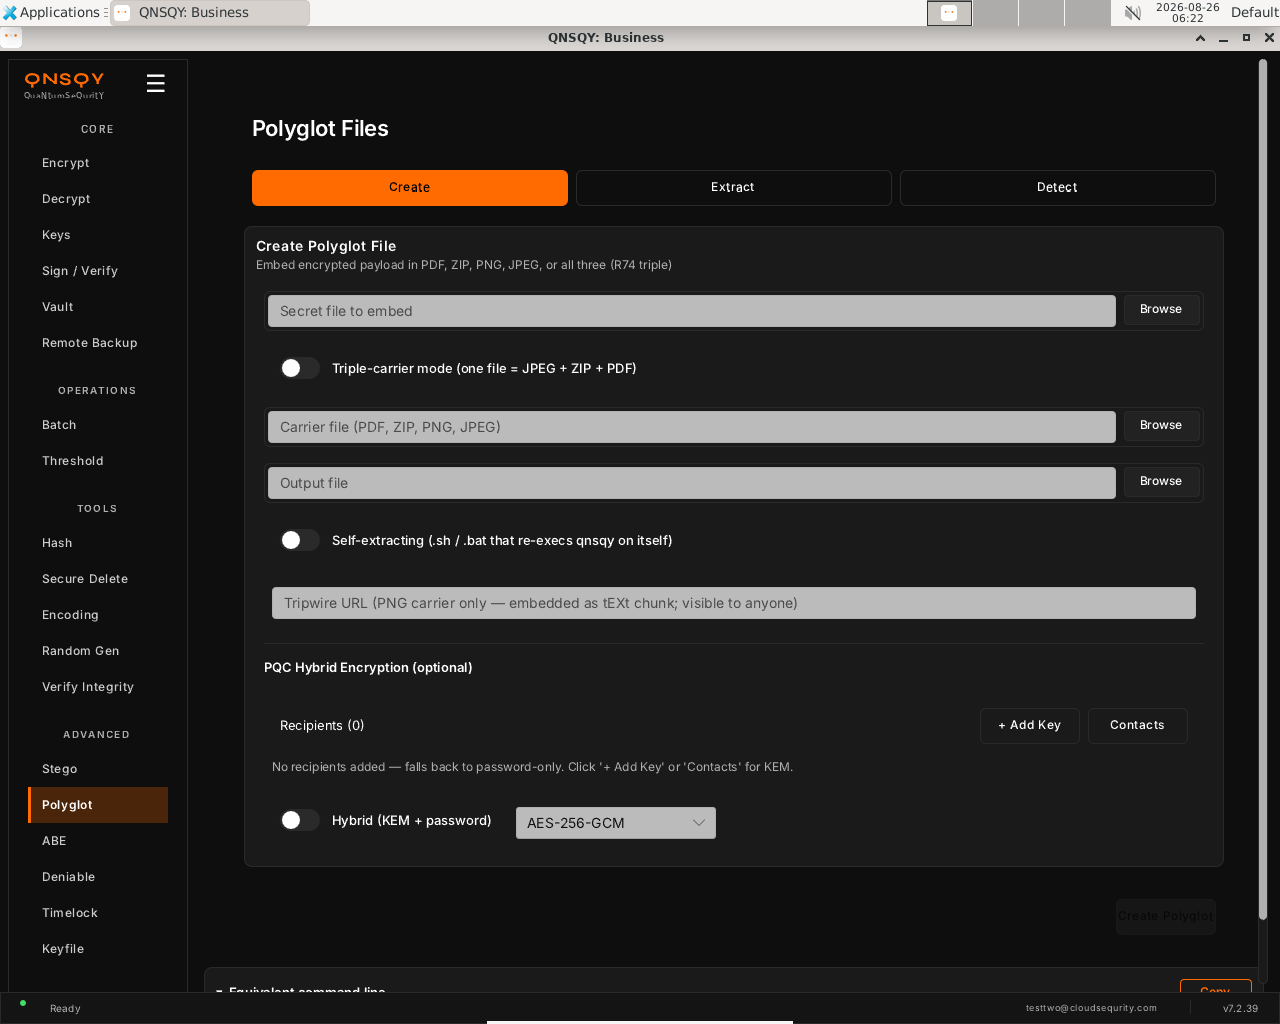
The Polyglot Create screen: secret, carrier, and output, with triple-carrier, self-extracting, tripwire, and optional PQC recipient (KEM) hybrid encryption. Pick the Secret file to embed, then a Carrier file (PDF, ZIP, PNG, or JPEG) and an Output file. Optionally turn on Triple-carrier mode (one file = JPEG + ZIP + PDF) or Self-extracting, and add recipients under PQC Hybrid Encryption for KEM instead of password-only.
Click Create Polyglot. The output opens normally in its host application while carrying your encrypted payload inside. The Equivalent command line updates as you configure, with a Copy button to grab it.
Prefer the terminal? This screen runs
qnsqy polyglot create -i <secret> --carrier <carrier> --recipient <key>
Watch (Linux GUI)
Watch (Windows GUI)
On Windows 11 (Business tier): the same screen and inputs. The completed operation and its result are shown in the Linux clip above.
Watch (Windows GUI)
Polyglot is available in the QNSQY GUI (screen above) and on the command line, but it is not one of the items in the interactive TUI menu. Use the GUI, or run qnsqy polyglot from a terminal (see the CLI tab).
qnsqy polyglot <create|create-selfx|extract|detect>
Linux
qnsqy polyglot create -i secret.txt --carrier doc.png -o doc-out.png --recipient bob.pub
qnsqy polyglot extract -i doc-out.png -o secret.txt --key bob
Windows (PowerShell)
qnsqy.exe polyglot create -i secret.txt --carrier doc.png -o doc-out.png --recipient bob.pub --acknowledge-no-sandbox
| Flag | Value | What it does |
|---|---|---|
| -i, --input | <FILE> | create: the secret payload to embed; extract & detect: the polyglot file to read. |
| --carrier | <FILE> | create: single carrier (PDF, ZIP, PNG, or JPEG). Mutually exclusive with --jpeg / --zip / --pdf. |
| --jpeg / --zip / --pdf | <FILE> | create: triple-carrier mode. Supply all three to make one file valid as JPEG, ZIP, and PDF. |
| -o, --output | <OUT> | create: the polyglot file to write; extract: where to write the recovered secret. |
| --recipient | <PUB> | create: encrypt to one or more recipient public keys (KEM). Repeatable. |
| --hybrid | flag | create: hybrid PQC + classical KEM. |
| --algorithm | <ALG> | create: symmetric cipher (e.g. aes256-gcm). |
| --kem | <KEM> | create: KEM identifier. |
| --password-stdin | flag | Read the password from stdin (create and extract). |
| -f, --force | flag | create: overwrite the output file if it already exists. |
| --tripwire | <URL> | create (PNG only): store a tripwire URL as an UNENCRYPTED tEXt chunk, visible to anyone. |
| --shell | bash | cmd | create-selfx: which self-extracting stub to emit. |
| -k, --key | <PRIV> | extract: recipient private key for KEM-encrypted payloads. |
Output
Carrier type: PNG
Polyglot file created: doc-out.png
Carrier: doc.png (788511 bytes)
Secret: secret.txt (105 bytes)
Method: recipient KEM (ML-KEM hybrid)
Algorithm: AES-256-GCM

# polyglot extract →
Extracted payload: secret.txt (105 bytes)
Common combinations
Build a self-extracting carrier (a bash stub that re-execs qnsqy on itself).
qnsqy polyglot create-selfx -i payload.txt --carrier logo.png --shell bash -o run.png
Detect whether a file is a polyglot.
qnsqy polyglot detect -i suspicious.png
Watch (Linux CLI)
A real command-line round-trip captured on Linux. The unsigned dev-build integrity banner is filtered out; the sandbox lines are the seccomp network lockdown.
Watch (Windows CLI)
Command-line usage on Windows 11 (--help). The written examples above show the full invocation; a real run is not shown here (it needs keys/setup or would print secret material).
Watch (Windows CLI)
ABE
Pro & up (authority: Business)Attribute-based encryption: encrypt so that only recipients whose attributes satisfy a policy expression, for example role=doctor AND clearance>=2, can decrypt. It rides the existing PQC multi-recipient KEM path, with no classical pairings, so it stays fully post-quantum.
Open ABE under the ADVANCED group in the left rail. The screen opens on the Encrypt tab, with a row of tabs across the top: Encrypt, Inspect Policy, Authority, Issue, Seal, and Open. The panel header reads “Encrypt with Policy” and notes that recipients whose attributes satisfy the policy can decrypt with their normal private key.
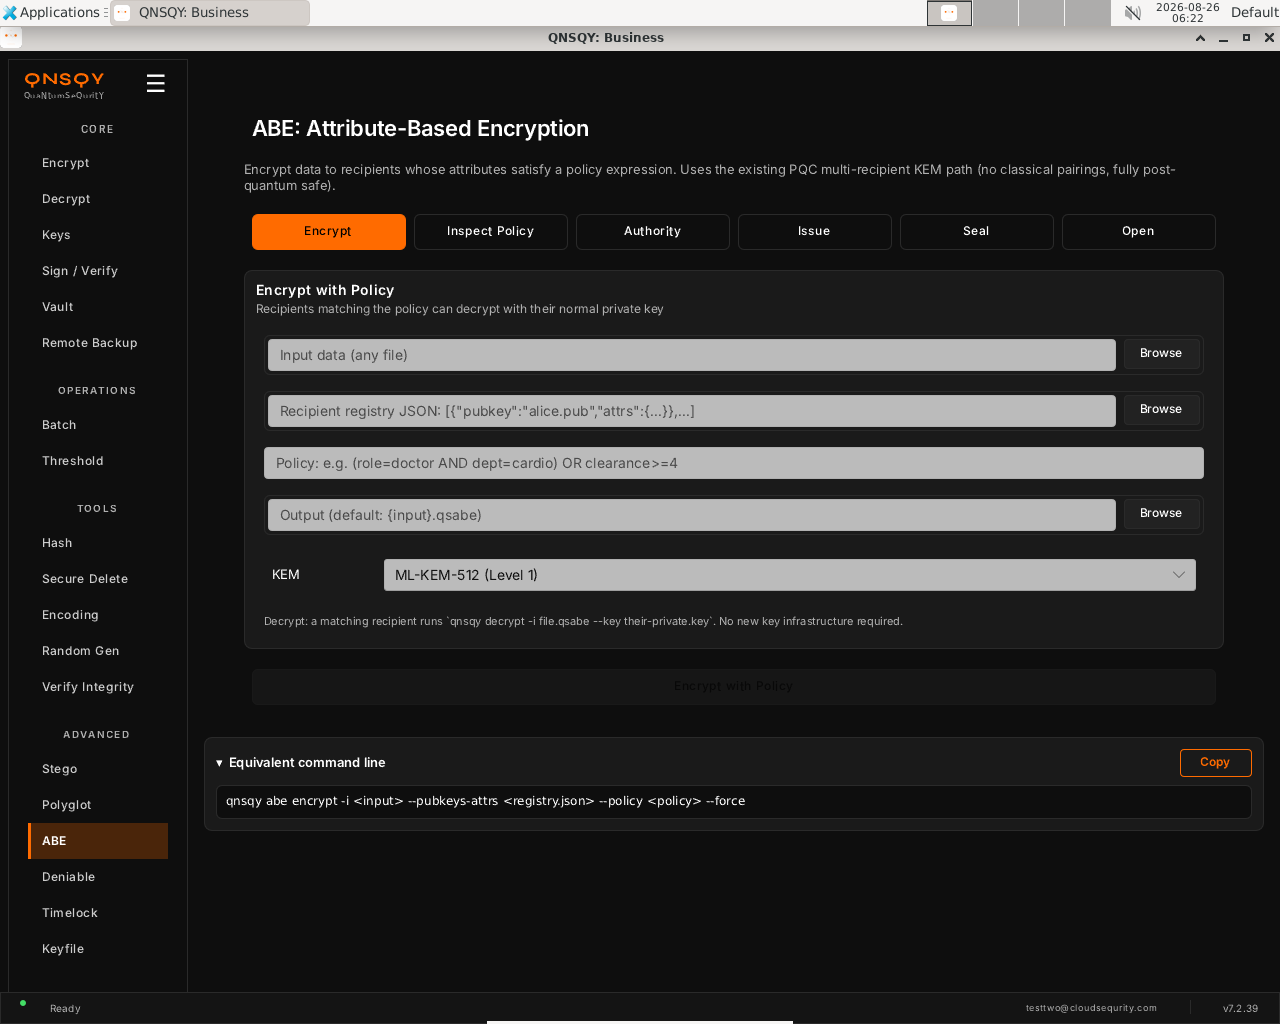
The ABE screen (Encrypt tab): input data, recipient registry JSON, policy expression, output, and KEM level. Choose the input data with Browse, paste the recipient registry JSON (each entry pairs a public key with its attributes), and type the policy, for example (role=doctor AND dept=cardio) OR clearance>=4. Leave the KEM at ML-KEM-512 (Level 1) or pick a higher level, and set an output path or accept the default {input}.qsabe.
Click “Encrypt with Policy”. For the full secret-sharing flow, use the Authority, Issue, Seal, and Open tabs instead; the Inspect Policy tab dry-runs a policy without encrypting anything.
Prefer the terminal? This screen runs
qnsqy abe seal --params <params> --policy "<expr>" --input <input>
Watch (Linux GUI)
Watch (Windows GUI)
On Windows 11 (Business tier): the same screen and inputs. The completed operation and its result are shown in the Linux clip above.
Launch the TUI with qnsqy --tui. The whole toolkit lives in one menu, grouped by category. Use j/k to highlight ABE Seal and press Enter.
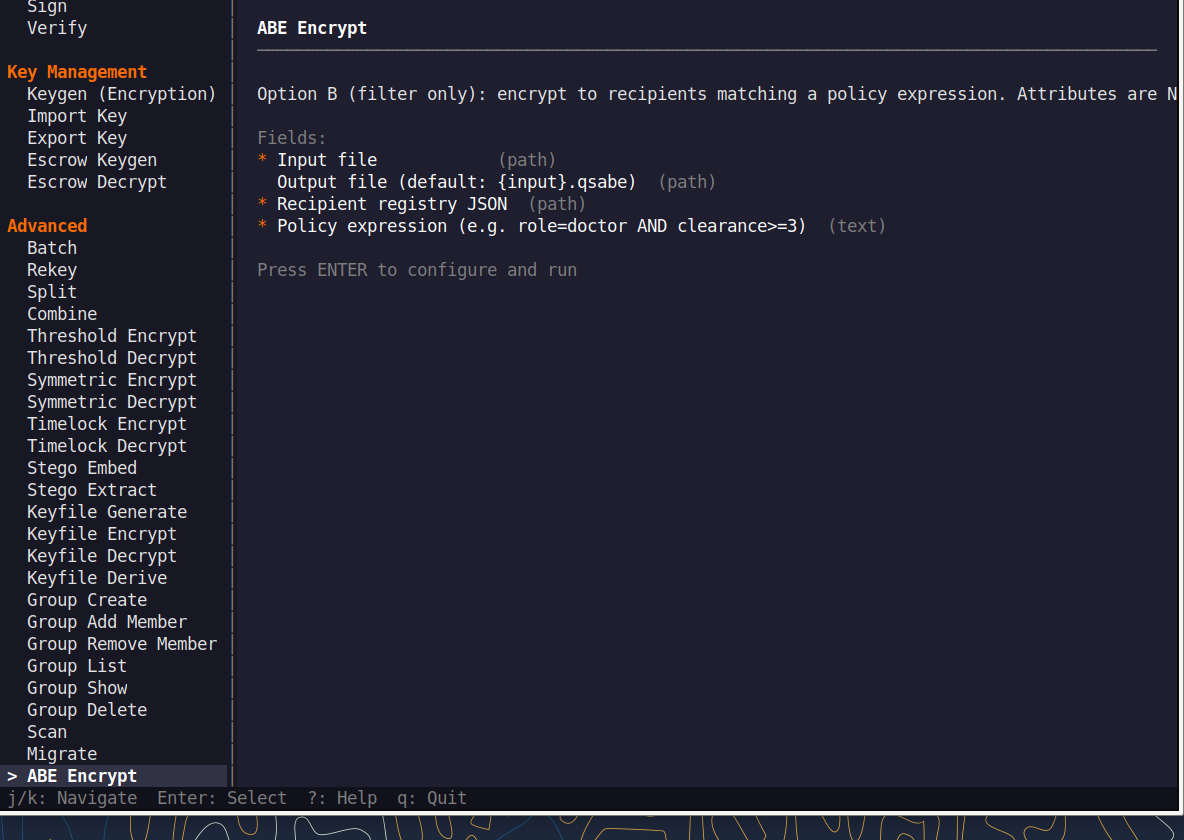
Fill the fields (Tab moves, Enter toggles), then press F5 to run. The password is prompted securely and never echoed, and a live Equivalent command line updates as you type.
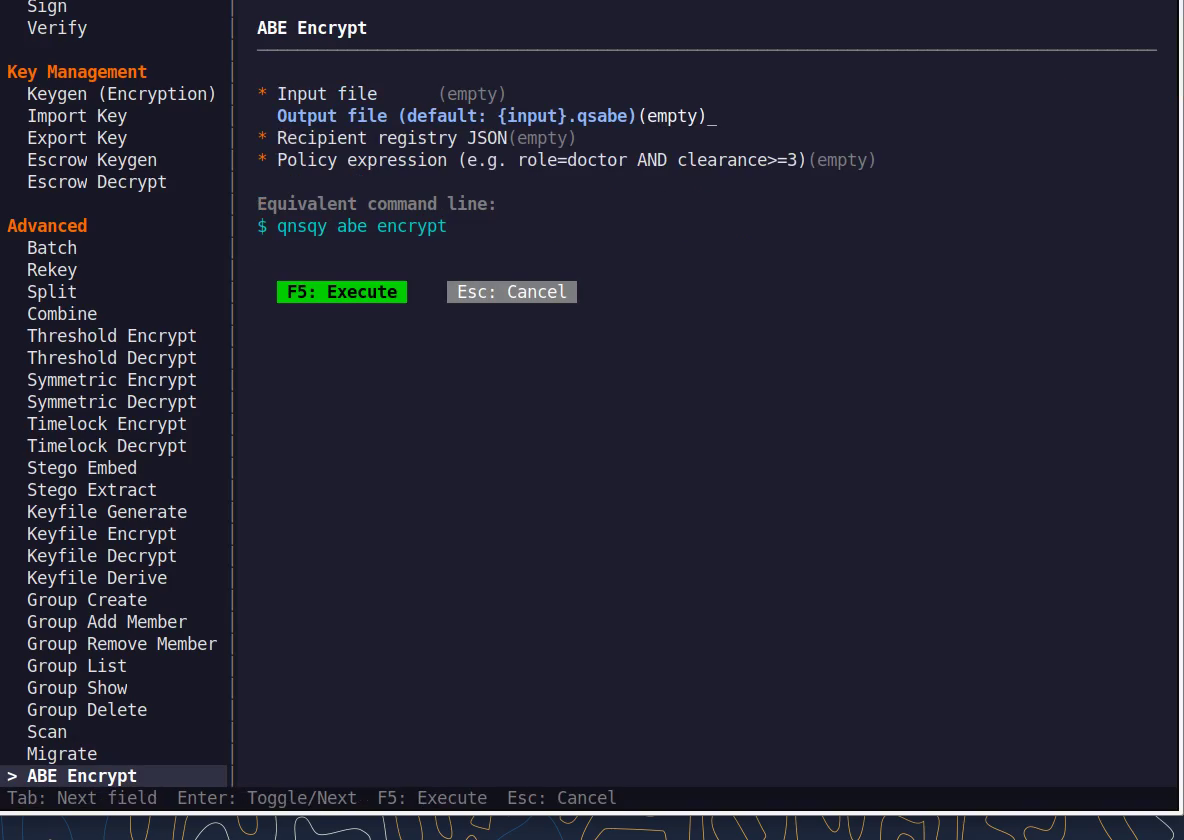
Equivalent command line (shown in the TUI too)
qnsqy abe seal --params <params> --policy "<expr>"Watch (Linux TUI)
Keys: j/k navigate · Enter select/toggle · Tab next field · F5 execute · Esc cancel · q quit.
qnsqy abe <encrypt|inspect|authority-keygen|issue|seal|open>
Linux
echo '{"role":["doctor","nurse"],"clearance":[1,2,3]}' > universe.json
printf "master\n" | qnsqy abe authority-keygen --universe universe.json --out authority --password-stdin
printf "master\n" | qnsqy abe issue --authority authority --user-id alice --out alice.key --attr role=doctor --attr clearance=3 --password-stdin
qnsqy abe seal --params authority.akpub --policy "role=doctor AND clearance>=2" --input report.txt -o sealed.qabe
qnsqy abe open --bundle alice.key --input sealed.qabe -o report.txt
Windows (PowerShell)
qnsqy.exe abe seal --params authority.akpub --policy "role=doctor AND clearance>=2" --input report.txt -o sealed.qabe --acknowledge-no-sandbox
qnsqy.exe abe open --bundle alice.key --input sealed.qabe -o report.txt --acknowledge-no-sandbox
The authority-keygen and issue steps read the master passphrase from a real terminal; in a headless shell wrap them with script -qec.
| Flag | Value | What it does |
|---|---|---|
| -i, --input | <FILE> | Data to encrypt/seal, or the sealed file to open |
| --pubkeys-attrs | <JSON> | Recipient registry: each public key paired with its attributes (encrypt/inspect) |
| --policy | <EXPR> | Boolean attribute policy, e.g. role=doctor AND clearance>=2 |
| -o, --output | <FILE> | Output file (.qsabe for encrypt, .qabe for seal) |
| --algorithm | <ALG> | AEAD algorithm for the payload (encrypt) |
| --kem | <KEM> | ML-KEM level (encrypt; informational label) |
| -f, --force | Overwrite an existing output file | |
| --universe | <JSON> | Attribute universe when creating an authority (authority-keygen) |
| --out | <FILE> | Authority or issued-bundle output (authority-keygen/issue) |
| --params | <FILE> | Public authority params (.akpub) used to seal (seal) |
| --authority | <FILE> | Authority secret used to issue a user bundle (issue) |
| --user-id | <ID> | Identity for the issued bundle (issue) |
| --attr | <k=v> | Grant an attribute to the user; repeatable (issue) |
| --bundle | <FILE> | A user's attribute bundle used to open a sealed file (open) |
| --password-stdin | Read the authority/master passphrase from stdin |
Output
SUCCESS: ABE authority created (5 attributes)
SUCCESS: ABE bundle issued for user 'alice'
Attributes: 2
SUCCESS: ABE-sealed -> sealed.qabe
Policy: role=doctor AND clearance>=2
SUCCESS: ABE-opened -> report.txt
Honest scope: this is secret-sharing ABE, not pairing CP-ABE. It is collusion-prone (users who pool their bundles can satisfy a policy neither holds alone) and assumes a single trusted attribute authority.
Common combinations
Dry-run a policy without encrypting anything (Inspect):
qnsqy abe inspect --pubkeys-attrs pk.json --policy "role=admin"
Issue a second user with fewer attributes, to show the policy denies them:
qnsqy abe issue --authority authority --user-id bob --out bob.key --attr role=nurse --password-stdin
Watch (Linux CLI)
Shows the command-line usage (qnsqy abe --help) and its subcommands. A real seal needs an authority and attribute bundles.
Watch (Windows CLI)
Command-line usage on Windows 11 (--help). The written examples above show the full invocation; a real run is not shown here (it needs keys/setup or would print secret material).
Deniable
BusinessOne container, two payloads: the real password reveals the real data and a decoy password reveals harmless decoy data. The output is indistinguishable from random, so no one can prove a hidden volume exists.
Open Deniable under the ADVANCED group in the left rail. The screen shows two tabs, Create and Open, and opens on Create. The panel is titled “Create Deniable Volume” with the tagline “Two passwords, two payloads, one file.”
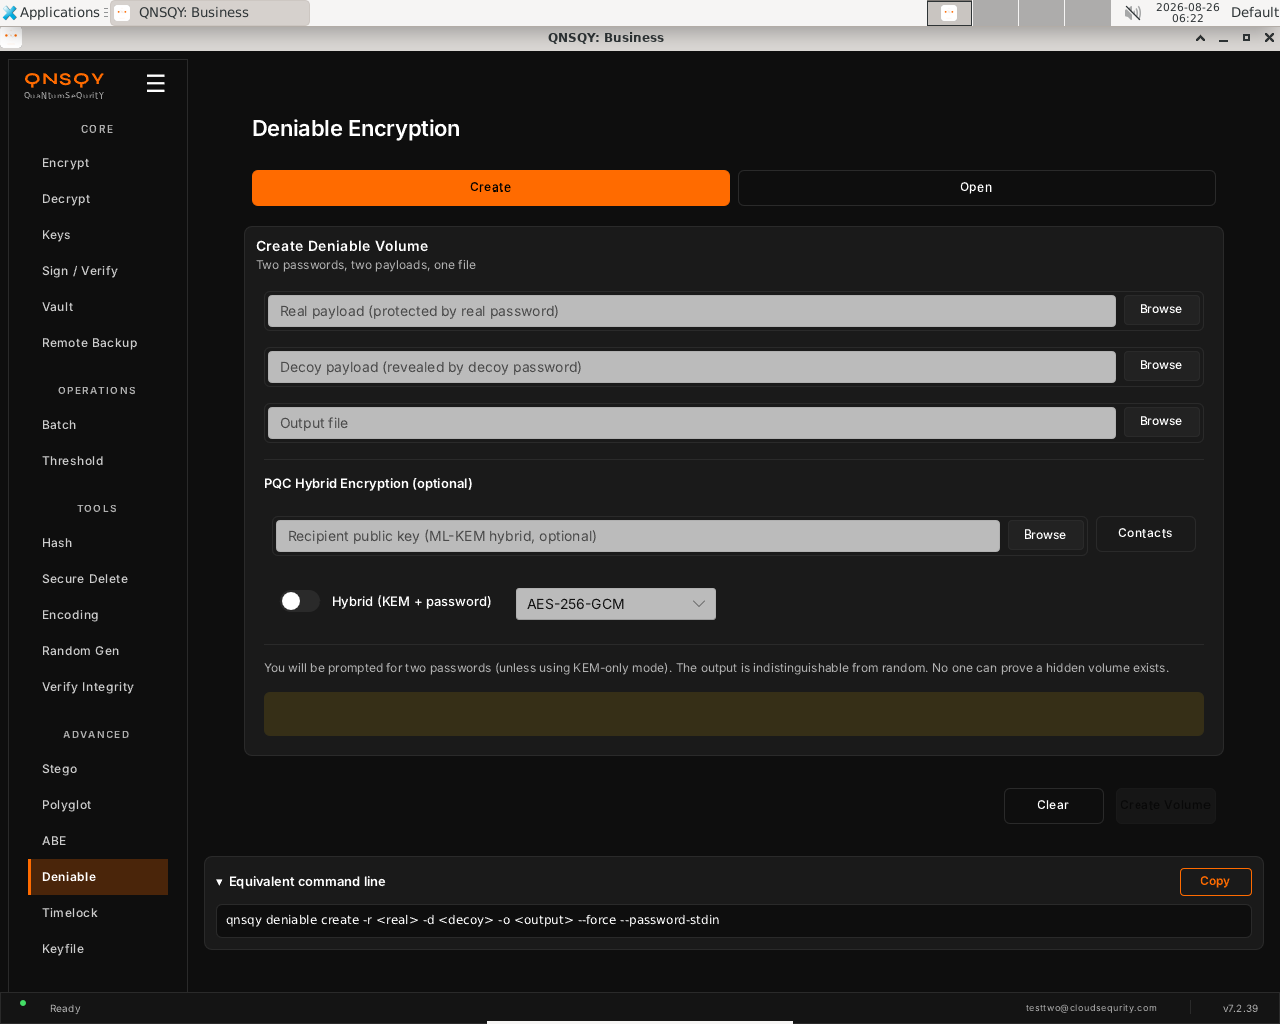
The Deniable screen (Create tab): real payload, decoy payload, output file, and an optional PQC-hybrid recipient. Pick the real payload (revealed by the real password) and the decoy payload (revealed by the decoy password), then set the output file. Optionally add a recipient public key and turn on “Hybrid (KEM + password)” to combine a post-quantum KEM with the passwords.
Click “Create Volume”. You are prompted for two passwords (unless you use KEM-only mode); the output is indistinguishable from random, so no one can prove a hidden volume exists.
Prefer the terminal? This screen runs
qnsqy deniable create --real <real> --decoy <decoy> --output <out>
Watch (Linux GUI)
Watch (Windows GUI)
On Windows 11 (Business tier): the same dual-payload screen and inputs. The real and decoy passwords are entered in a separate secure-entry terminal; the completed .qs round-trip is shown in the command-line clip below.
Deniable is available in the QNSQY GUI (screen above) and on the command line, but it is not one of the items in the interactive TUI menu. Use the GUI, or run qnsqy deniable from a terminal (see the CLI tab).
qnsqy deniable <create|open>
Linux
printf "realpw\nrealpw\ndecoypw\ndecoypw\n" | qnsqy deniable create --real secret.txt --decoy diary.txt --output den.qs
printf "realpw\n" | qnsqy deniable open -i den.qs -o out.txt --password-stdin
Windows (PowerShell)
"realpw`nrealpw`ndecoypw`ndecoypw" | qnsqy.exe deniable create --real secret.txt --decoy diary.txt --output den.qs --acknowledge-no-sandbox
"realpw" | qnsqy.exe deniable open -i den.qs -o out.txt --password-stdin --acknowledge-no-sandbox
Create reads FOUR password lines in order: real, real-confirm, decoy, decoy-confirm. The real password later reveals the real payload; the decoy password reveals only the decoy.
| Flag | Value | What it does |
|---|---|---|
| -r, --real | <FILE> | Real payload, revealed only by the real password |
| -d, --decoy | <FILE> | Decoy payload, revealed by the decoy password |
| -o, --output | <FILE> | Output deniable container |
| --recipient | <PUB> | Recipient public key for PQC-hybrid (KEM) mode |
| --hybrid | Combine a post-quantum KEM with the passwords | |
| --algorithm | <ALG> | AEAD algorithm (e.g. AES-256-GCM) |
| --password-stdin | Read passwords from stdin; create expects FOUR lines (real, real-confirm, decoy, decoy-confirm) | |
| -f, --force | Overwrite an existing output file | |
| --progress | Show a progress indicator | |
| -i, --input | <FILE> | Container to open (open) |
| -k, --key | <PRIV> | Recipient private key for KEM-based containers (open) |
Output
SUCCESS: Deniable container created (16720 bytes)
Real password -> real data | Decoy password -> decoy data
SUCCESS: Decrypted -> out.txt
The password prompt uses the terminal; --password-stdin works from a real TTY, and piping into a bare headless shell needs a pty.
Common combinations
Open with the decoy password under coercion, which yields only the decoy payload:
printf "decoypw\n" | qnsqy deniable open -i den.qs -o out.txt --password-stdin
Recipient-based deniable volume (PQC hybrid):
qnsqy deniable create --real r --decoy d -o den.qs --recipient bob.pub
Watch (Linux CLI)
A real command-line round-trip captured on Linux. The unsigned dev-build integrity banner is filtered out; the sandbox lines are the seccomp network lockdown.
Watch (Windows CLI)
Command-line usage on Windows 11 (--help). The written examples above show the full invocation; a real run is not shown here (it needs keys/setup or would print secret material).
Watch (Windows CLI)
Timelock
BusinessEncrypt so the data cannot be decrypted until a chosen duration of sequential computation has elapsed. It uses an RSW time-lock puzzle, so the delay cannot be skipped by throwing more machines at it.
Open Timelock under the ADVANCED group in the left rail. The screen has Encrypt and Decrypt tabs and opens on Encrypt. The panel is titled “Lock File” with the note “Encrypt with time delay (RSW puzzle).”
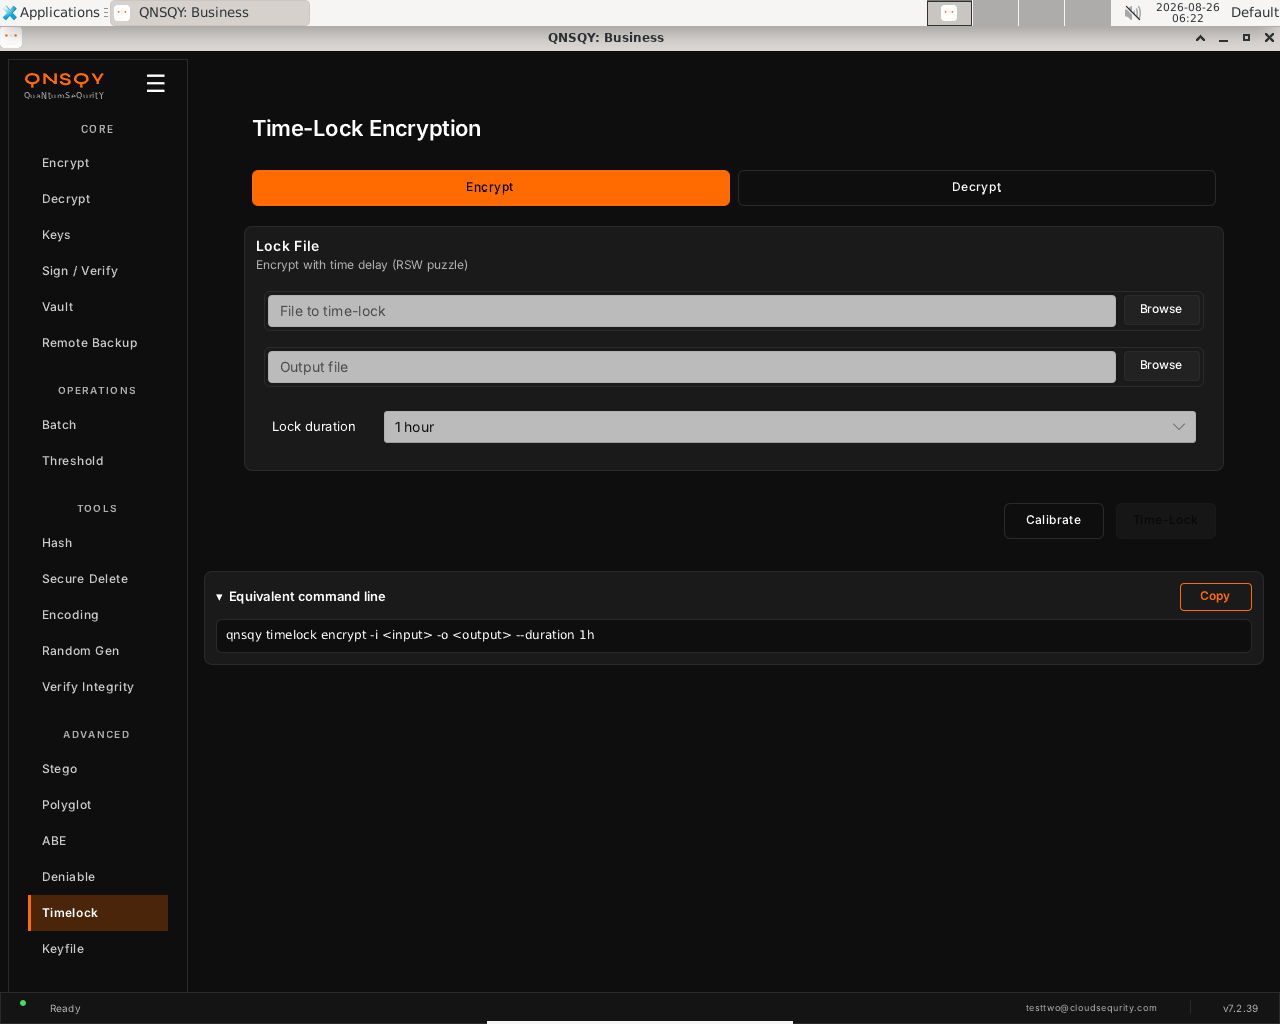
The Timelock screen (Encrypt tab): file to time-lock, output, and a Lock duration selector (here 1 hour). Choose the file to time-lock with Browse, set an output path, and pick a Lock duration (the selector shows presets such as 1 hour). Optionally click Calibrate first so the puzzle is sized to this machine's speed.
Click “Time-Lock”. The file cannot be decrypted until that much sequential computation has elapsed; decrypting later solves the puzzle and takes roughly the chosen duration.
Prefer the terminal? This screen runs
qnsqy timelock encrypt -i <input> --duration 24h
Watch (Linux GUI)
Watch (Windows GUI)
On Windows 11 (Business tier): the same screen and inputs. The completed operation and its result are shown in the Linux clip above.
Launch the TUI with qnsqy --tui. The whole toolkit lives in one menu, grouped by category. Use j/k to highlight Timelock Encrypt and press Enter.
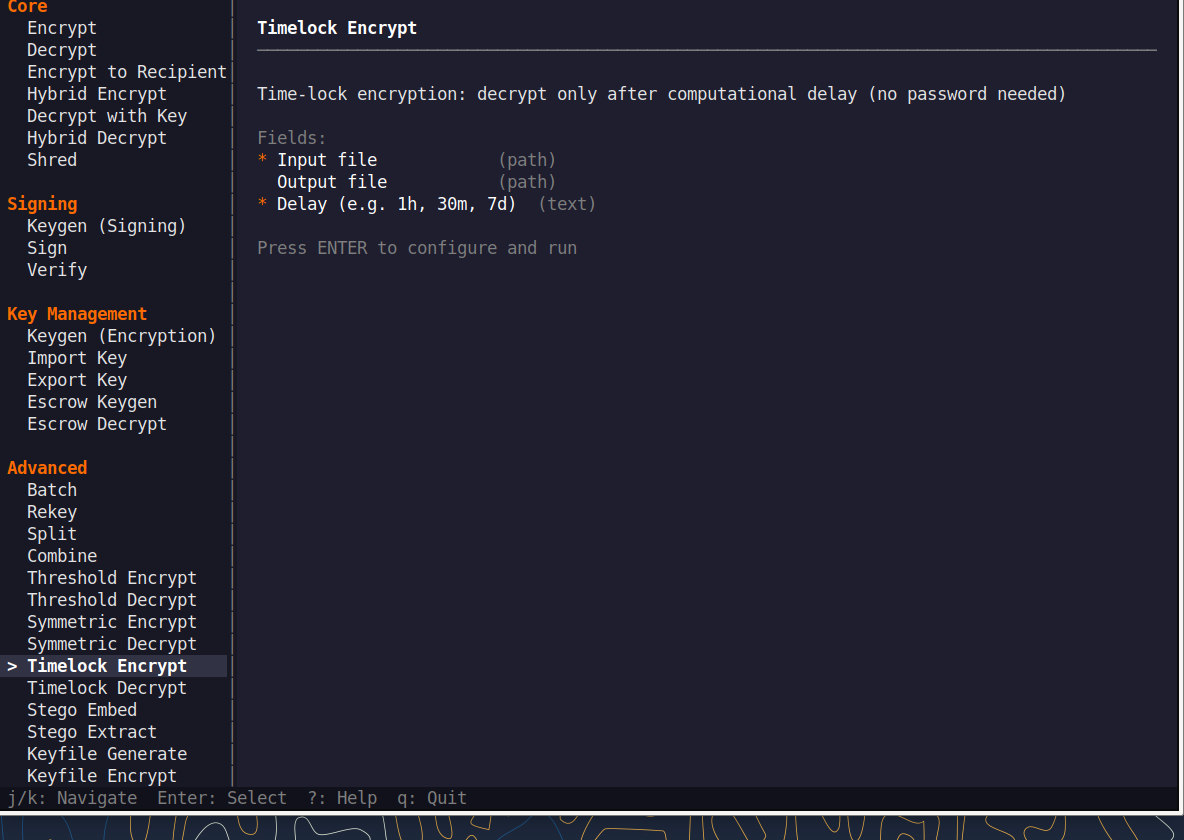
Fill the fields (Tab moves, Enter toggles), then press F5 to run. The password is prompted securely and never echoed, and a live Equivalent command line updates as you type.
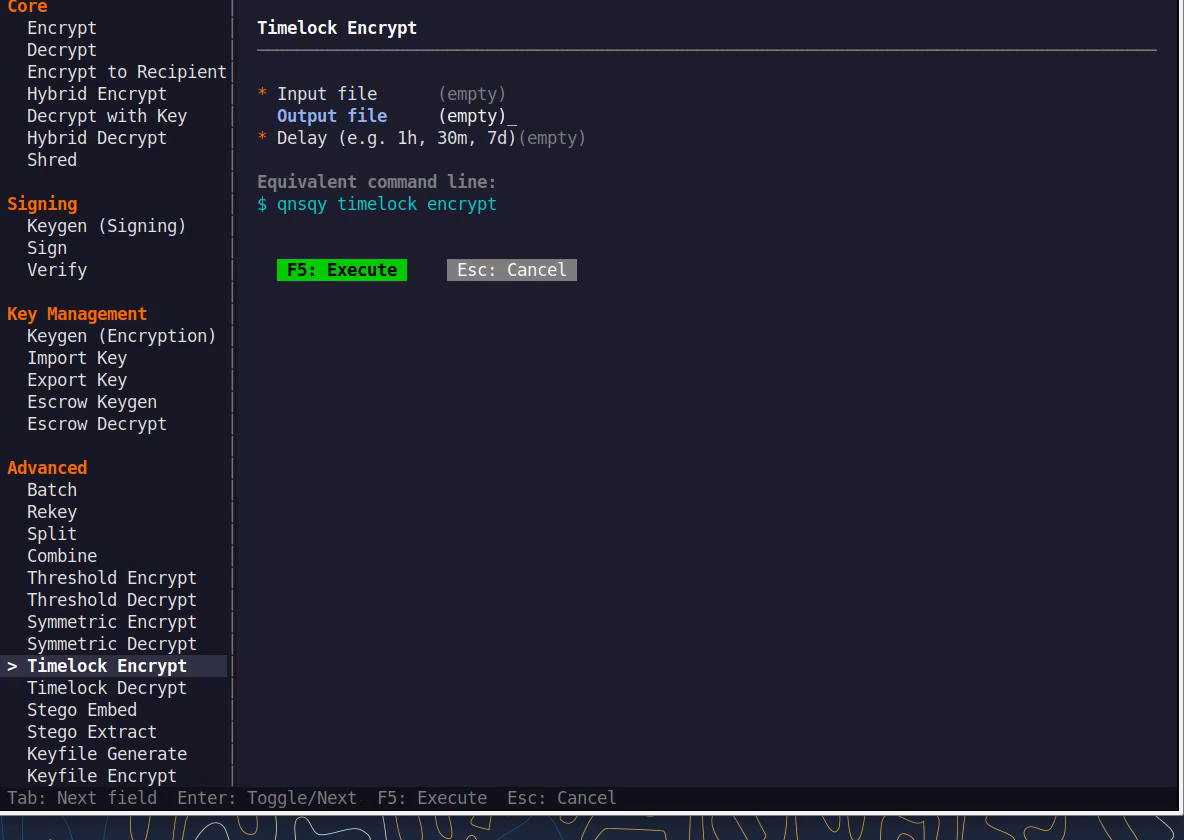
Equivalent command line (shown in the TUI too)
qnsqy timelock encrypt --duration 24hWatch (Linux TUI)
Keys: j/k navigate · Enter select/toggle · Tab next field · F5 execute · Esc cancel · q quit.
qnsqy timelock <encrypt|decrypt|calibrate>
Linux
qnsqy timelock encrypt -i report.txt --duration 24h -o report.qstl --recipient bob.pub
qnsqy timelock decrypt -i report.qstl -o report.txt --key bob
Windows (PowerShell)
qnsqy.exe timelock encrypt -i report.txt --duration 24h -o report.qstl --recipient bob.pub --acknowledge-no-sandbox
qnsqy.exe timelock decrypt -i report.qstl -o report.txt --key bob --acknowledge-no-sandbox
Decrypt performs the full sequential computation, so it takes about the chosen duration to finish. There is no shortcut, which is the whole point of a time-lock.
| Flag | Value | What it does |
|---|---|---|
| -i, --input | <FILE> | File to time-lock (encrypt) or the .qstl to open (decrypt) |
| --duration | <DUR> | Lock duration: "10s", "30m", "1h", "7d" |
| -o, --output | <FILE> | Output file (.qstl for encrypt) |
| --keyfile | <FILE> | Gate the puzzle with a keyfile |
| --recipient | <PUB> | Recipient public key (KEM) that also gates decryption |
| --hybrid | Combine a KEM with the time-lock puzzle | |
| --algorithm | <ALG> | AEAD algorithm for the payload |
| --password-stdin | Read a passphrase from stdin | |
| -k, --key | <PRIV> | Recipient private key (decrypt) |
| --vault | <FILE> | Store the measured machine speed in a vault (calibrate) |
Output
Calibrating hardware speed...
Time-lock parameters:
Duration: 10s (10 seconds)
Squarings/sec: ~443000
Total squarings: 4439380
✓ Time-locked file created: report.qstl

Time-lock puzzle (v2...)
Squarings required: 4439380
Starting sequential computation...
✓ Time-locked file decrypted: report.txt
Common combinations
Seven-day embargo on a press release:
qnsqy timelock encrypt -i press-release.pdf --duration 7d
Calibrate this machine's puzzle speed first:
qnsqy timelock calibrate
Watch (Linux CLI)
A real command-line round-trip captured on Linux. The unsigned dev-build integrity banner is filtered out; the sandbox lines are the seccomp network lockdown.
Watch (Windows CLI)
Command-line usage on Windows 11 (--help). The written examples above show the full invocation; a real run is not shown here (it needs keys/setup or would print secret material).
Keyfile
Pro & upEncrypt with a 256-bit key file, something you have, instead of a password. Anyone who holds the key file can decrypt, so guard it like a physical key.
Open Keyfile under the ADVANCED group in the left rail. The screen stacks three sections: Key File (select or generate a 256-bit AES key), Encrypt (encrypt a file with the selected key), and Decrypt (decrypt a file that used symmetric key encryption).
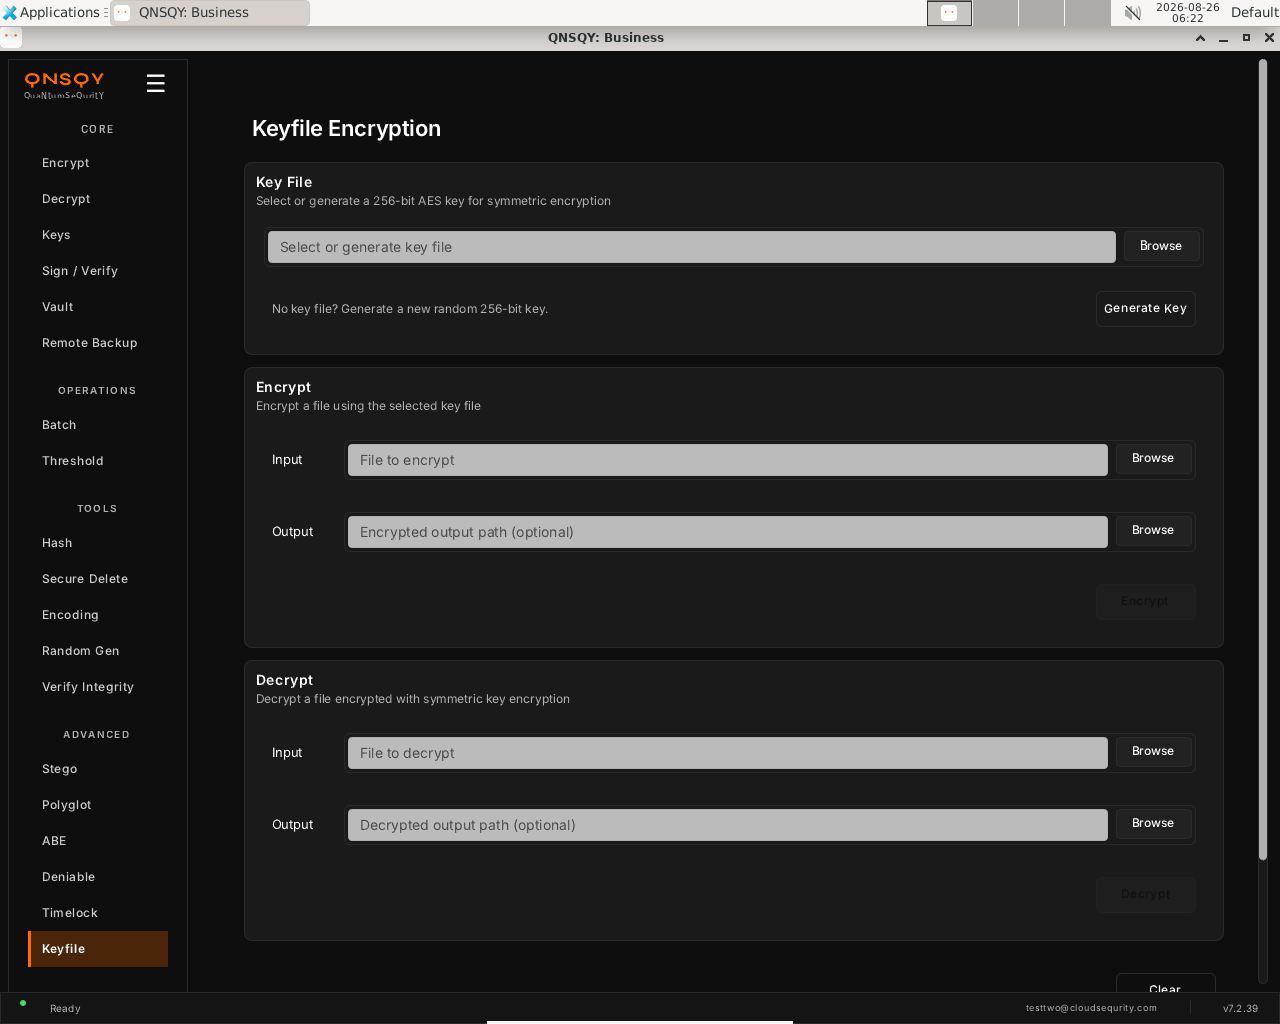
The Keyfile screen: a Key File selector/generator on top, then Encrypt and Decrypt sections. In the Key File section, Browse to an existing 256-bit key file or click “Generate Key” to create a new random one. Then, in the Encrypt section, choose the file to encrypt and an optional output path.
Click “Encrypt” to produce a .qskf file. To reverse it, use the Decrypt section with the same key file. Keep the key file safe: anyone who holds it can decrypt your data.
Prefer the terminal? This screen runs
qnsqy keyfile encrypt -i <input> -k <keyfile>
Watch (Linux GUI)
Watch (Windows GUI)
On Windows 11 (Business tier): the same screen and inputs. The completed operation and its result are shown in the Linux clip above.
Watch (Windows GUI)
Launch the TUI with qnsqy --tui. The whole toolkit lives in one menu, grouped by category. Use j/k to highlight Keyfile Encrypt and press Enter.
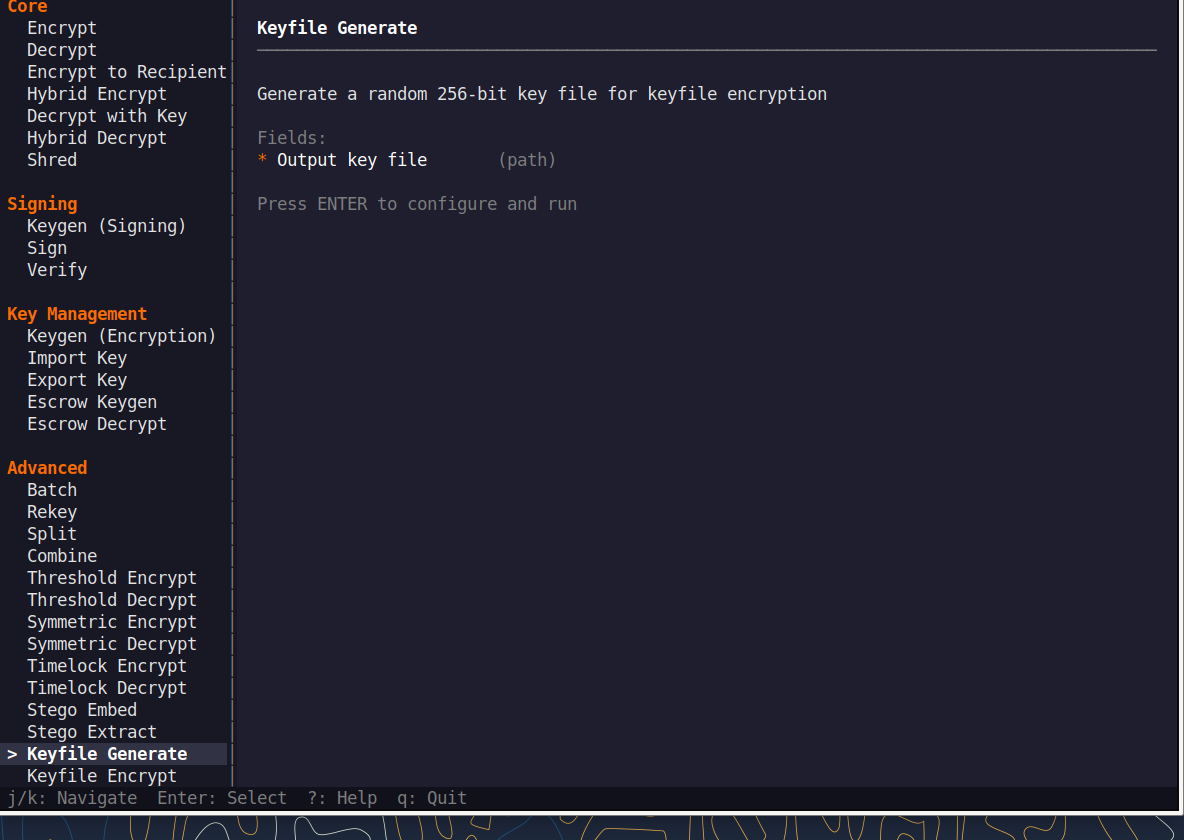
Fill the fields (Tab moves, Enter toggles), then press F5 to run. The password is prompted securely and never echoed, and a live Equivalent command line updates as you type.
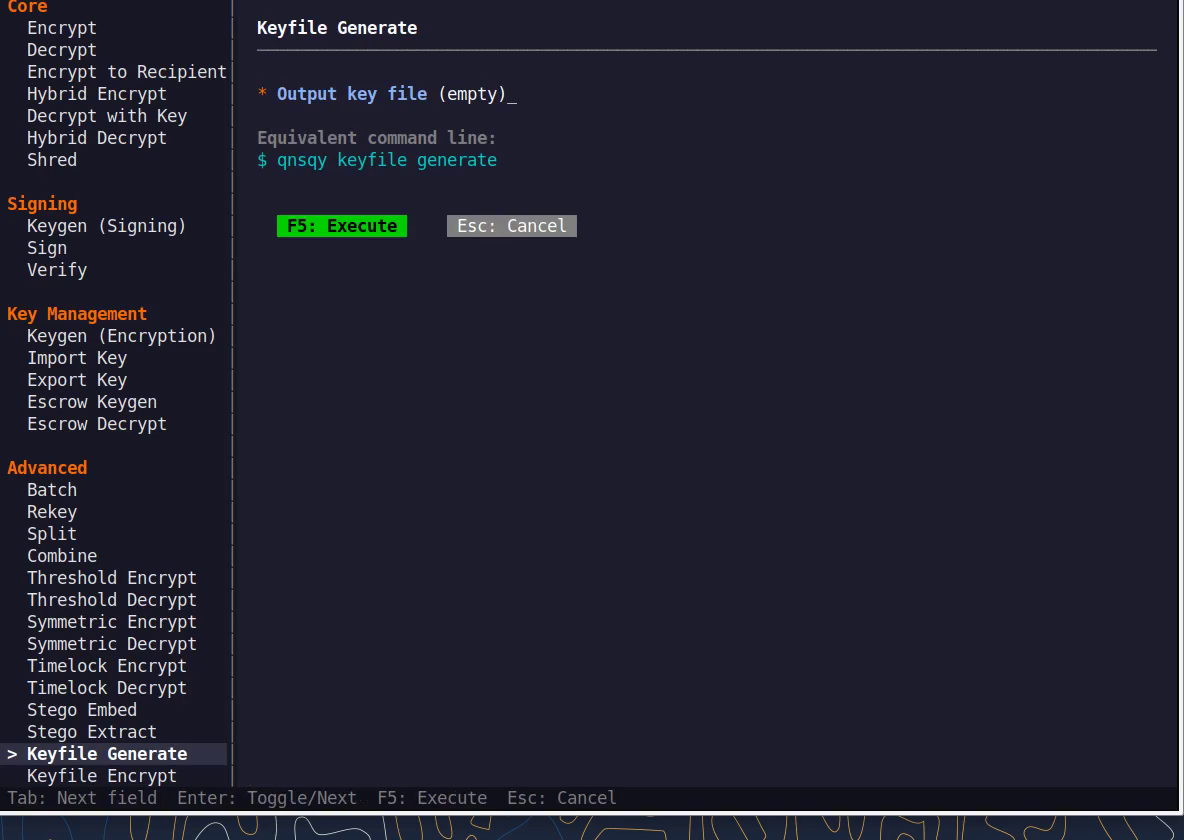
Equivalent command line (shown in the TUI too)
qnsqy keyfile encrypt -k <keyfile>Watch (Linux TUI)
Watch (Windows TUI)
Keys: j/k navigate · Enter select/toggle · Tab next field · F5 execute · Esc cancel · q quit.
qnsqy keyfile <generate|encrypt|decrypt|derive>
Linux
qnsqy keyfile generate -o my.key
qnsqy keyfile encrypt -i report.txt -k my.key -o report.qskf
qnsqy keyfile decrypt -i report.qskf -k my.key -o report.txt
Windows (PowerShell)
qnsqy.exe keyfile generate -o my.key
qnsqy.exe keyfile encrypt -i report.txt -k my.key -o report.qskf --acknowledge-no-sandbox
qnsqy.exe keyfile decrypt -i report.qskf -k my.key -o report.txt --acknowledge-no-sandbox
keyfile generate is free (0 credits) and needs no sandbox flag; on Windows, encrypt and decrypt add --acknowledge-no-sandbox.
| Flag | Value | What it does |
|---|---|---|
| -i, --input | <FILE> | File to encrypt, decrypt, or derive a fingerprint from |
| -o, --output | <FILE> | Output: the new key (generate) or the result (.qskf / plaintext) |
| -k, --keyfile | <32B> | 256-bit key file to use; mutually exclusive with --keyfile-from |
| --keyfile-from | <FILE> | Derive the key from ANY existing file instead of a 32-byte key |
| --keyfile-label | <TEXT> | Label bound to a derived key; must match on decrypt |
| --label | <TEXT> | Label to derive or verify a fingerprint for (derive) |
Output
Generated 256-bit key file: my.key
SECURITY: Keep this file secure! Anyone with this file can decrypt your data.
Encrypted: report.txt -> report.qskf
Decrypted: report.qskf -> report.txt
Common combinations
Use ANY existing file as the key material:
qnsqy keyfile encrypt -i data --keyfile-from song.mp3 --keyfile-label track
Derive a fingerprint to verify two parties hold the same keyfile:
qnsqy keyfile derive -i data.qskf --label track
Watch (Linux CLI)
A real command-line round-trip captured on Linux. The unsigned dev-build integrity banner is filtered out; the sandbox lines are the seccomp network lockdown.
Watch (Windows CLI)
Command-line usage on Windows 11 (--help). The written examples above show the full invocation; a real run is not shown here (it needs keys/setup or would print secret material).
Watch (Windows CLI)
Rekey
ProChange the password on an encrypted .qs file without re-encrypting the data itself. Only the password wrapping is replaced, so it is fast even for very large files.
Open Rekey (under Manage). Click Browse and choose the encrypted
.qsfile whose password you want to change.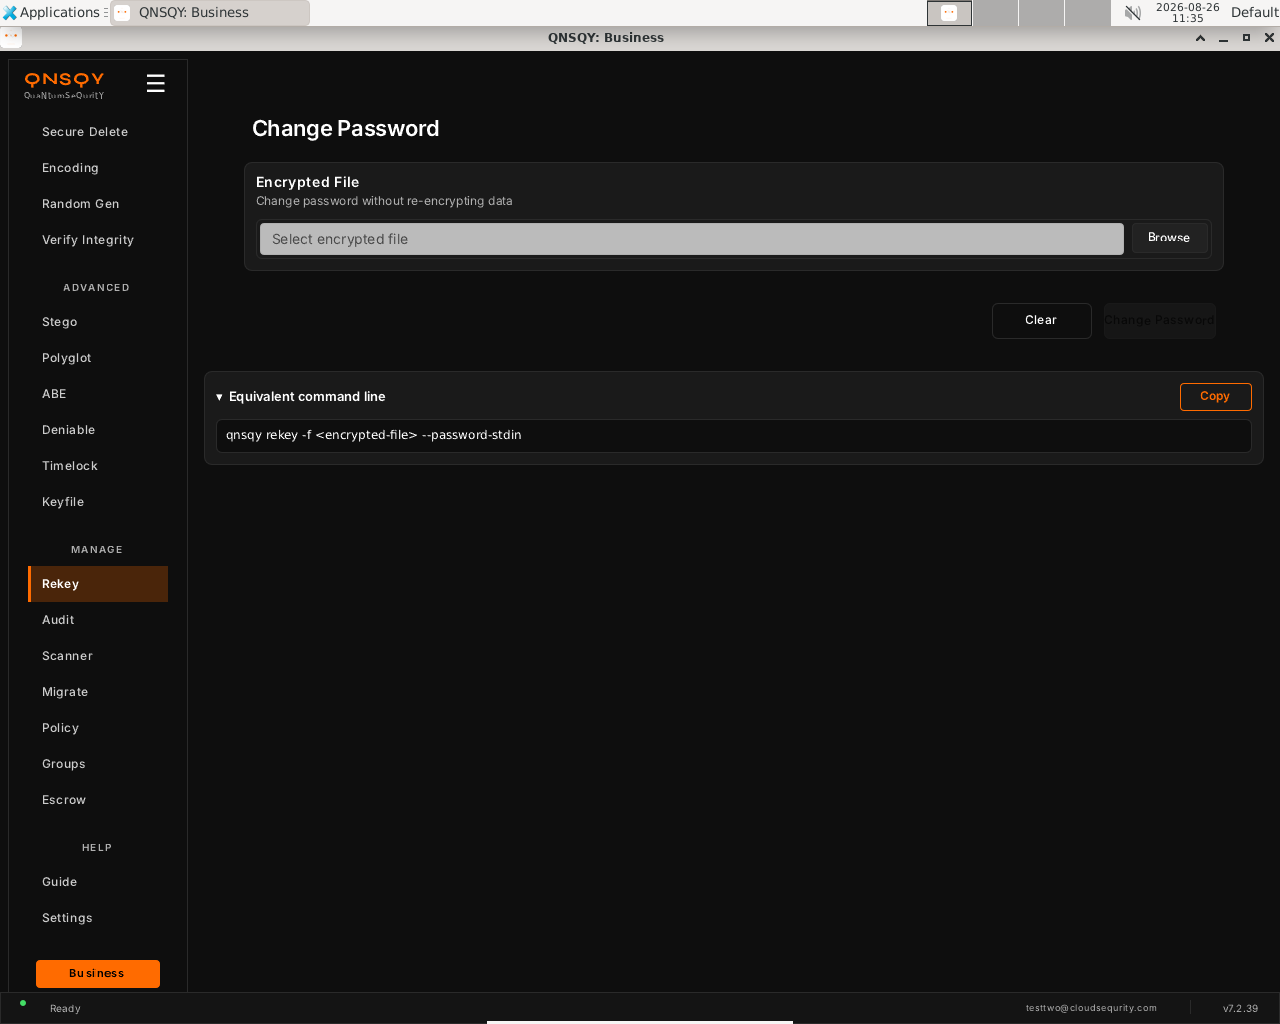
Rekey / Change Password (Linux) Click Change Password. You are prompted for the current password, then the new password. Only the password wrapping is rewritten; the encrypted data is not touched.
The file is updated in place. The Equivalent command line panel shows the exact
qnsqy rekeycommand, with a Copy button to grab it.
Prefer the terminal? This screen runs
qnsqy rekey --file locked.qs
Watch (Linux GUI)
Watch (Windows GUI)
On Windows 11 (Business tier): the same screen and inputs. The completed operation and its result are shown in the Linux clip above.
Launch the TUI with qnsqy --tui. Use j/k to highlight Rekey and press Enter.
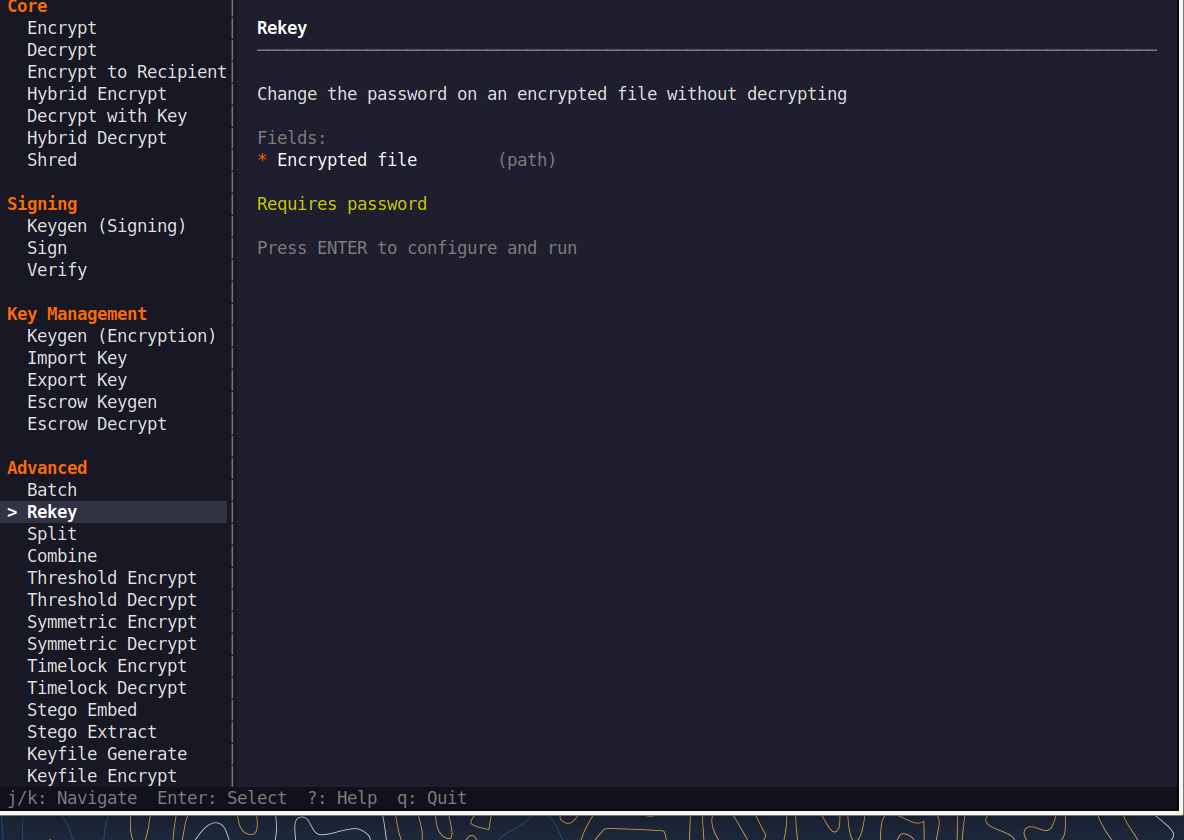
Fill the fields (Tab moves, Enter toggles), then press F5 to run. A live Equivalent command line updates as you type.
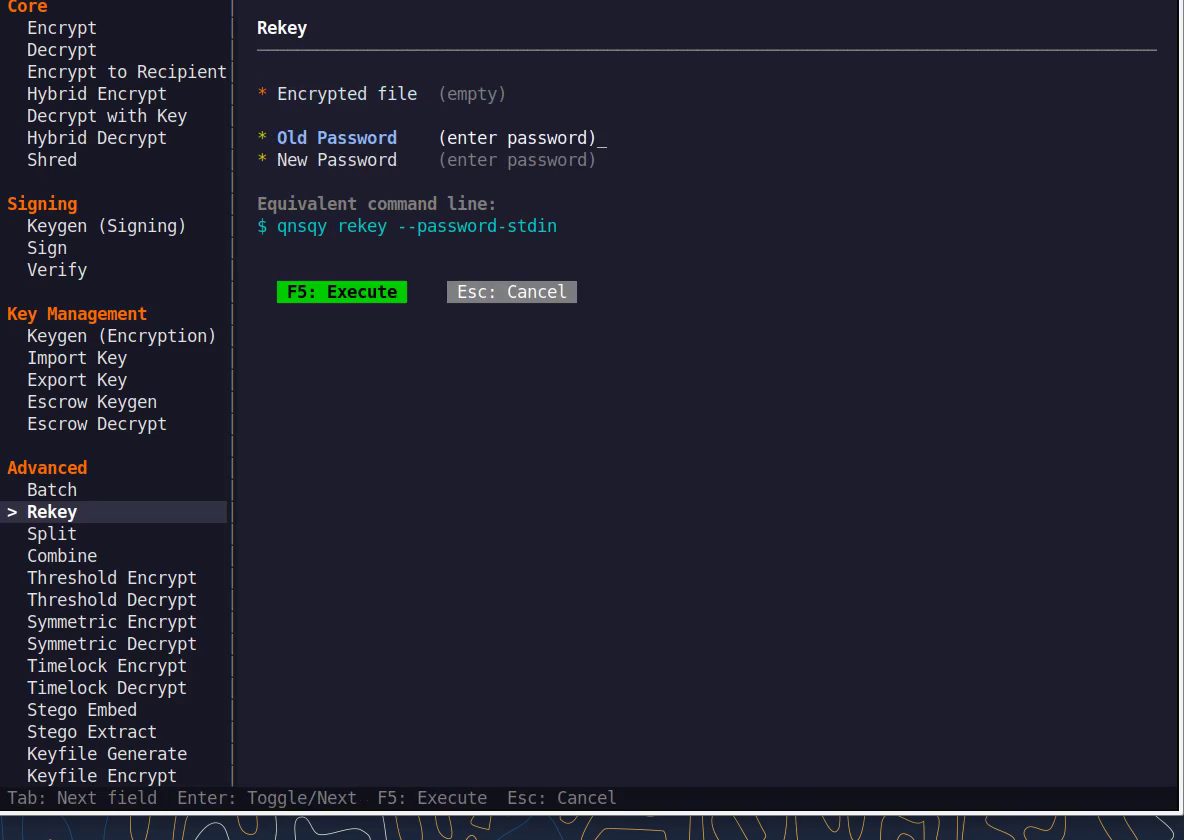
Equivalent command line (shown in the TUI too)
qnsqy rekey --file locked.qsWatch (Linux TUI)
Watch (Windows TUI)
Keys: j/k navigate · Enter select/toggle · Tab next field · F5 execute · Esc cancel · q quit.
qnsqy rekey [OPTIONS] --file <FILE>
Linux
qnsqy rekey --file locked.qs                       (prompts: old password, then new password)
printf 'oldpw\nnewpw\n' | qnsqy rekey --file locked.qs --password-stdin
Windows (PowerShell)
qnsqy.exe rekey --file locked.qs --acknowledge-no-sandbox
| Flag | Value | What it does |
|---|---|---|
| -f, --file | <FILE> | Encrypted file to change the password on (required). |
| -o, --output | <OUT> | Write the rekeyed file here instead of in place. |
| --password-stdin | flag | Read the OLD password then the NEW password from stdin (two lines). |
| --argon2-preset | <P> | Argon2 KDF preset for the new password. |
| --argon2-memory | <KiB> | Argon2 memory cost. |
| --argon2-iterations | <N> | Argon2 time cost. |
| --argon2-parallelism | <N> | Argon2 parallelism. |
| --no-extension | flag | Do not add or expect the .qs extension. |
| --no-audit | flag | Do not write an audit-log entry. |
| --force | flag | Overwrite the output if it exists. |
| -y, --yes | flag | Skip the confirmation prompt. |
Output
[Documented from the verified --help. Changes the password wrapper on the file in place; the ciphertext body is not re-encrypted. With --password-stdin, line 1 is the OLD password and line 2 is the NEW password.]
Documented from the verified --help; a live Linux CLI clip is being captured.
Common combinations
Rekey to a new file instead of in place
qnsqy rekey --file a.qs -o b.qs
Use a stronger KDF for the new password
qnsqy rekey --file a.qs --argon2-preset paranoid
Watch (Linux CLI)
A real command-line round-trip captured on Linux. The unsigned dev-build integrity banner is filtered out; the sandbox lines are the seccomp network lockdown.
Watch (Windows CLI)
Command-line usage on Windows 11 (--help). The written examples above show the full invocation; a real run is not shown here (it needs keys/setup or would print secret material).
Watch (Windows CLI)
Audit
ProRead this device’s append-only, tamper-evident audit log of operations, export it for a SIEM, and verify its hash chain.
Open Audit (under Manage). Click Load to read this device’s append-only audit log. Use Options to filter to security-relevant events only.
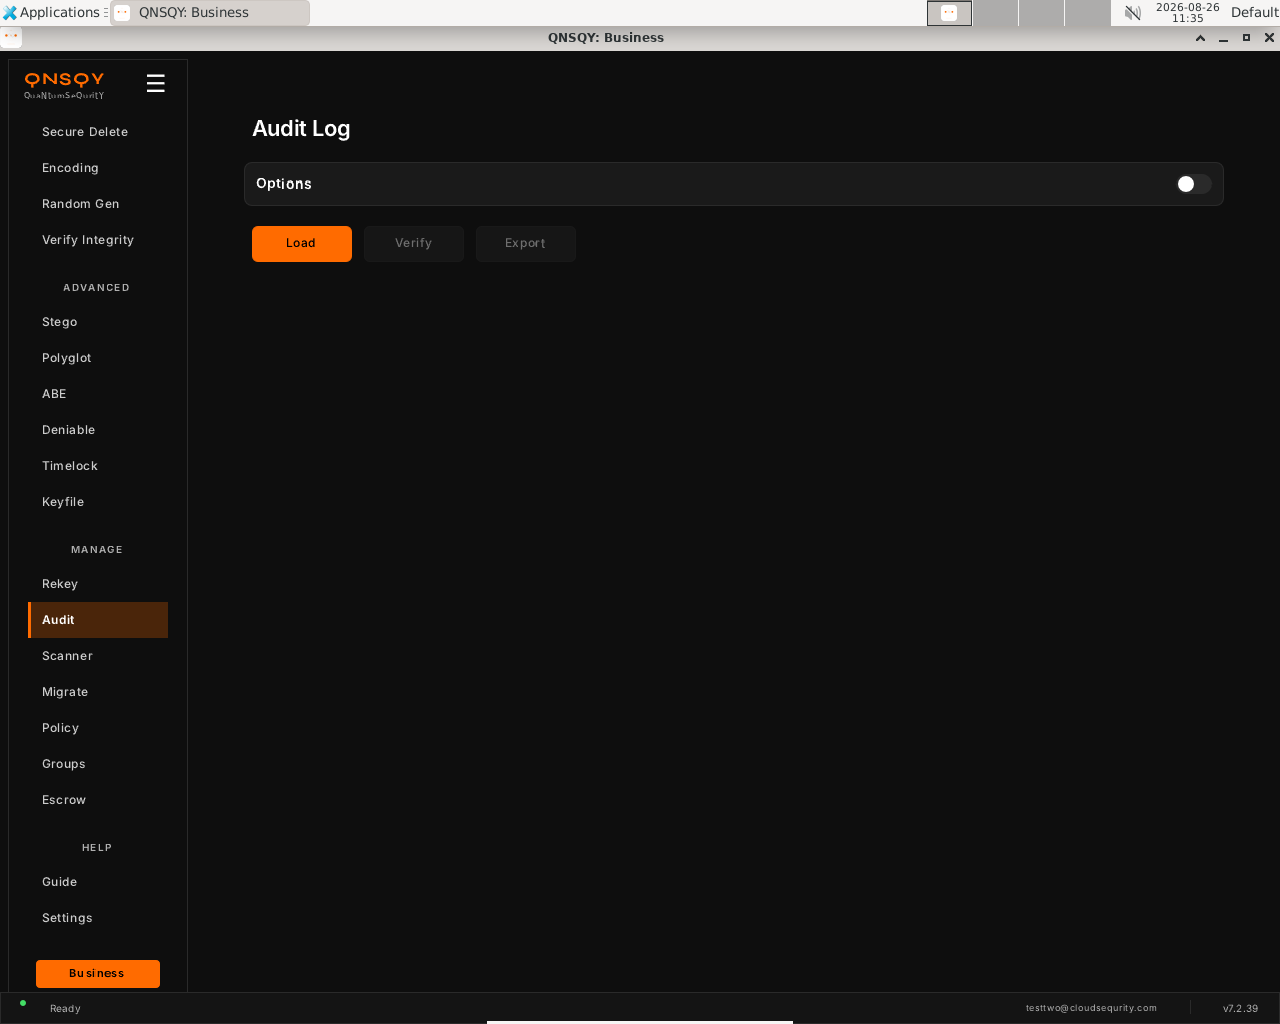
Audit Log (Linux) Click Verify to check the log’s tamper-evident hash chain. A broken chain means the log was altered.
Click Export to write the log out (CSV, JSON, syslog or CEF) for a SIEM.
Prefer the terminal? This screen runs
qnsqy audit --verify
Watch (Linux GUI)
Watch (Windows GUI)
On Windows 11 (Business tier): the same log load, shown here completing end-to-end (entries loaded).
Watch (Windows GUI)
Audit is not in the interactive TUI menu. Use the GUI screen above or the command line. The TUI covers the crypto and file operations; this management command runs from the GUI or a terminal.
qnsqy audit
Linux
qnsqy audit
qnsqy audit --security-only --format json --export audit.json
Windows (PowerShell)
qnsqy.exe audit
| Flag | Value | What it does |
|---|---|---|
| --security-only | Show only security-relevant events | |
| --export | <FILE> | Write the log to a file |
| --after | <DATE|ts> | Show only events after a date or timestamp |
| --verify | Verify the tamper-evident hash chain | |
| --format | csv|json|syslog|cef (default csv) | Output format for the log |
Output
[0] 2026-08-25 06:00:48 - Application started
[5] 2026-08-25 06:02:09 - Key generated
...
Common combinations
Export a SIEM-ready CEF log
qnsqy audit --format cef --export audit.cef
Verify the tamper-evident chain
qnsqy audit --verify
Watch (Linux CLI)
A real command-line round-trip captured on Linux. The unsigned dev-build integrity banner is filtered out; the sandbox lines are the seccomp network lockdown.
Watch (Windows CLI)
A real command-line round-trip on Windows 11 (PowerShell, Business tier). The unsigned dev-build integrity notice is filtered out.
Watch (Windows CLI)
Scanner
Free (all tiers)Scan a directory for data still protected by classical, non-quantum-safe cryptography (RSA, ECC and similar) and get concrete post-quantum replacement recommendations for each finding.
Open Scanner (under Manage). Click Browse and pick a directory to scan for classical, non-quantum-safe cryptography.
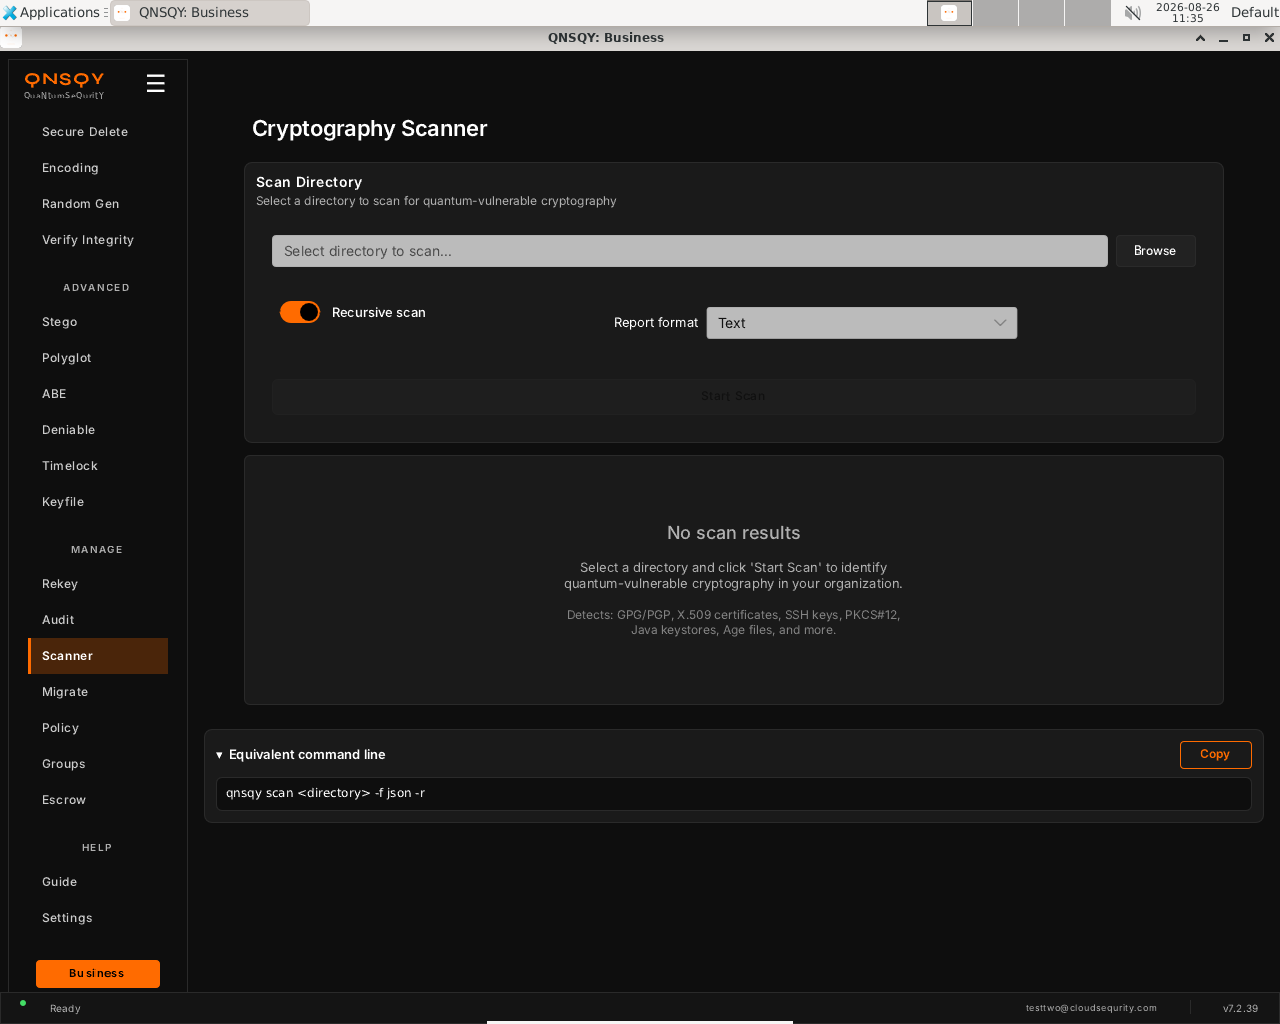
Cryptography Scanner (Linux) Turn on Recursive scan to include subfolders, and pick a Report format (Text, JSON, and so on).
Click Start Scan. Findings appear in the results panel: GPG/PGP keys, X.509 certificates, SSH keys, PKCS#12, Java keystores, Age files and more, each with a post-quantum recommendation.
Prefer the terminal? This screen runs
qnsqy scan ~/Documents
Watch (Linux GUI)
Watch (Windows GUI)
On Windows 11 (Business tier): the same screen and inputs. The completed operation and its result are shown in the Linux clip above.
Watch (Windows GUI)
Launch the TUI with qnsqy --tui. Use j/k to highlight Scanner and press Enter.
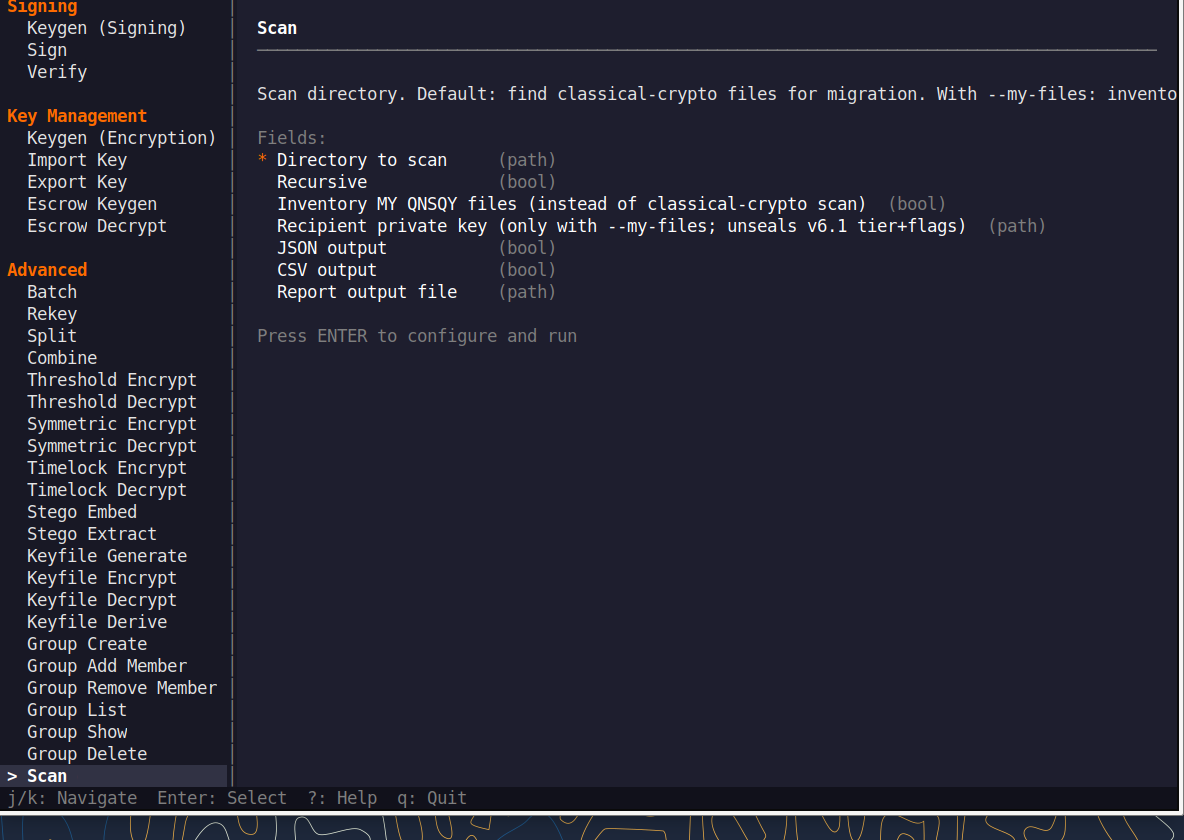
Fill the fields (Tab moves, Enter toggles), then press F5 to run. A live Equivalent command line updates as you type.
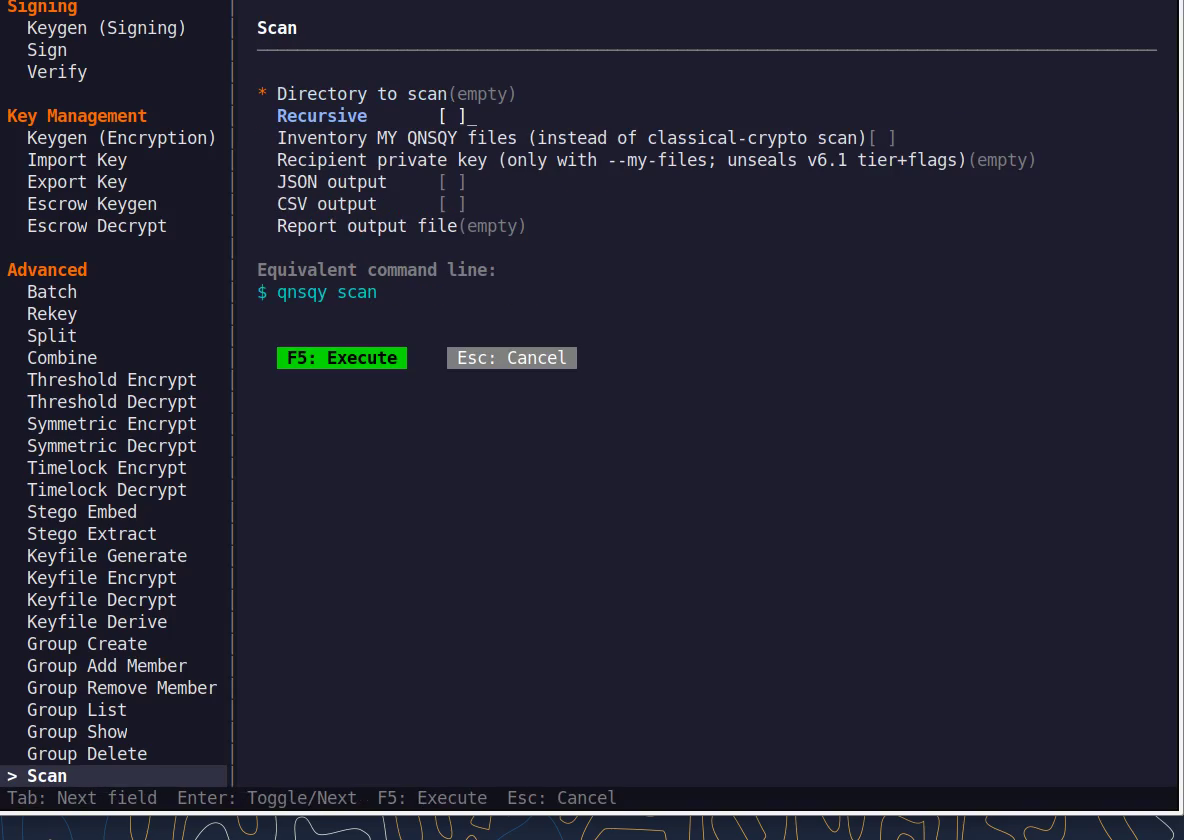
Equivalent command line (shown in the TUI too)
qnsqy scan ~/DocumentsWatch (Linux TUI)
Watch (Windows TUI)
Keys: j/k navigate · Enter select/toggle · Tab next field · F5 execute · Esc cancel · q quit.
qnsqy scan <DIRECTORY>
Linux
qnsqy scan ~/Documents -f text
Windows (PowerShell)
qnsqy.exe scan C:\Users\me\Documents
| Flag | Value | What it does |
|---|---|---|
| <DIRECTORY> | positional | Directory to scan. |
| -r, --recursive | flag | Recurse into subdirectories. |
| -f, --output | text|json|csv|html|markdown | Report output format (default text). |
| -o, --output-file | <FILE> | Write the report to a file. |
| --force | flag | Skip confirmation prompts. |
| --min-risk | safe|low|medium|high|critical | Only report findings at or above this risk level. |
| --my-files | flag | Scan your own encrypted files (with --key / --password-stdin). |
| --json | flag | Shorthand for JSON output. |
| --csv | flag | Shorthand for CSV output. |
Output
Scanning for classical cryptography files...
Total cryptographic files: 1
🔴 CRITICAL: 1 files
scandir/old_rsa.pem
Type: PEM Certificate/Key
Algorithms: RSA-2048
→ RSA-2048: Replace with ML-KEM-768/1024 for encryption or ML-DSA-65/87 for signatures
Common combinations
JSON report
qnsqy scan ~/keys -f json -o report.json
Only high-and-above risk
qnsqy scan / -r --min-risk high
Watch (Linux CLI)
A real command-line round-trip captured on Linux. The unsigned dev-build integrity banner is filtered out; the sandbox lines are the seccomp network lockdown.
Watch (Windows CLI)
A real command-line round-trip on Windows 11 (PowerShell, Business tier). The unsigned dev-build integrity notice is filtered out.
Watch (Windows CLI)
Migrate
BusinessFind data protected by classical cryptography and migrate it to post-quantum protection. Preview everything with a dry run first, and keep a full backup during the real migration.
Open Migrate (under Manage). Click Browse to choose the directory to scan and migrate, and a separate backup directory for the original files.
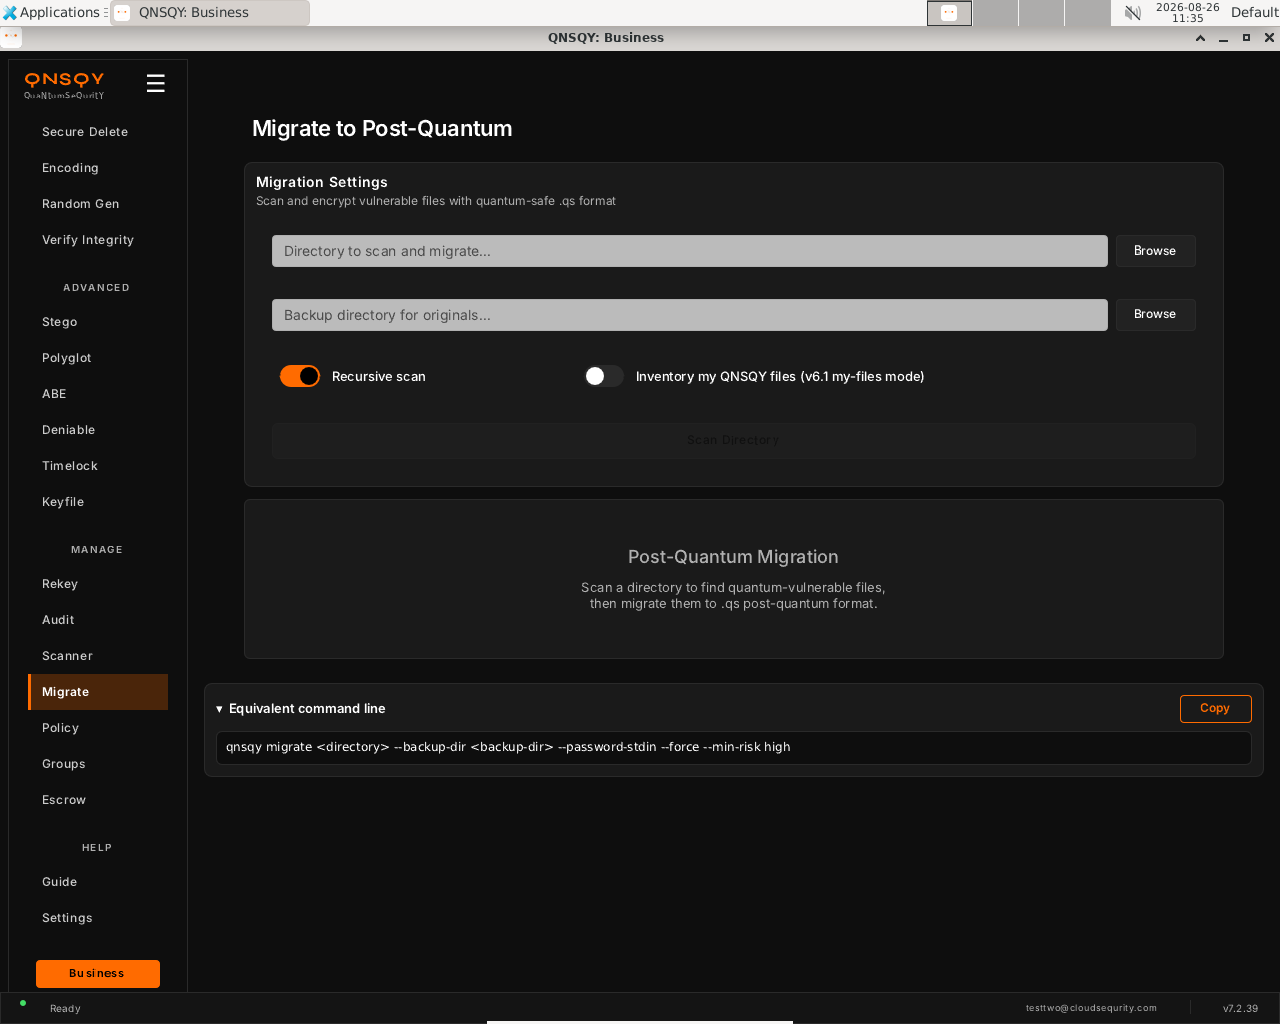
Migrate to Post-Quantum (Linux) Turn on Recursive scan to include subfolders. Leave Inventory my QNSQY files off unless you are cataloguing files you already encrypted.
Click Scan Directory to preview, then migrate the vulnerable files to the quantum-safe
.qsformat. The originals are copied to your backup directory first.
Prefer the terminal? This screen runs
qnsqy migrate ~/legacy --backup-dir ~/backup
Watch (Linux GUI)
Watch (Windows GUI)
On Windows 11 (Business tier): the same screen and inputs. The completed operation and its result are shown in the Linux clip above.
Launch the TUI with qnsqy --tui. Use j/k to highlight Migrate and press Enter.
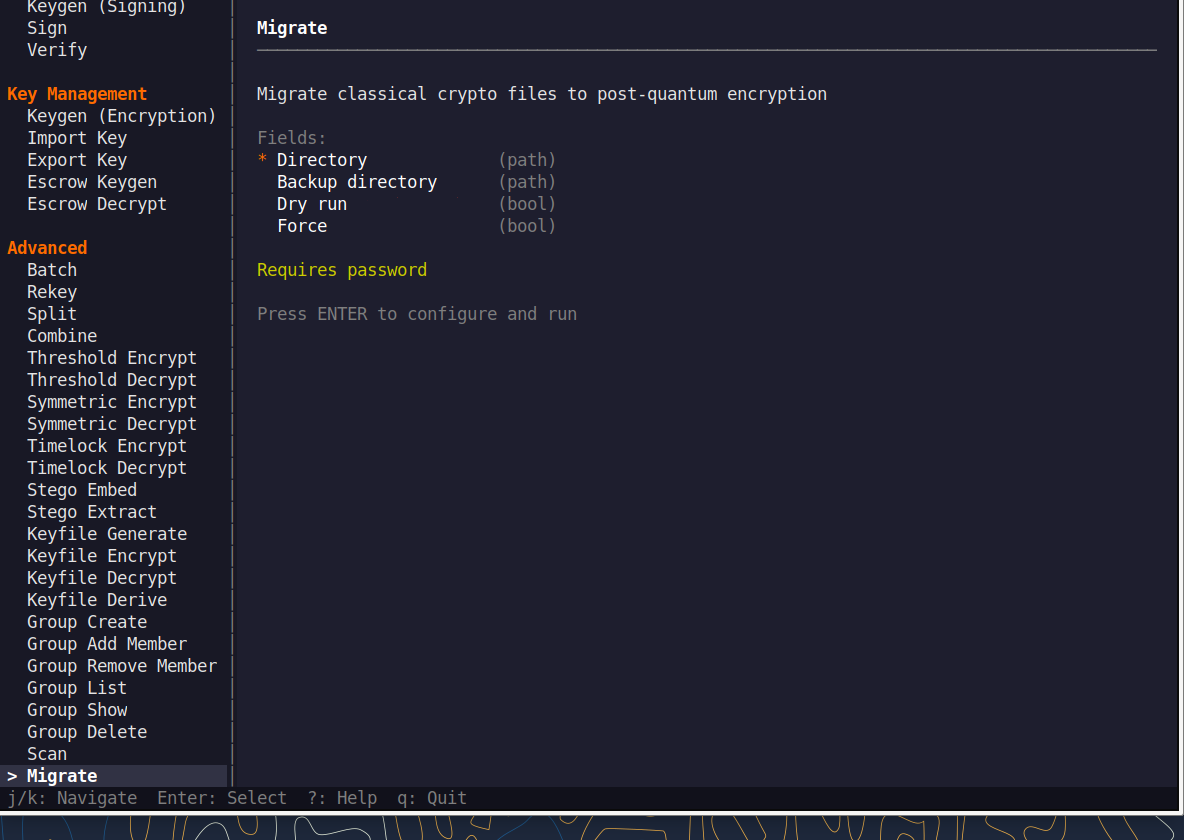
Fill the fields (Tab moves, Enter toggles), then press F5 to run. A live Equivalent command line updates as you type.
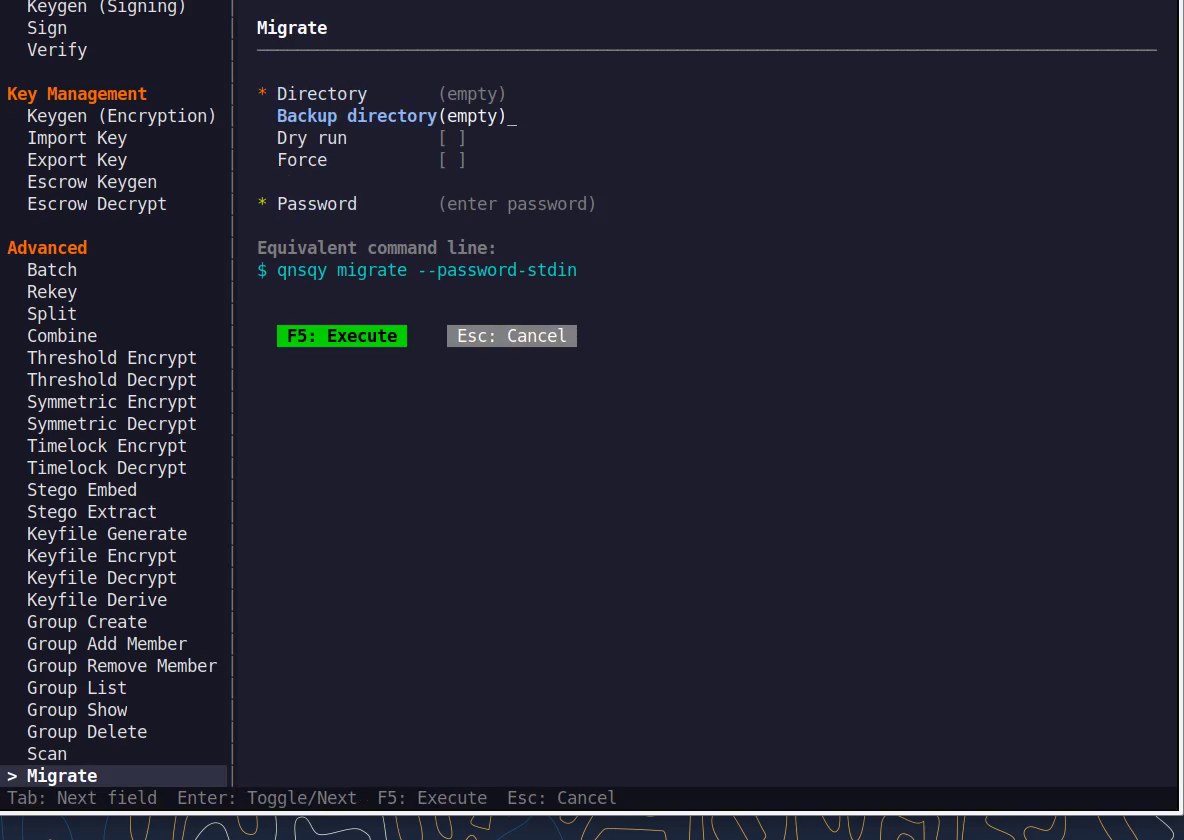
Equivalent command line (shown in the TUI too)
qnsqy migrate ~/legacy --backup-dir ~/backupWatch (Linux TUI)
Watch (Windows TUI)
Keys: j/k navigate · Enter select/toggle · Tab next field · F5 execute · Esc cancel · q quit.
qnsqy migrate <DIRECTORY>
Linux
qnsqy migrate ~/legacy --dry-run                 (preview; nothing changes)
printf "pw\npw\n" | qnsqy migrate ~/legacy --backup-dir ~/legacy-backup --password-stdin
Windows (PowerShell)
qnsqy.exe migrate C:\legacy --dry-run --acknowledge-no-sandbox
| Flag | Value | What it does |
|---|---|---|
| <DIRECTORY> | positional | Directory to migrate. |
| --dry-run | flag | Preview only; no files are modified. |
| --backup-dir | <DIR> | Backup destination (required unless --dry-run). |
| --order | alpha|mtime | Order in which files are processed. |
| --password-stdin | flag | Read the password from stdin (given twice). |
| --min-risk | <level> | Minimum risk level to migrate (default high). |
| -f, --force | flag | Force; skip confirmation. |
Output
DRY RUN - No files will be modified
Scanning for files to migrate...
Found 1 files to migrate:
🔴 Critical - scandir/old_rsa.pem
Dry run complete. 1 files would be migrated.
Common combinations
Migrate oldest-first with a backup
migrate ~/legacy --backup-dir ~/bak --order mtime
Preview only critical findings
migrate / --dry-run --min-risk critical
Watch (Linux CLI)
A real command-line round-trip captured on Linux. The unsigned dev-build integrity banner is filtered out; the sandbox lines are the seccomp network lockdown.
Watch (Windows CLI)
A real command-line round-trip on Windows 11 (PowerShell, Business tier). The unsigned dev-build integrity notice is filtered out.
Watch (Windows CLI)
Policy
BusinessView and set a local organization policy (minimum password length; require signature, hybrid, or audit; auto-shred) enforced on this device.
Open Policy (under Manage). Click Init Policy once to create the local policy file, then Show Policy to view the current settings.
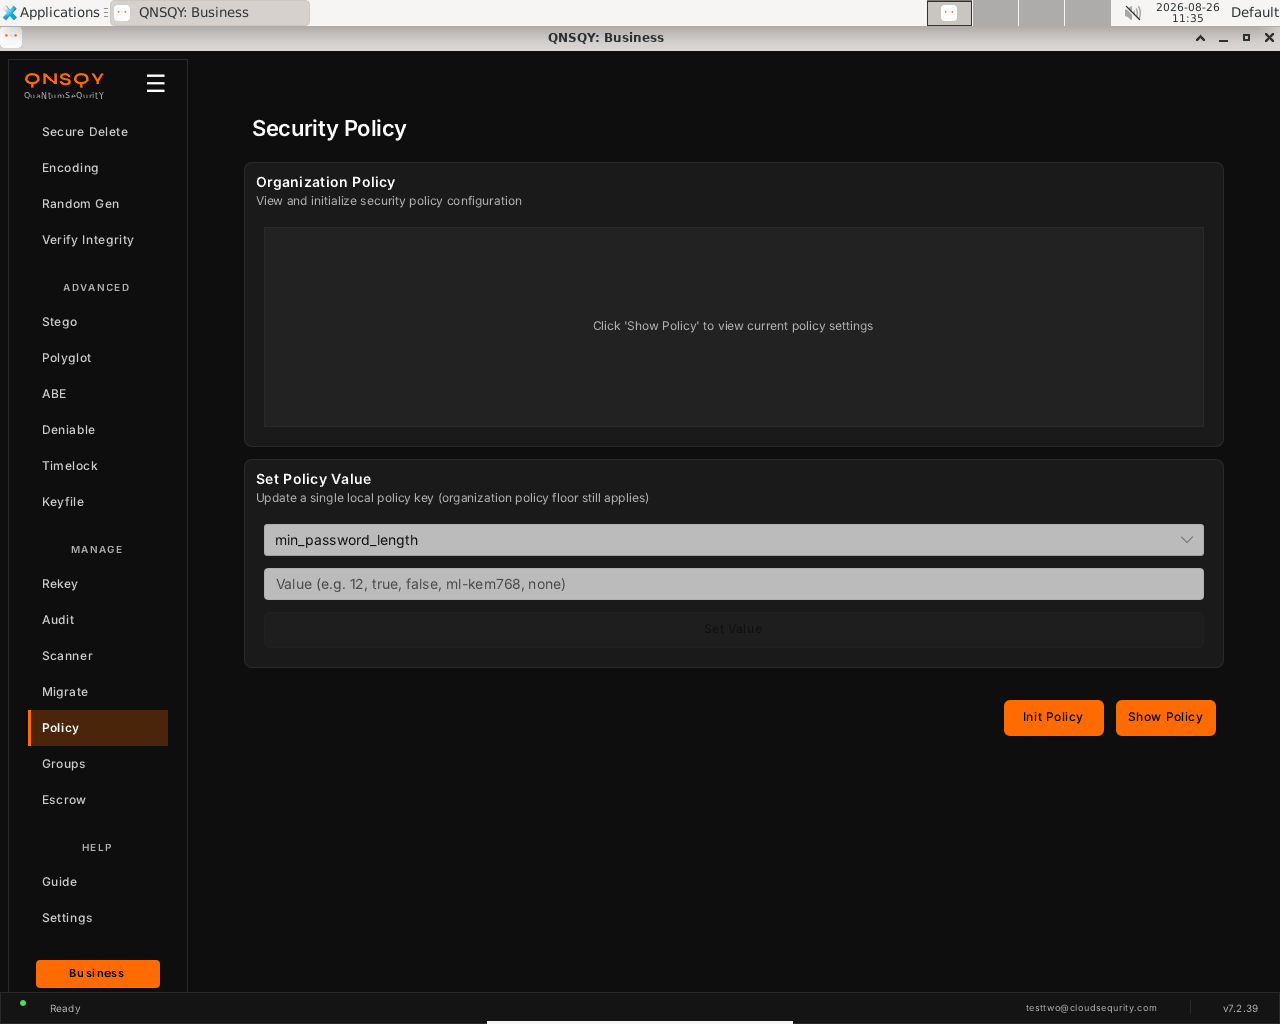
Security Policy (Linux) Under Set Policy Value, pick a key (for example
min_password_length) and enter a value (a number,true/false, an algorithm likeml-kem768, ornone).Click Set Value. The organization policy floor still applies on top of any local value.
Prefer the terminal? This screen runs
qnsqy policy show
Watch (Linux GUI)
Watch (Windows GUI)
On Windows 11 (Business tier): the same screen and inputs. The completed operation and its result are shown in the Linux clip above.
Watch (Windows GUI)
Policy is not in the interactive TUI menu. Use the GUI screen above or the command line. The TUI covers the crypto and file operations; this management command runs from the GUI or a terminal.
qnsqy policy <show|init|set|sync>
Linux
qnsqy policy init
qnsqy policy show
qnsqy policy set min_password_length 12
Windows (PowerShell)
qnsqy.exe policy ...
| Flag | Value | What it does |
|---|---|---|
| show | Show the current organization policy | |
| init | Create the default policy file | |
| set | <KEY> <VALUE> | Set a policy value |
| sync | Sync the policy |
Output
Created default policy: ~/.config/qnsqy/policy.toml
QNSQY Organization Policy
Min password length: 8
Require signature: false
Require compression: false
Require hybrid: false
Auto-shred: false
Require audit: false
Common combinations
Enforce signatures org-wide
qnsqy policy set require_signature true
Require audit logging
qnsqy policy set require_audit true
Watch (Linux CLI)
A real command-line round-trip captured on Linux. The unsigned dev-build integrity banner is filtered out; the sandbox lines are the seccomp network lockdown.
Watch (Windows CLI)
A real command-line round-trip on Windows 11 (PowerShell, Business tier). The unsigned dev-build integrity notice is filtered out.
Watch (Windows CLI)
Groups
BusinessManage local recipient groups: named collections of public keys you can threshold-encrypt to with --group.
Open Groups (under Manage). Type a Group Name and click Create to make a new recipient group.
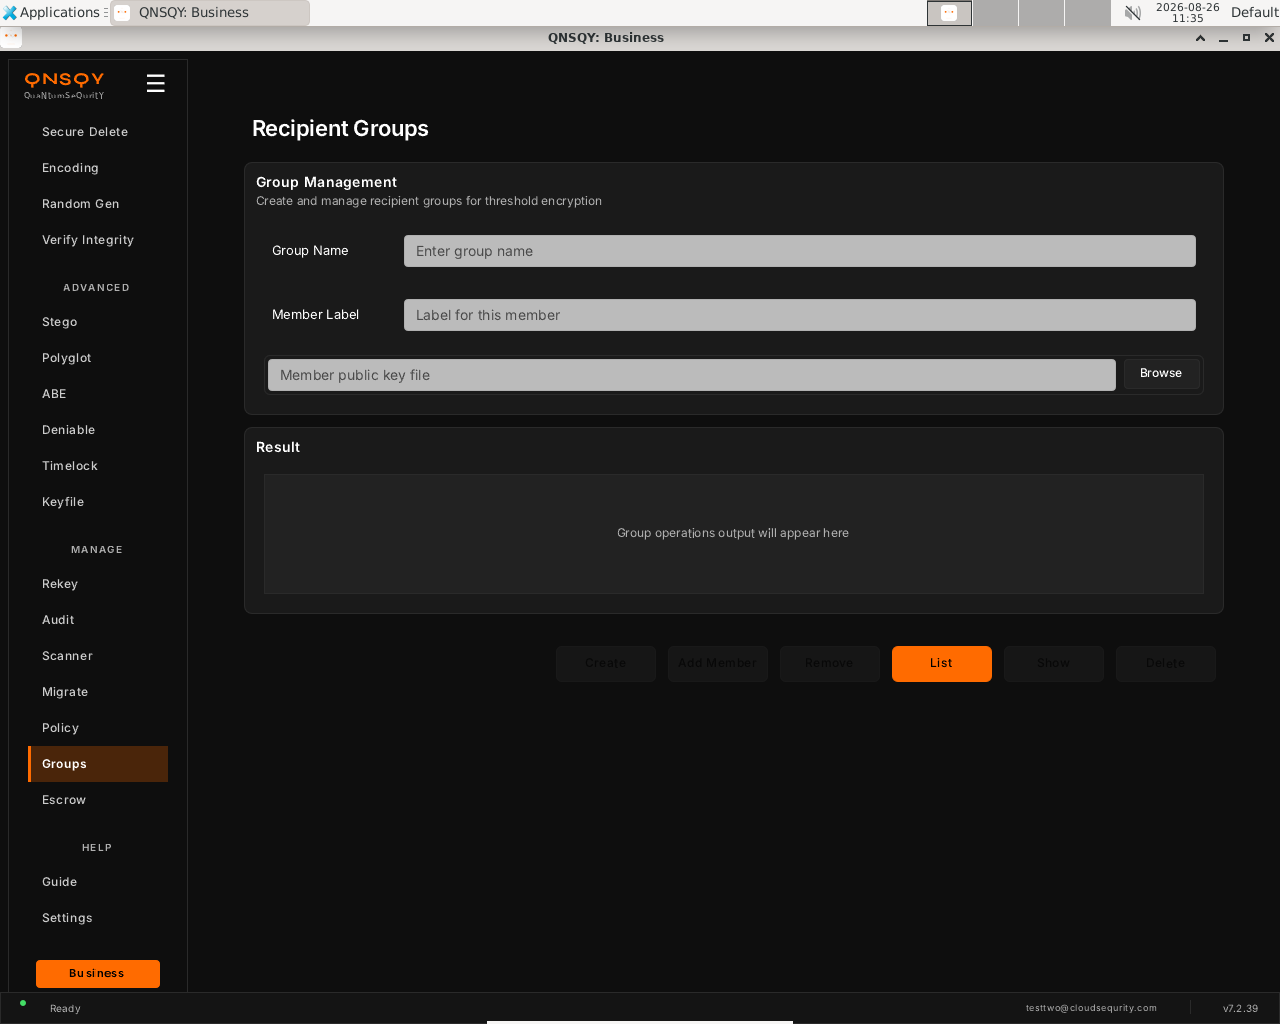
Recipient Groups (Linux) To add a member, enter a Member Label, click Browse to pick that member’s public key file, then click Add Member.
Use List, Show, Remove and Delete to manage groups. Encrypt to a whole group later with
--group.
Prefer the terminal? This screen runs
qnsqy group create board
Watch (Linux GUI)
Watch (Windows GUI)
On Windows 11 (Business tier): the same screen and inputs. The completed operation and its result are shown in the Linux clip above.
Watch (Windows GUI)
Launch the TUI with qnsqy --tui. Use j/k to highlight Groups and press Enter.
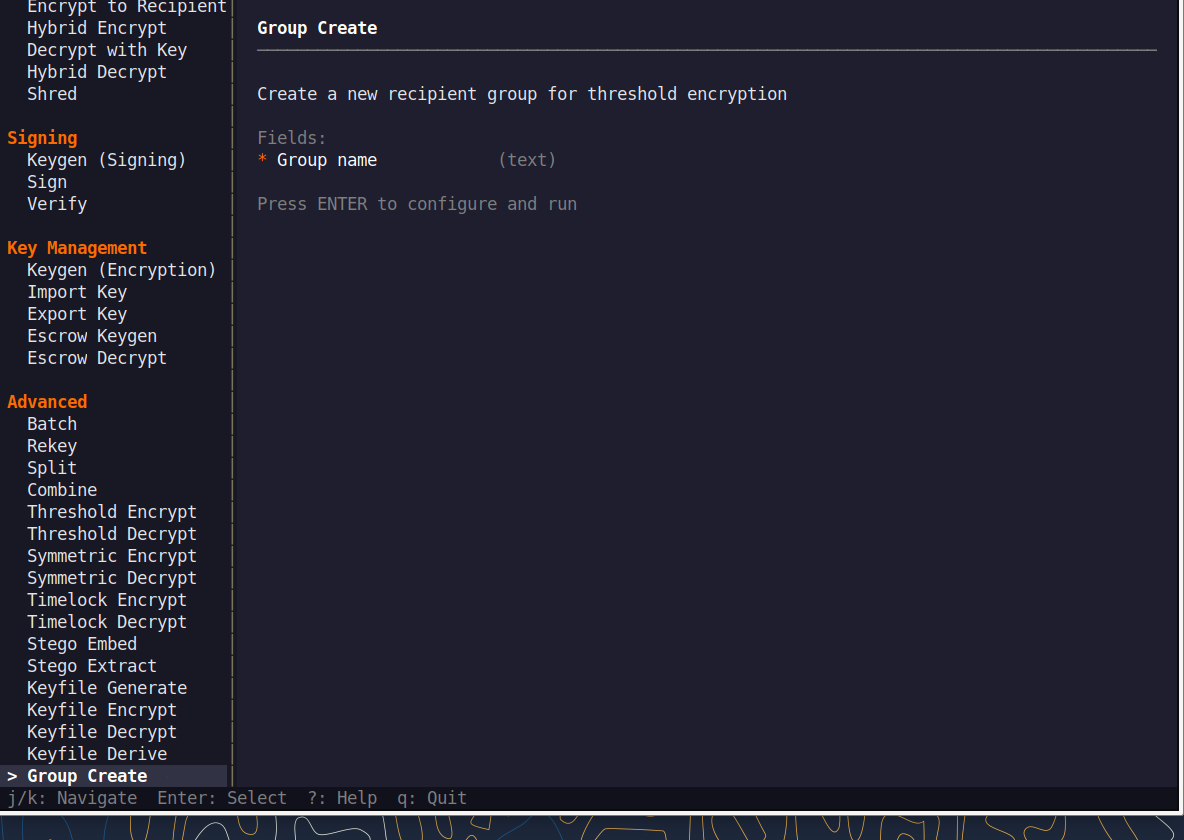
Fill the fields (Tab moves, Enter toggles), then press F5 to run. A live Equivalent command line updates as you type.
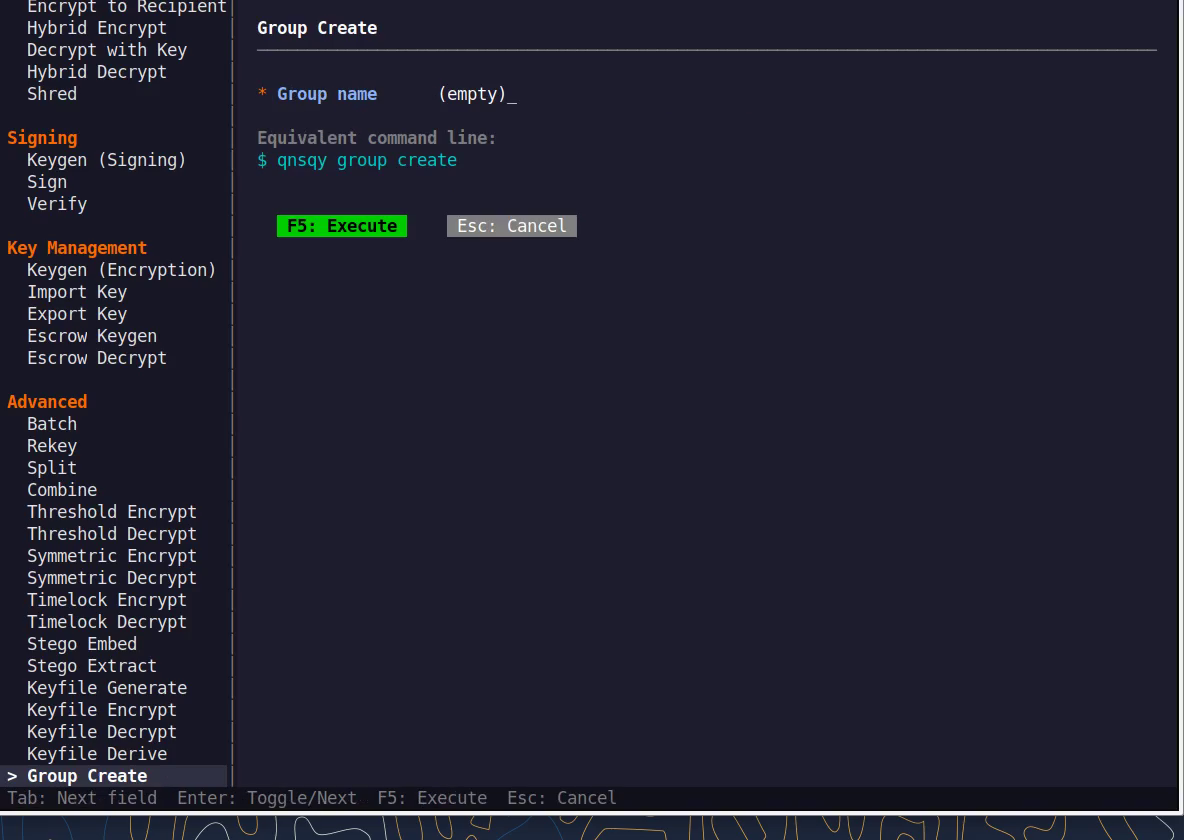
Equivalent command line (shown in the TUI too)
qnsqy group create boardWatch (Linux TUI)
Watch (Windows TUI)
Keys: j/k navigate · Enter select/toggle · Tab next field · F5 execute · Esc cancel · q quit.
qnsqy group <create|add|remove|list|show|delete>
Linux
qnsqy group create board
qnsqy group add board --label alice --key alice.pub
qnsqy group list
Windows (PowerShell)
qnsqy.exe group ...
| Flag | Value | What it does |
|---|---|---|
| create | <NAME> | Create a new group with the given name |
| add | <NAME> --label <L> --key <PUB> | Add a member (public key) to a group under a label |
| remove | <NAME> --label <L> | Remove a member from a group by label |
| list | List all groups | |
| show | <NAME> | Show a group and its members |
| delete | <NAME> | Delete a group |
Output
Created group: board
Added 'alice' to group 'board'
board (1 members)
Common combinations
Build a 5-member board group, then threshold-encrypt to it with --group
qnsqy group create board
qnsqy group add board --label alice --key alice.pub
Show a group's members
qnsqy group show board
Watch (Linux CLI)
A real command-line round-trip captured on Linux. The unsigned dev-build integrity banner is filtered out; the sandbox lines are the seccomp network lockdown.
Watch (Windows CLI)
A real command-line round-trip on Windows 11 (PowerShell, Business tier). The unsigned dev-build integrity notice is filtered out.
Watch (Windows CLI)
Escrow
BusinessGenerate an organization escrow key and use it to recover encrypted data when an individual key is lost, for example a departed employee’s files. Guard the escrow bundle carefully.
Open Escrow (under Manage). Under Generate Escrow Keys, enter your Organization name and an output directory, then generate the escrow key pair. Store the private bundle offline.
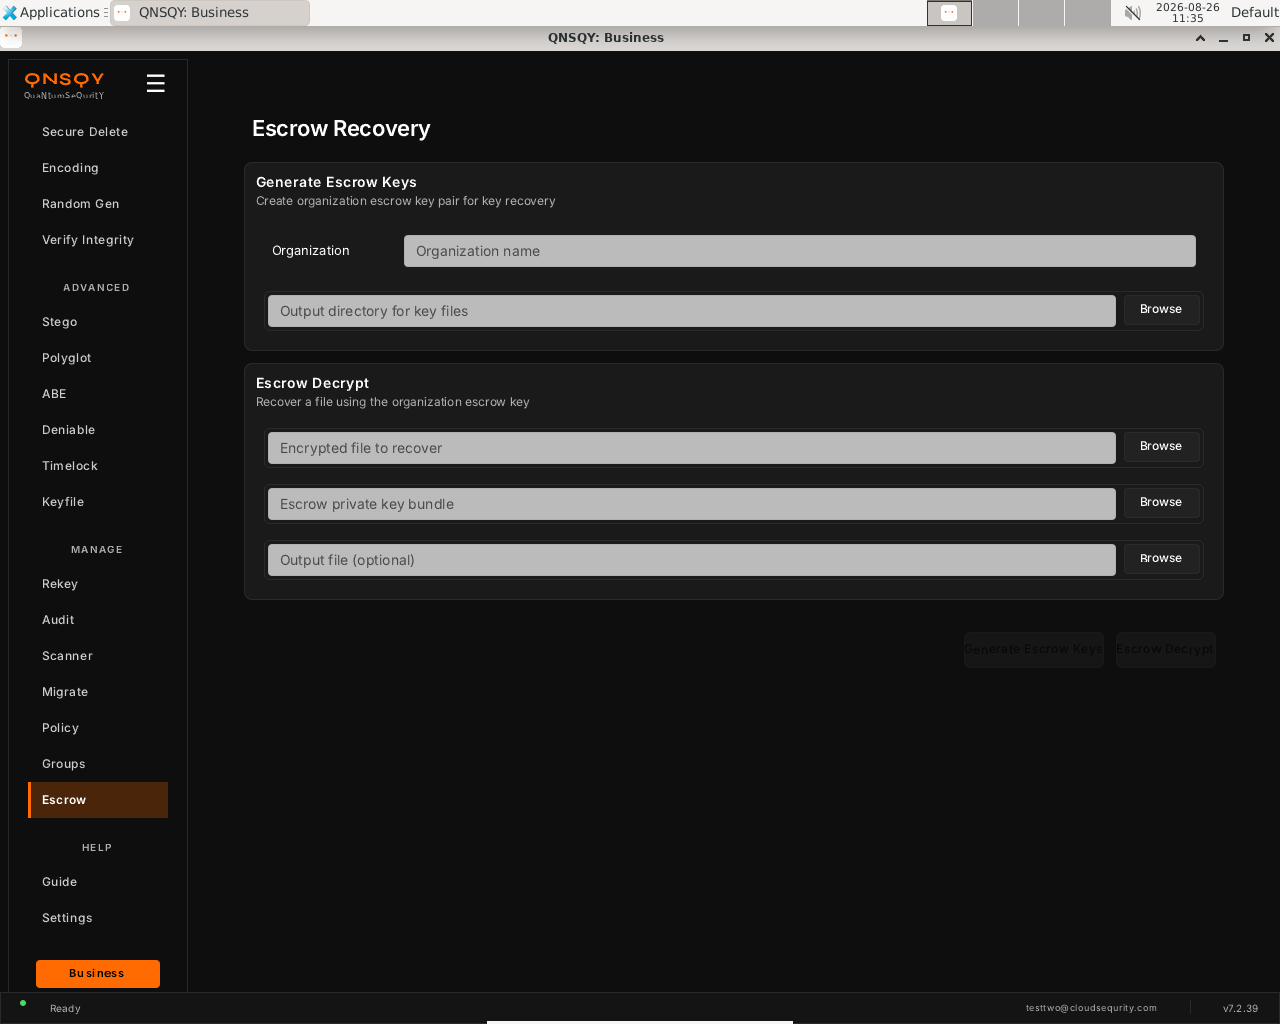
Escrow Recovery (Linux) To recover data, use Escrow Decrypt: pick the encrypted file, the escrow private key bundle, and an output file.
Click the matching action button. Escrow lets an organization recover a file when the individual key is lost.
Prefer the terminal? This screen runs
qnsqy escrow-keygen --org "Acme Health"
Watch (Linux GUI)
Watch (Windows GUI)
On Windows 11 (Business tier): the same escrow screen and inputs, shown filled and ready. A live key-generation run is not captured on either OS because it writes private escrow key material.
Launch the TUI with qnsqy --tui. Use j/k to highlight Escrow and press Enter.
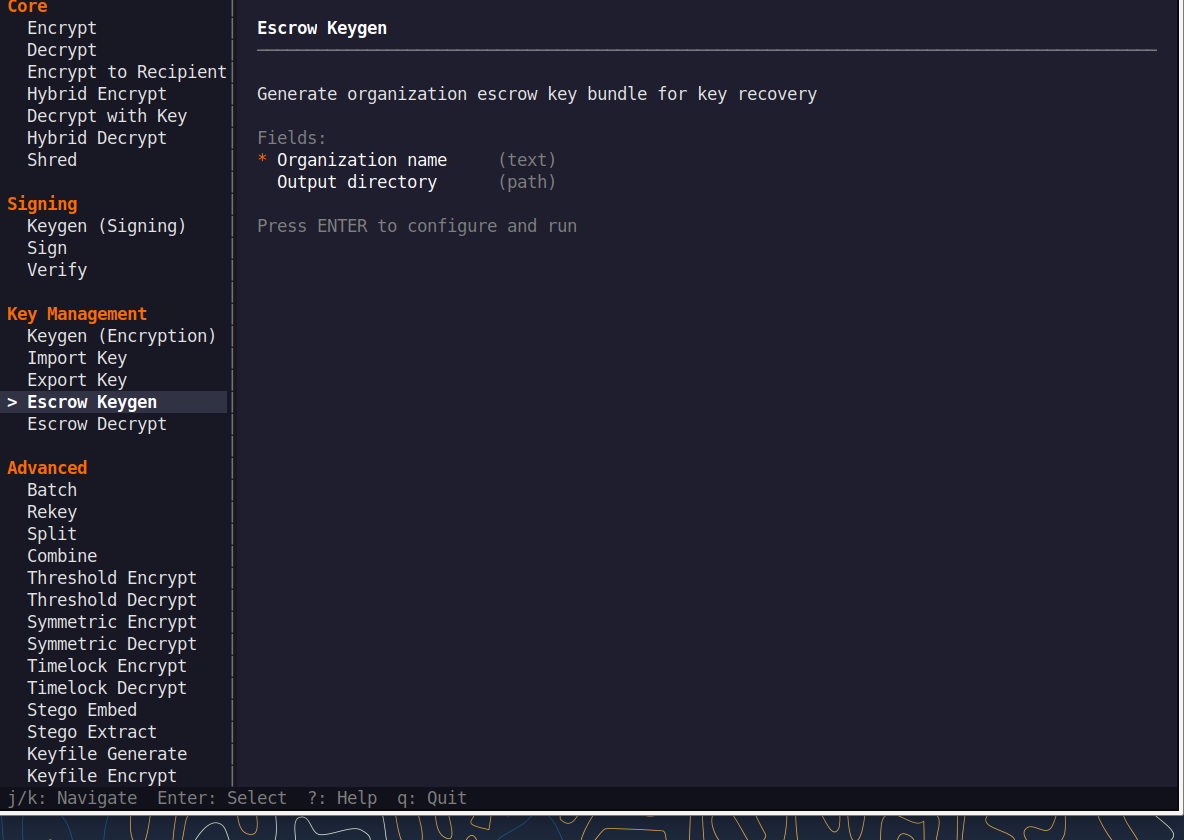
Fill the fields (Tab moves, Enter toggles), then press F5 to run. A live Equivalent command line updates as you type.
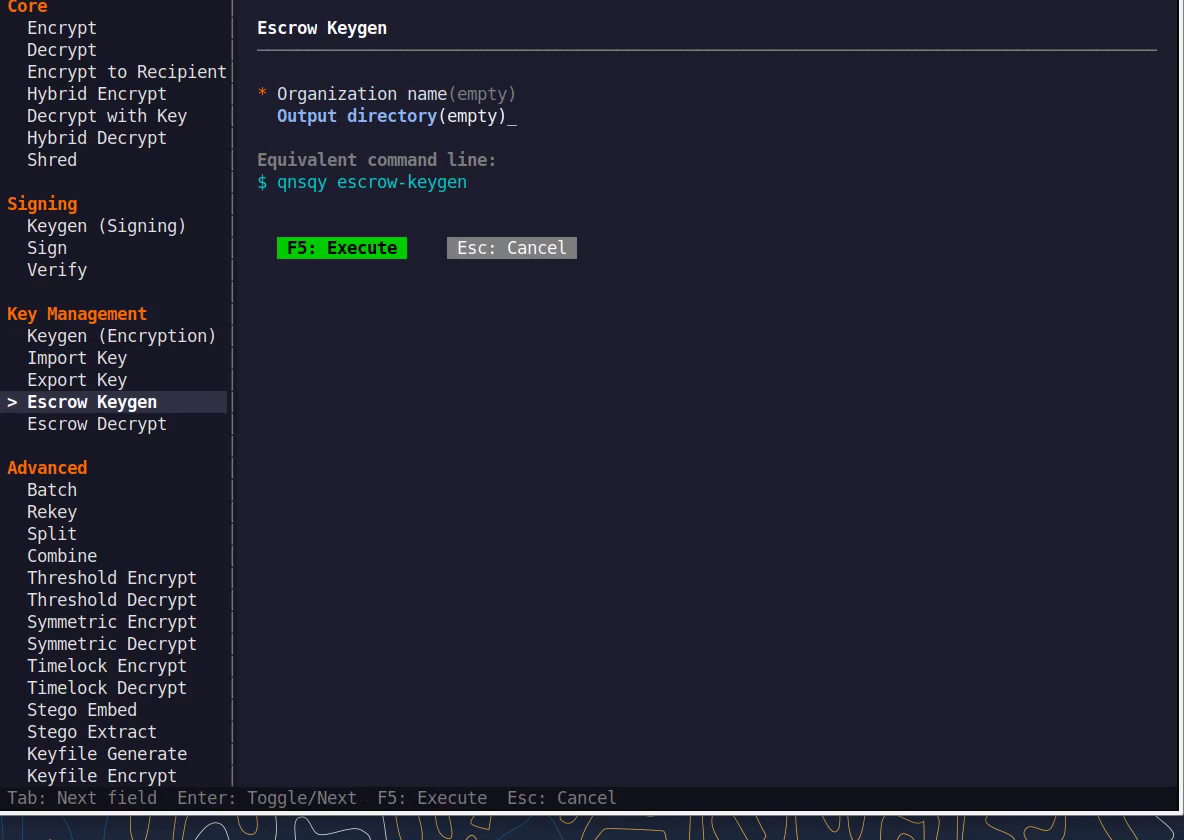
Equivalent command line (shown in the TUI too)
qnsqy escrow-keygen --org "Acme Health"Watch (Linux TUI)
Watch (Windows TUI)
Keys: j/k navigate · Enter select/toggle · Tab next field · F5 execute · Esc cancel · q quit.
qnsqy escrow-keygen ; qnsqy escrow-decrypt
Linux
qnsqy escrow-keygen --org "Acme Health"
qnsqy escrow-decrypt --input locked.qs --escrow-key acme-escrow.bundle -o locked.txt
Windows (PowerShell)
qnsqy.exe escrow-keygen --org "Acme Health" --acknowledge-no-sandbox
qnsqy.exe escrow-decrypt --input locked.qs --escrow-key acme-escrow.bundle -o locked.txt --acknowledge-no-sandbox
| Flag | Value | What it does |
|---|---|---|
| escrow-keygen --org | <ORG> | Organization name for the escrow key. |
| escrow-keygen -o | <DIR> | Output directory (default "."). |
| escrow-keygen --password-stdin | flag | Read the passphrase (and confirmation) from stdin. |
| escrow-keygen --no-passphrase | flag | Create the escrow key without a passphrase. |
| escrow-decrypt --input | <IN> | The encrypted file to recover. |
| escrow-decrypt --escrow-key | <BUNDLE> | The organization escrow bundle. |
| escrow-decrypt -o | <FILE> | Output file. |
| escrow-decrypt -f | flag | Force overwrite. |
Output
[documented from §7, org recovery key generation + emergency decrypt. Escrow lets an organization recover data if an individual key is lost; guard the escrow bundle carefully.]
Documented from the verified --help; not run live here.
Common combinations
Generate an org escrow key with a passphrase, then store it offline.
Emergency-decrypt a departed employee's file with the escrow bundle.
Watch (Linux CLI)
Shows the command-line usage (qnsqy escrow-keygen --help). A real run is not shown because generating an escrow key prints secret key material.
Watch (Windows CLI)
Command-line usage on Windows 11 (--help). The written examples above show the full invocation; a real run is not shown here (it needs keys/setup or would print secret material).
Watch (Windows CLI)
Account & Billing
All tiers Command-lineManage your QNSQY account from the terminal: sign in, check your tier, credits and usage, manage devices and API keys, and sync receipts. Your tier is always decided by the billing server at runtime.
This is a command-line feature, there is no dedicated GUI screen in the app. Run it from a terminal (Linux/macOS/Windows). The same binary and flags work everywhere.
qnsqy account <info|set-company|set-user|set-email|set-org|new-key|list-keys|revoke-key> ; qnsqy login/logout/signup/status/usage/quickstart/reset-state ; devices <list|remove|rename> ; receipts <sync|verify|status>
Linux
qnsqy status        (tier, credits, plan)
qnsqy login -e [email protected]
qnsqy usage
Windows (PowerShell)
qnsqy.exe status
| Flag | Value | What it does |
|---|---|---|
| account info | account set-* | <VALUE> | View or set account fields (set-company/user/email/org). |
| login -e, --email | <EMAIL> | Sign in with this email; password is prompted. |
| login --sso | <slug> | Sign in through your organization's SSO. |
| signup --email | <EMAIL> | Email for a new account. |
| signup --name | <NAME> | Name for a new account. |
| signup --no-auto-login | flag | Create the account without logging in. |
| receipts sync | flag | Sync receipts from the billing server (network). |
| receipts verify | flag | Verify receipts locally. |
| receipts status | flag | Show receipt status. |
| devices list | flag | List your enrolled devices. |
| devices remove | <ID> | Remove a device by ID. |
| devices rename | <ID> <NAME> | Rename a device. |
Output (qnsqy status ; qnsqy usage)
QNSQY Account Status
Logged in:    Yes
Tier:         Business
Plan:         business_yearly
Usage:        Unlimited
Period ends:  2026-09-15T02:10:15.526Z

Manage subscription: https://quantumsequrity.com/dashboard

QNSQY Billing Usage
===================
Plan:   Business
Usage:  Unlimited
Usage:  [------------------------------------] 0.0%
Watch (Linux CLI): qnsqy status ; qnsqy usage
A real logged-in Business account on Linux. Your tier and usage are decided by the billing server at runtime, not baked into the binary.
Version & algorithm inventory
qnsqy version --verbose prints the build version and the full set of algorithms your tier can use (KEM, signatures, AEAD, KDF, hashing) plus the credit-free rules.
qnsqy version --verbose
Watch (Linux CLI): qnsqy version --verbose
Common combinations
First-time interactive setup (account creation, login, first encryption)
qnsqy quickstart
Reset corrupted local state (rate-limit, audit-log or config errors)
qnsqy reset-state
List your devices
qnsqy devices list
Rotate an API key
qnsqy account new-key --name laptop ; qnsqy account revoke-key <OLD_ID>
Provenance
Business Command-lineWatch (Windows CLI)
Create an on-device signing identity and stamp files with a tamper-evident provenance trailer, so you can later prove which enrolled device produced a given file.
This is a command-line feature, there is no dedicated GUI screen in the app. Run it from a terminal (Linux/macOS/Windows). The same binary and flags work everywhere.
qnsqy provenance <enroll|sign|verify|scan|keys|trust>
Linux
qnsqy provenance enroll --algorithm ml-dsa87
qnsqy provenance sign report.txt -y            (appends a QPRV trailer IN-PLACE; -y to skip the destructive-op confirm)
qnsqy provenance verify report.txt
Windows (PowerShell)
add --acknowledge-no-sandbox; qnsqy.exe.
| Flag | Value | What it does |
|---|---|---|
| enroll --algorithm | ml-dsa44|65|87 | Algorithm for the on-device identity (default ml-dsa87). |
| sign <FILE> | <FILE> | Sign a file; appends a QPRV trailer in place (irreversible). |
| sign -y | flag | Skip the destructive-operation confirmation. |
| sign -f | flag | Force. |
| verify <FILE> | <FILE> | Verify a file's provenance trailer. |
| verify --expect-key-id | <KEY_ID> | Require a specific signing key ID. |
| verify --require-signed | flag | Fail if the file is not signed. |
| scan <DIR> | <DIR> | Scan a directory for provenance. |
| scan -r | flag | Recurse into subdirectories. |
| scan --expect-key-id | <KEY_ID> | Require a specific key ID during the scan. |
| scan --allow-unsigned | flag | Permit unsigned files during the scan. |
| keys | flag | List provenance keys. |
| trust <KEY_ID> | <KEY_ID> | Trust another account's key. |
Output
Enrolled provenance identity.
key_id:    0748b1c59e4e0f17169653c9e9f0242a
algorithm: MlDsa44
Private key stored on this device only (machine-key wrapped).
Common combinations
Prove a whole release tree
provenance scan ./release -r
Trust another account's key
provenance trust <KEY_ID>
Watch (Linux CLI)
A real enroll → sign → verify flow on Linux (device identity, QPRV trailer, verified INTACT with ML-DSA-87).
Watch (Windows CLI)
Command-line usage on Windows 11 (--help). The written examples above show the full invocation; a real run is not shown here (it needs keys/setup or would print secret material).
Key import/export
Pro & up Command-lineMove keys in and out of the managed keystore: export a key (public-only to share) or import someone else's public key.
This is a command-line feature, there is no dedicated GUI screen in the app. Run it from a terminal (Linux/macOS/Windows). The same binary and flags work everywhere.
qnsqy key-export ; qnsqy key-import
Linux
qnsqy key-export --name alice --output alice.pub --public-only
qnsqy key-import --file bob.pub --name bob
Windows (PowerShell)
qnsqy.exe key-export ... ; qnsqy.exe key-import ...
| Flag | Value | What it does |
|---|---|---|
| key-export --name | <NAME> | Name of the keystore key to export |
| key-export --output | <FILE> | File to write the exported key to |
| key-export --public-only | Export just the shareable public key | |
| key-import -f, -i, --file | <FILE> | Key file to import (aliases -i/--input) |
| key-import --name | <NAME> | Name to store the imported key under |
| key-import --force | Overwrite an existing key (long option only) |
Output
[documented from §7, moves keys in/out of the managed keystore. --public-only exports just the shareable public key.]
Documented from the verified --help; not run live here.
Common combinations
Export only the public key to share
qnsqy key-export --name alice --output alice.pub --public-only
Import a colleague's public key
qnsqy key-import --file colleague.pub --name colleague
Watch (Windows CLI)
Command-line usage on Windows 11 (--help). The written examples above show the full invocation; a real run is not shown here (it needs keys/setup or would print secret material).
Release signing
Tooling Command-lineWatch (Linux CLI)
Sign and verify release artifacts with a detached ML-DSA-87 (NIST FIPS 204, level 5) signature for supply-chain integrity.
This is a command-line feature, there is no dedicated GUI screen in the app. Run it from a terminal (Linux/macOS/Windows). The same binary and flags work everywhere.
qnsqy sign-release --input <ARTIFACT> --key <PRIV> --output <SIG> ; qnsqy verify-release <ARTIFACT> <SIGNATURE> [--pubkey <hex|@file>]
Linux
qnsqy sign-release --input qnsqy-7.2.40.tar.gz --key release.key --output qnsqy-7.2.40.sig
qnsqy verify-release qnsqy-7.2.40.tar.gz qnsqy-7.2.40.sig --pubkey @release.pub.hex
Windows (PowerShell)
qnsqy.exe sign-release ... ; qnsqy.exe verify-release ...
| Flag | Value | What it does |
|---|---|---|
| sign-release --input | <ARTIFACT> | Artifact to sign |
| sign-release --key | <PRIV> | ML-DSA-87 private signing key |
| sign-release --output | <SIG> | Detached signature file to write |
| sign-release --hex | Write the signature hex-encoded | |
| verify-release ARTIFACT | <ARTIFACT> | Artifact to verify (positional) |
| verify-release SIGNATURE | <SIGNATURE> | Signature file (positional) |
| verify-release --pubkey | <hex|@file> | Public key as raw hex or @file (5184 hex chars for ML-DSA-87) |
Output
Signed: qnsqy-7.2.40.tar.gz
Algorithm:  ML-DSA-87 (NIST FIPS 204, level 5)
Artifact:   qnsqy-7.2.40.tar.gz
Signature:  qnsqy-7.2.40.sig (4627 bytes raw)
Common combinations
Write a hex-encoded signature
qnsqy sign-release --input app --key k --output app.sig --hex
Supply-chain gate in CI
qnsqy verify-release app app.sig --pubkey @trusted.hex
Watch (Windows CLI)
Command-line usage on Windows 11 (--help). The written examples above show the full invocation; a real run is not shown here (it needs keys/setup or would print secret material).
Choosing the algorithm
Watch (Windows CLI)
Watch (Windows CLI)
Watch (Windows CLI)
Watch (Windows CLI)
Watch (Windows CLI)
Watch (Windows CLI)
Watch (Windows CLI)
Watch (Windows TUI)
Watch (Linux TUI)
QNSQY is a full post-quantum toolkit, not a single-cipher app. You choose the method (password, public key, or a hybrid of both), the KEM family and security level for encryption (ML-KEM-512/768/1024, or HQC), and the signature family (ML-DSA, SLH-DSA, FN-DSA, or stateful LMS) with its level. This section shows where those choices live in the GUI and on the command line. Which options you can pick depends on your tier.
In the GUI
On the Encrypt screen, open Encryption Method to switch between password, public key and hybrid, then expand Advanced (Business) to pick the cipher and KDF. On the Keys screen, the Algorithm and Security Level dropdowns choose the exact PQC scheme your keypair uses.
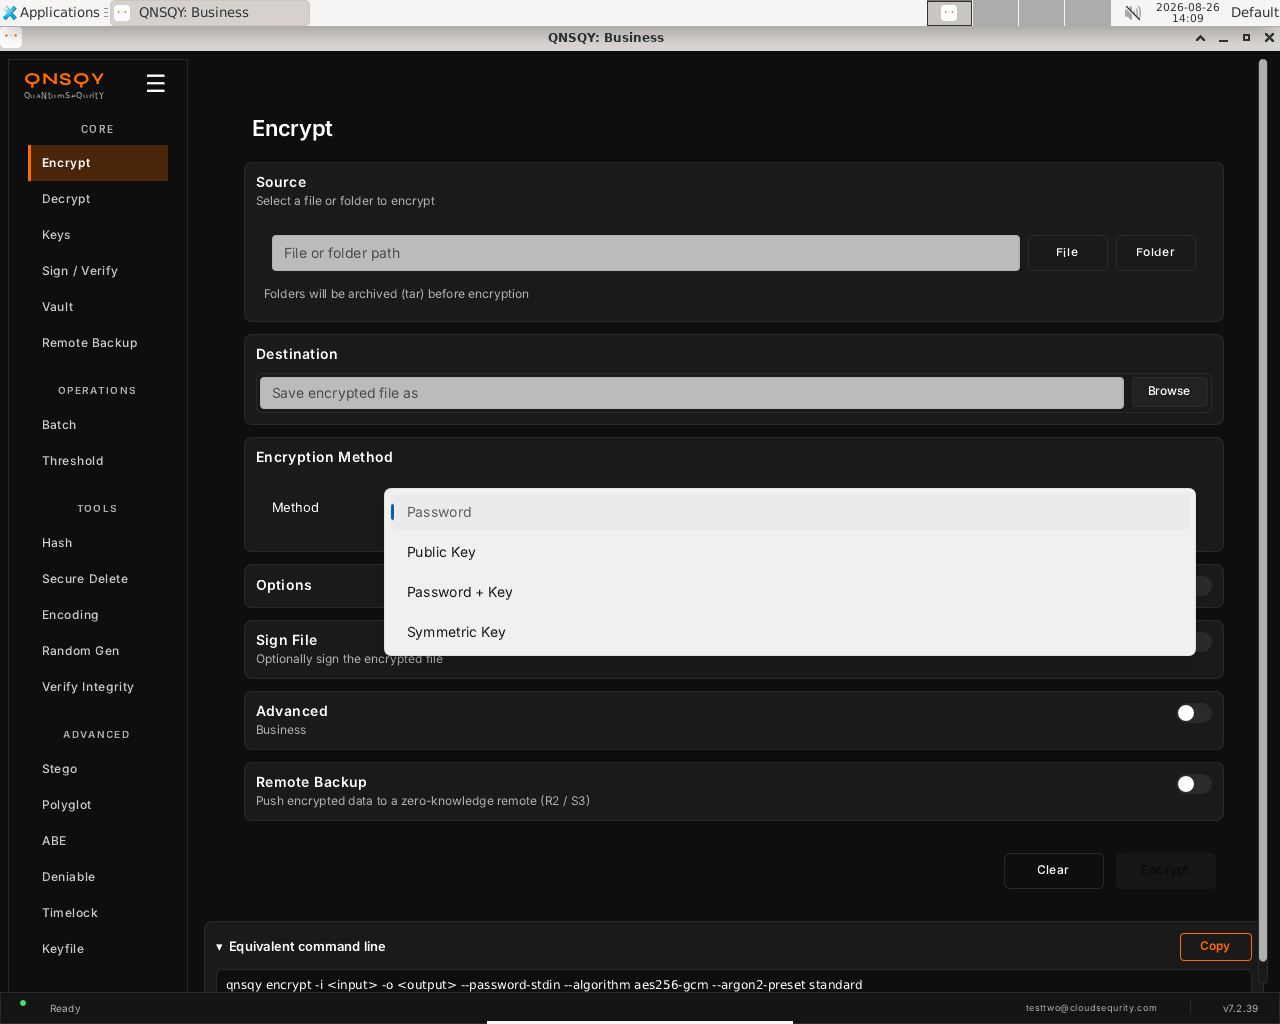
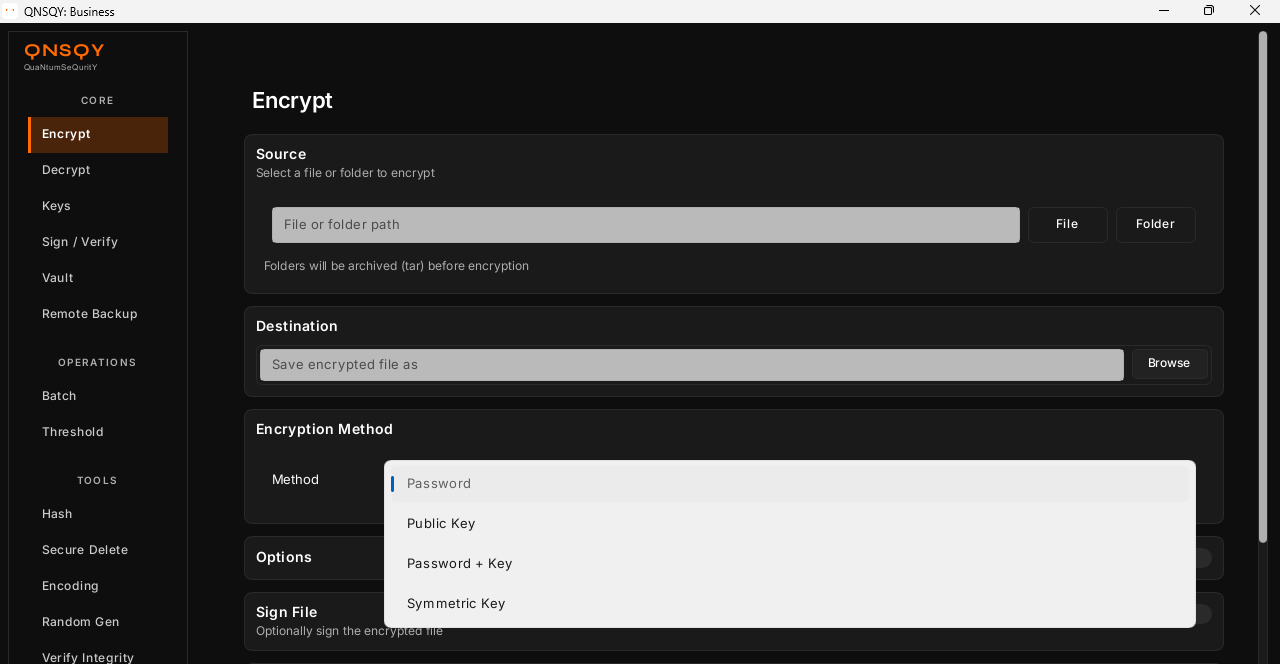
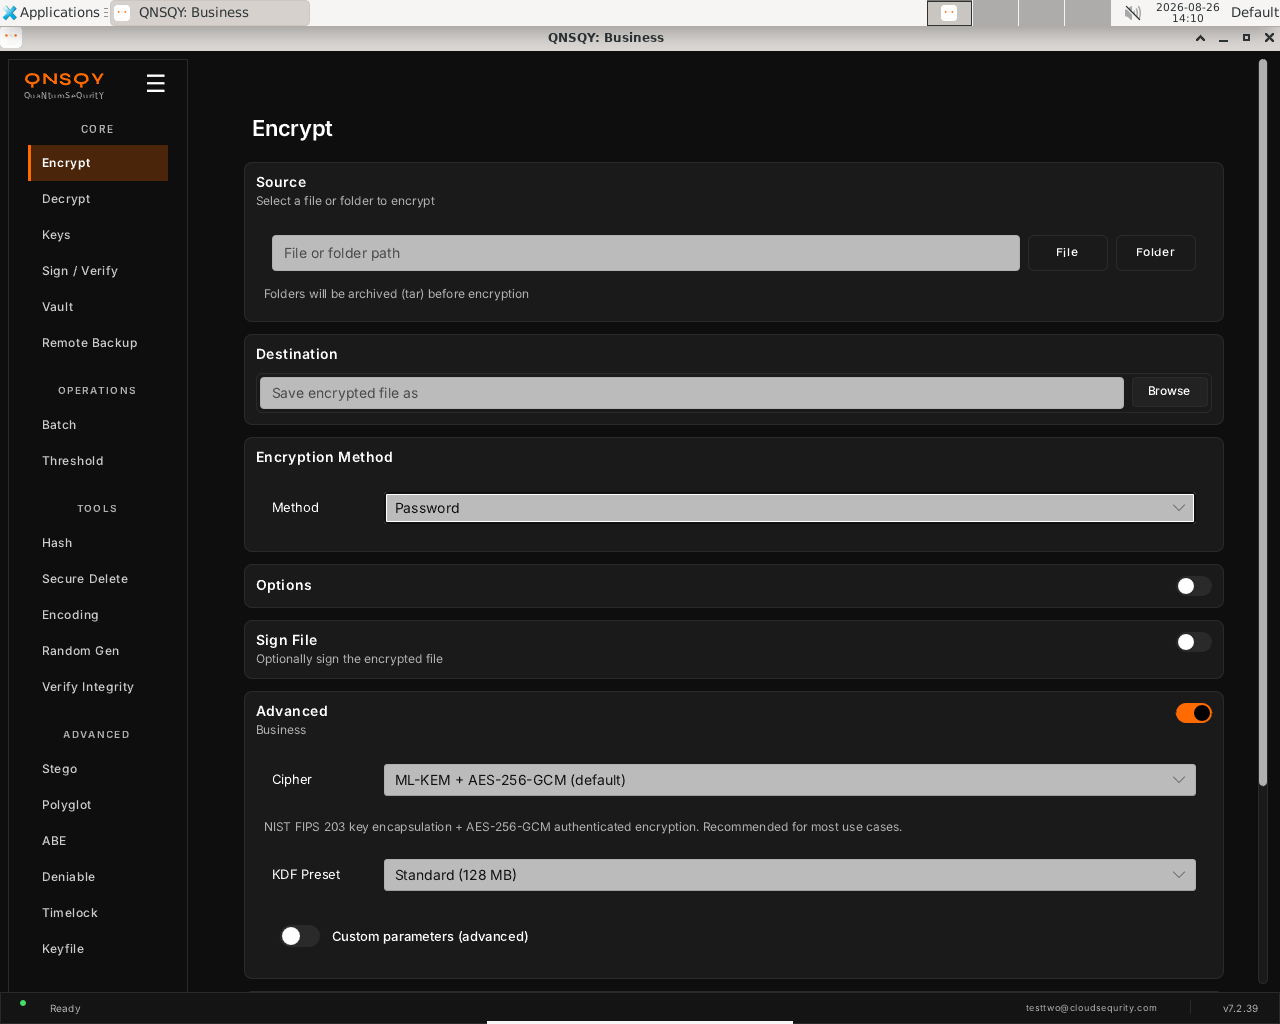
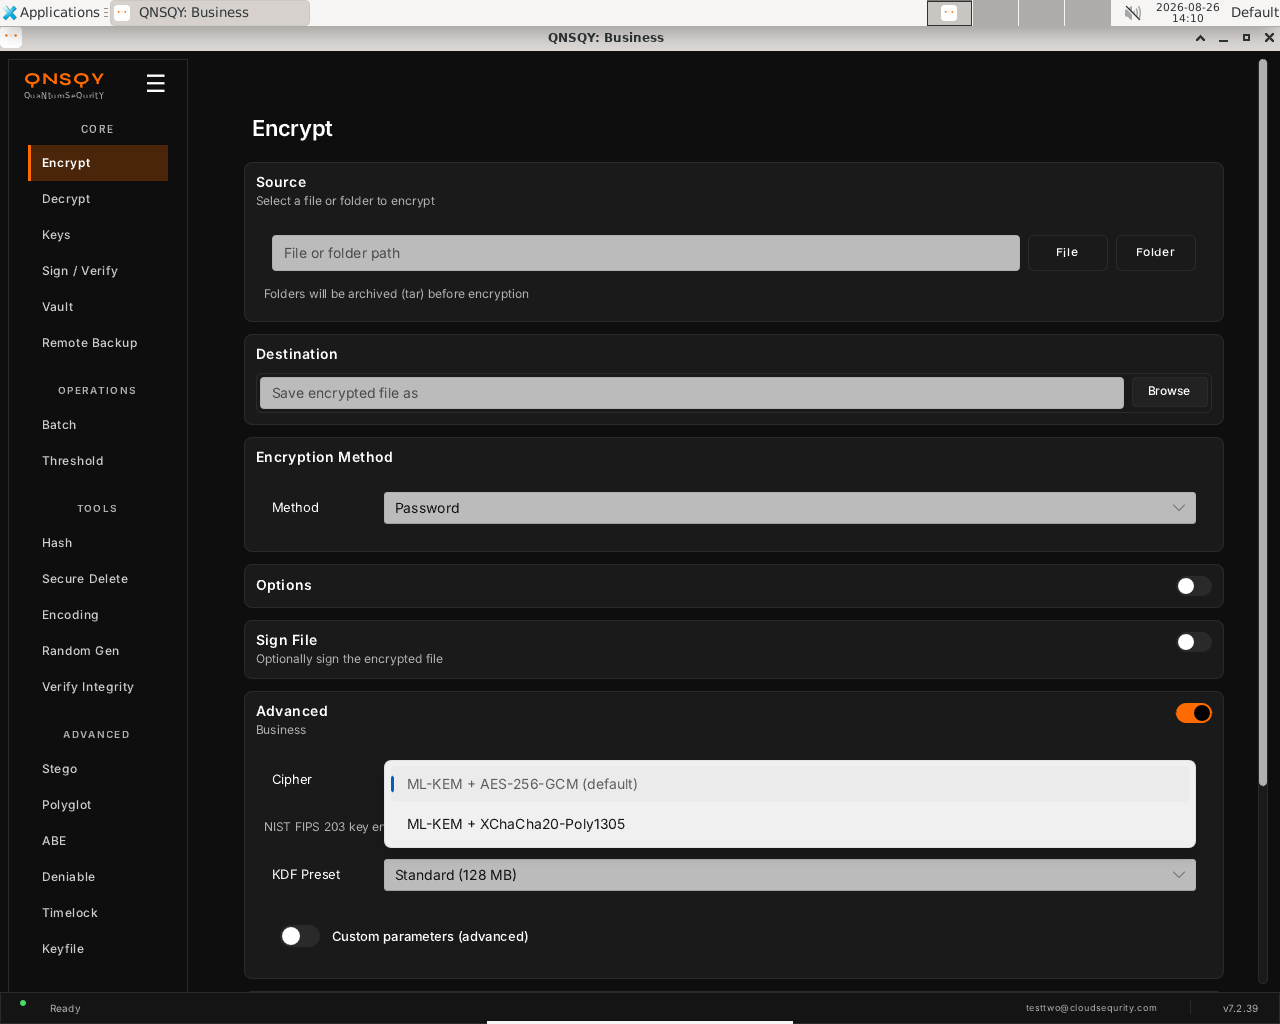
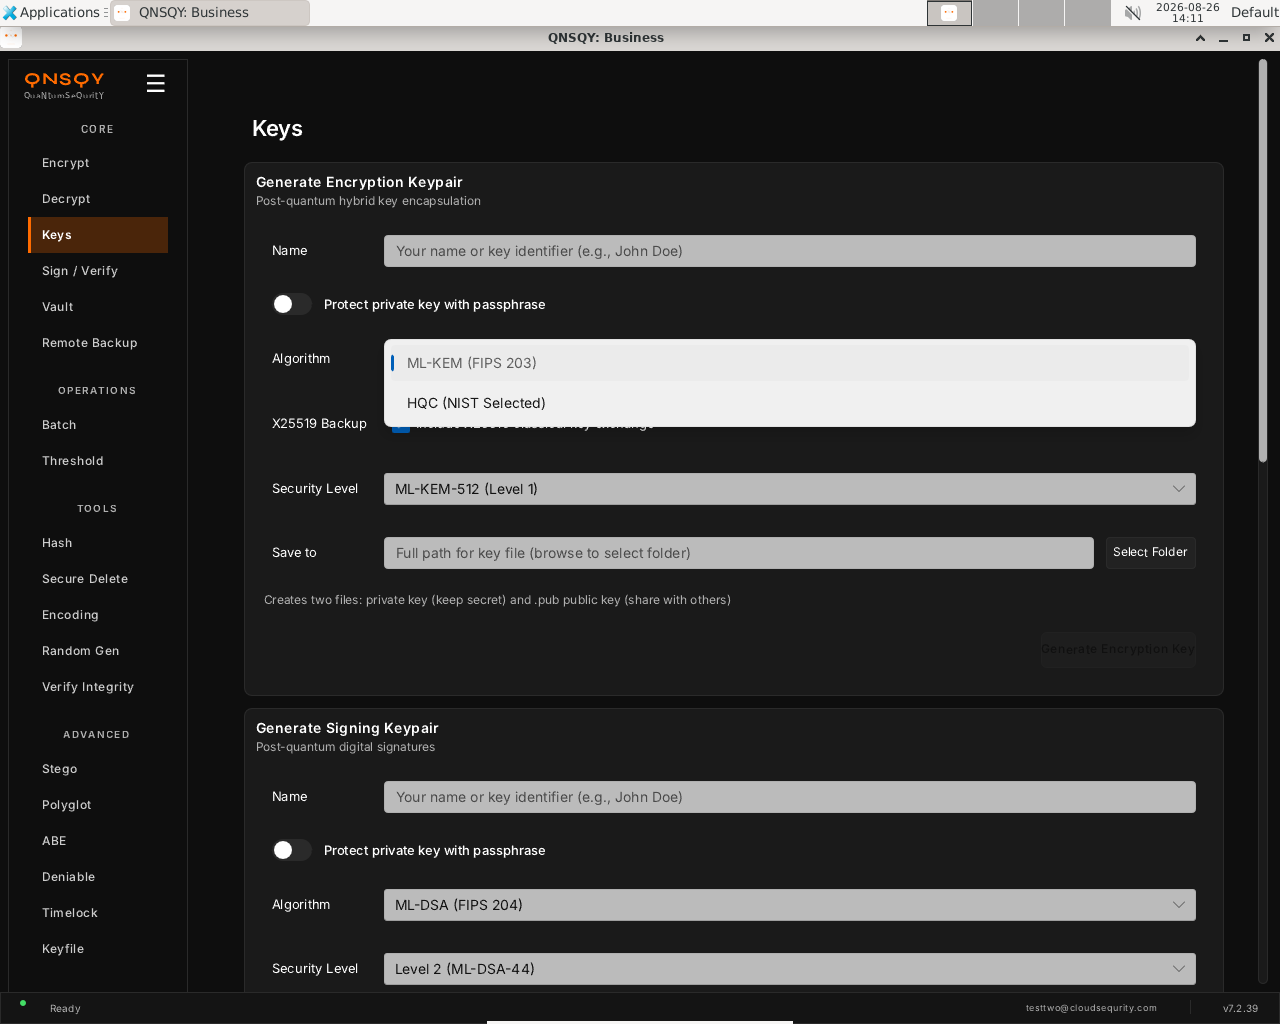
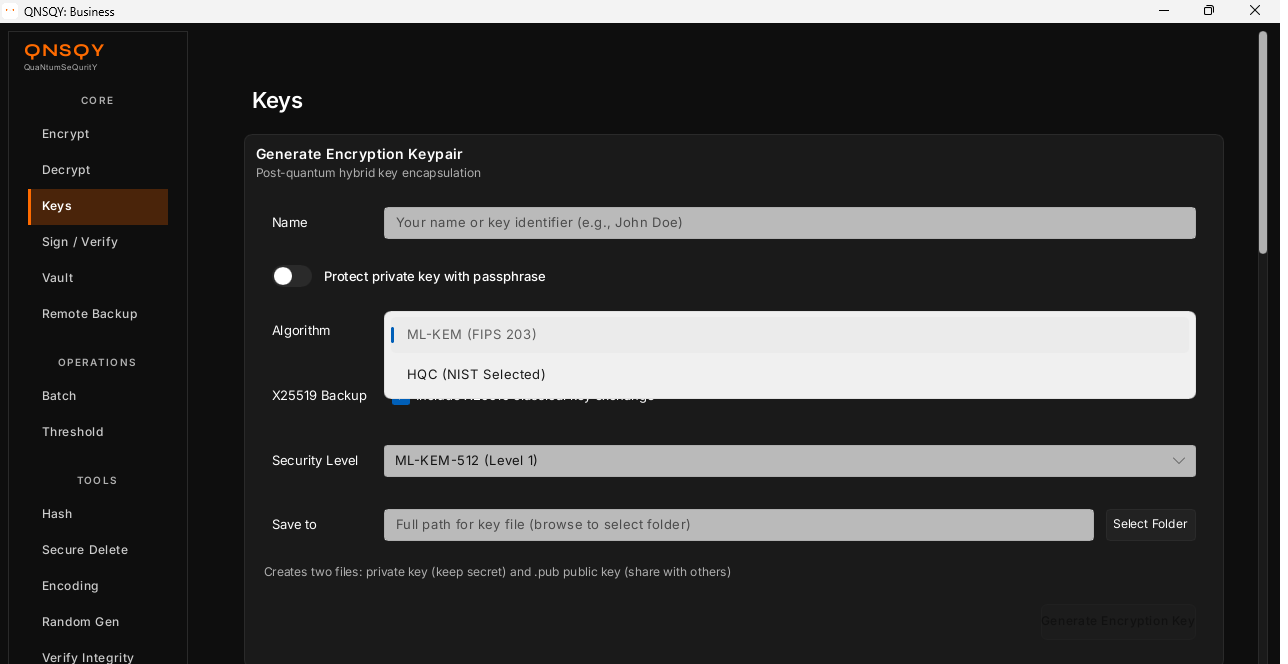
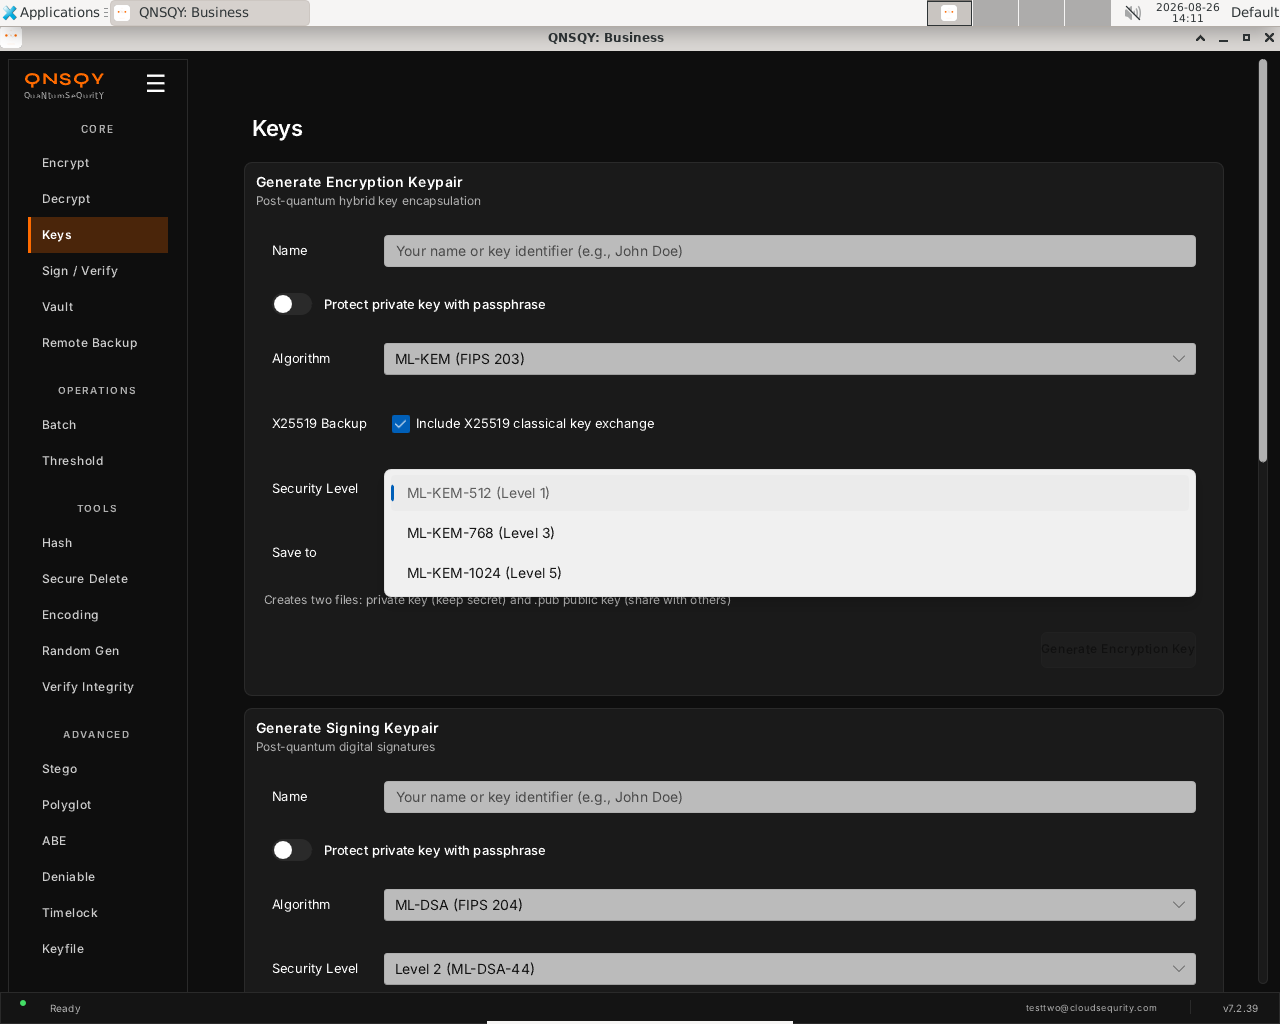
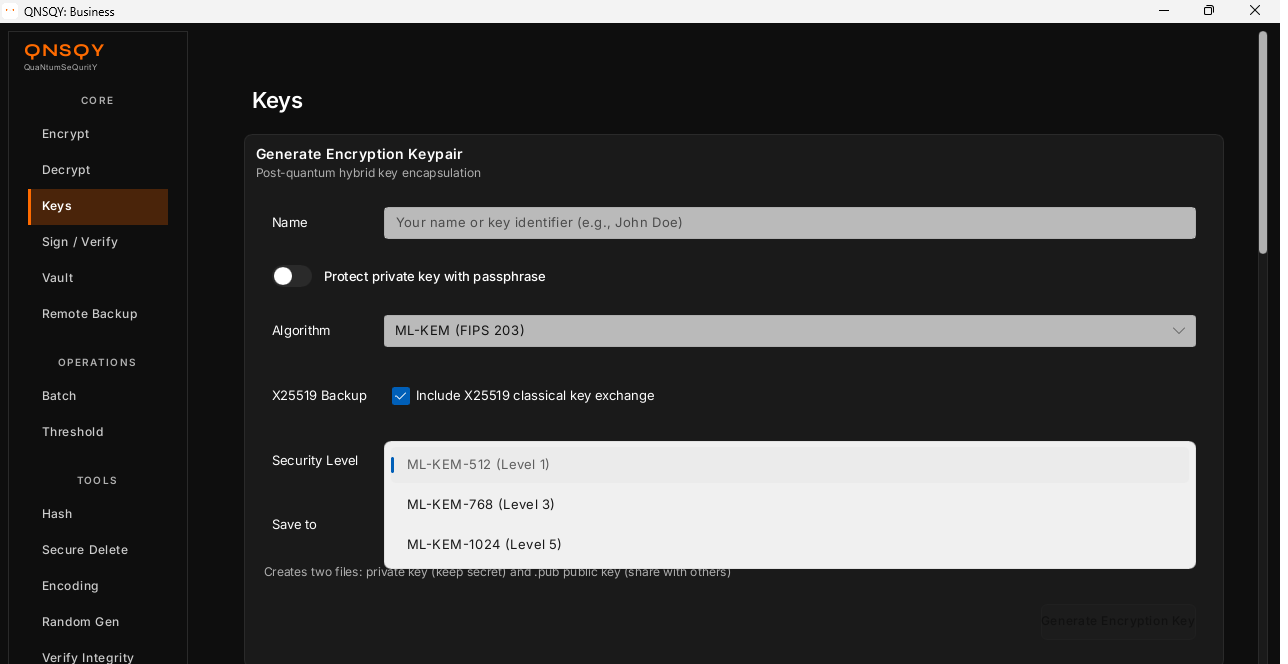
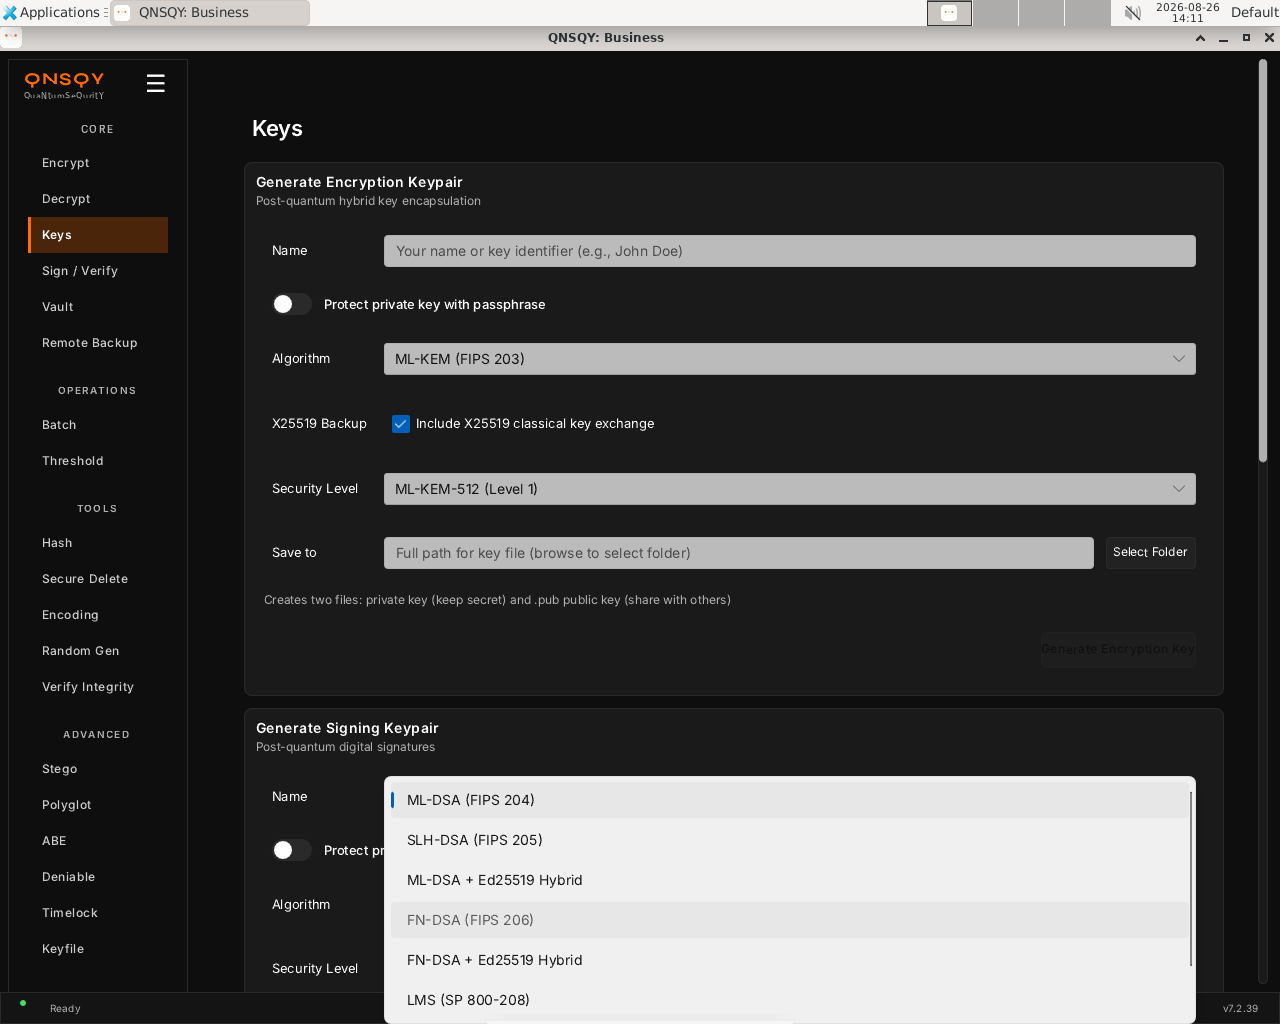
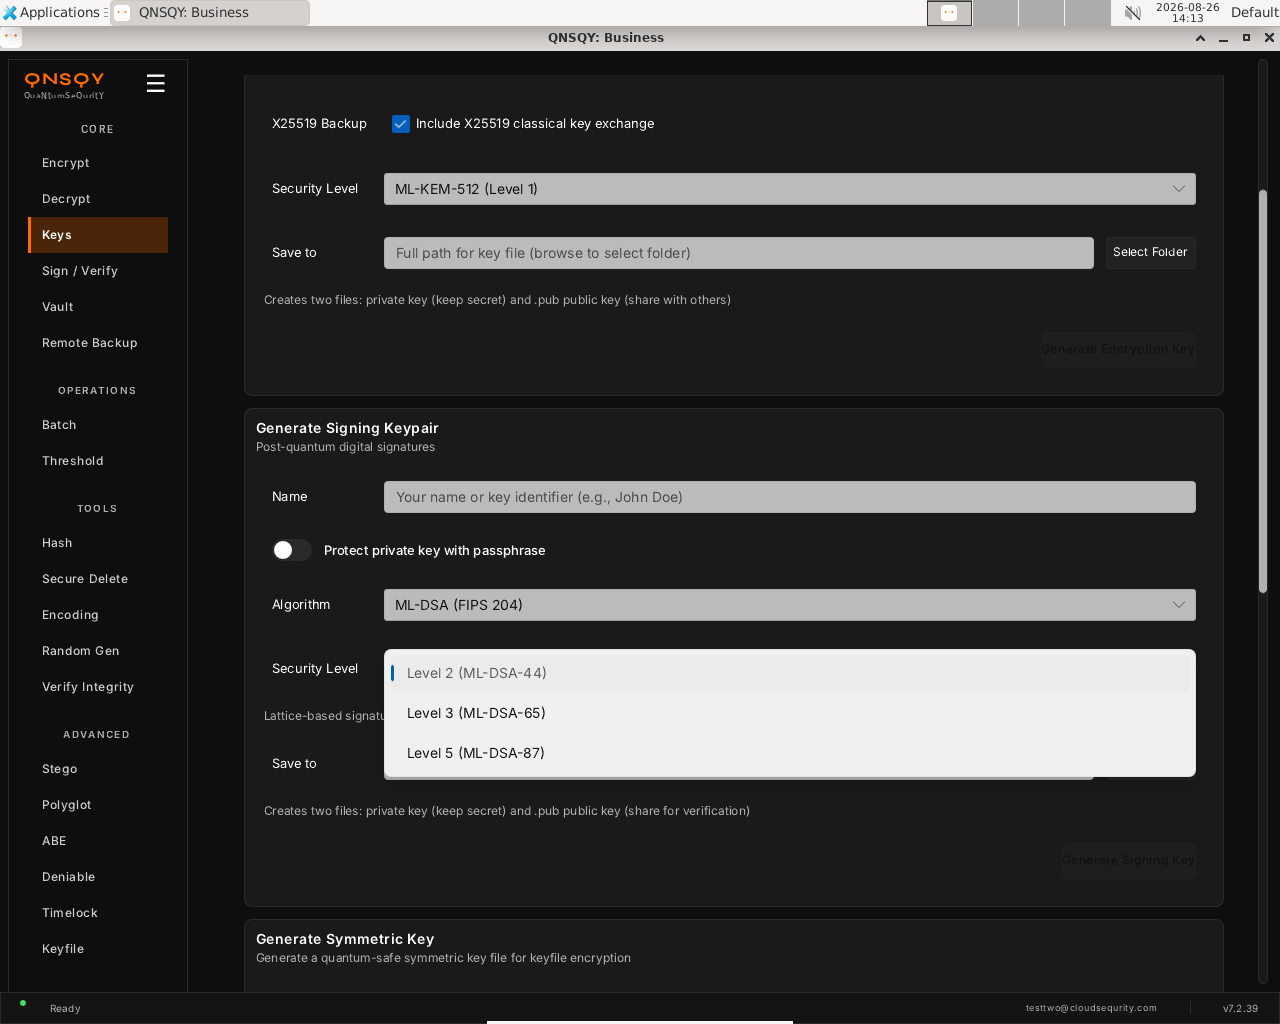
The three encryption methods
The Method dropdown maps to three ways to lock a file. Here is each one run end to end on the command line:
1. Password (Argon2id) — anyone with the password can open it
qnsqy encrypt -i doc.txt -o doc-pw.qs --password-stdin → “Encrypted to: doc-pw.qs”.
2. Public key (recipient) — no password, opens only with the matching private key
qnsqy encrypt … --recipient vaultkey.pub → algorithm ML-KEM-1024 + X25519, no password required.
3. Hybrid (public key + password) — needs BOTH to open
qnsqy encrypt … --recipient vaultkey.pub --hybrid --password-stdin → ML-KEM-1024 + X25519. Decrypt needs both the private key AND the password.
On the command line
Every choice is a flag, so scripts pin the exact algorithm:
qnsqy keygen-enc --name alice --algorithm ml-kem1024      # Pro: ML-KEM-1024 + X25519
qnsqy keygen-sign --name signer --algorithm ml-dsa87     # Pro: ML-DSA-87 (Level 5)
qnsqy encrypt -i report.txt -o report.qs --recipient alice.pub --hybrid    # KEM + password
qnsqy encrypt -i report.txt -o report.qs --password-stdin --algorithm x-cha-cha20-poly1305   # Pro: XChaCha20
Watch (Linux CLI): keygen-enc --algorithm ml-kem1024
Watch (Linux CLI): keygen-sign --algorithm ml-dsa87
Watch (Linux CLI): encrypt --recipient --hybrid (ML-KEM-1024 + X25519)
Watch (Linux CLI): symmetric --algorithm x-cha-cha20-poly1305
In the TUI
Run qnsqy --tui, highlight an operation with j/k and press Enter. The configure form exposes the same choices, including an Algorithm field you cycle with Enter, and a live Equivalent command line. Here it is on Windows:
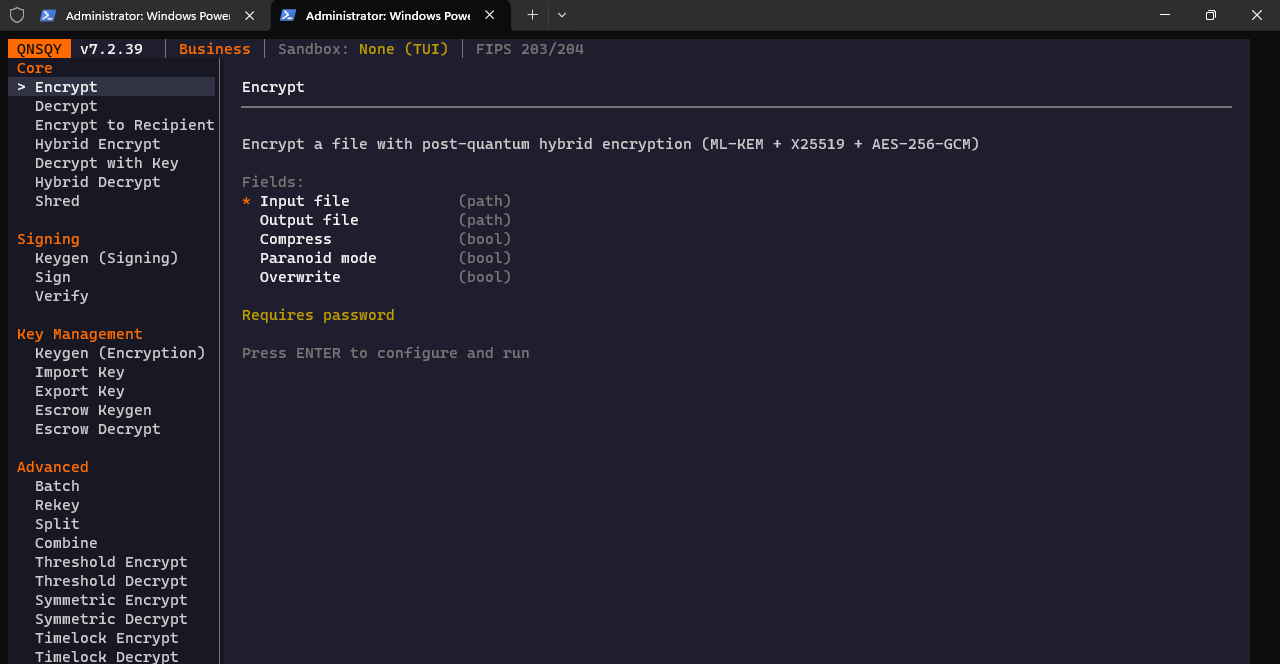
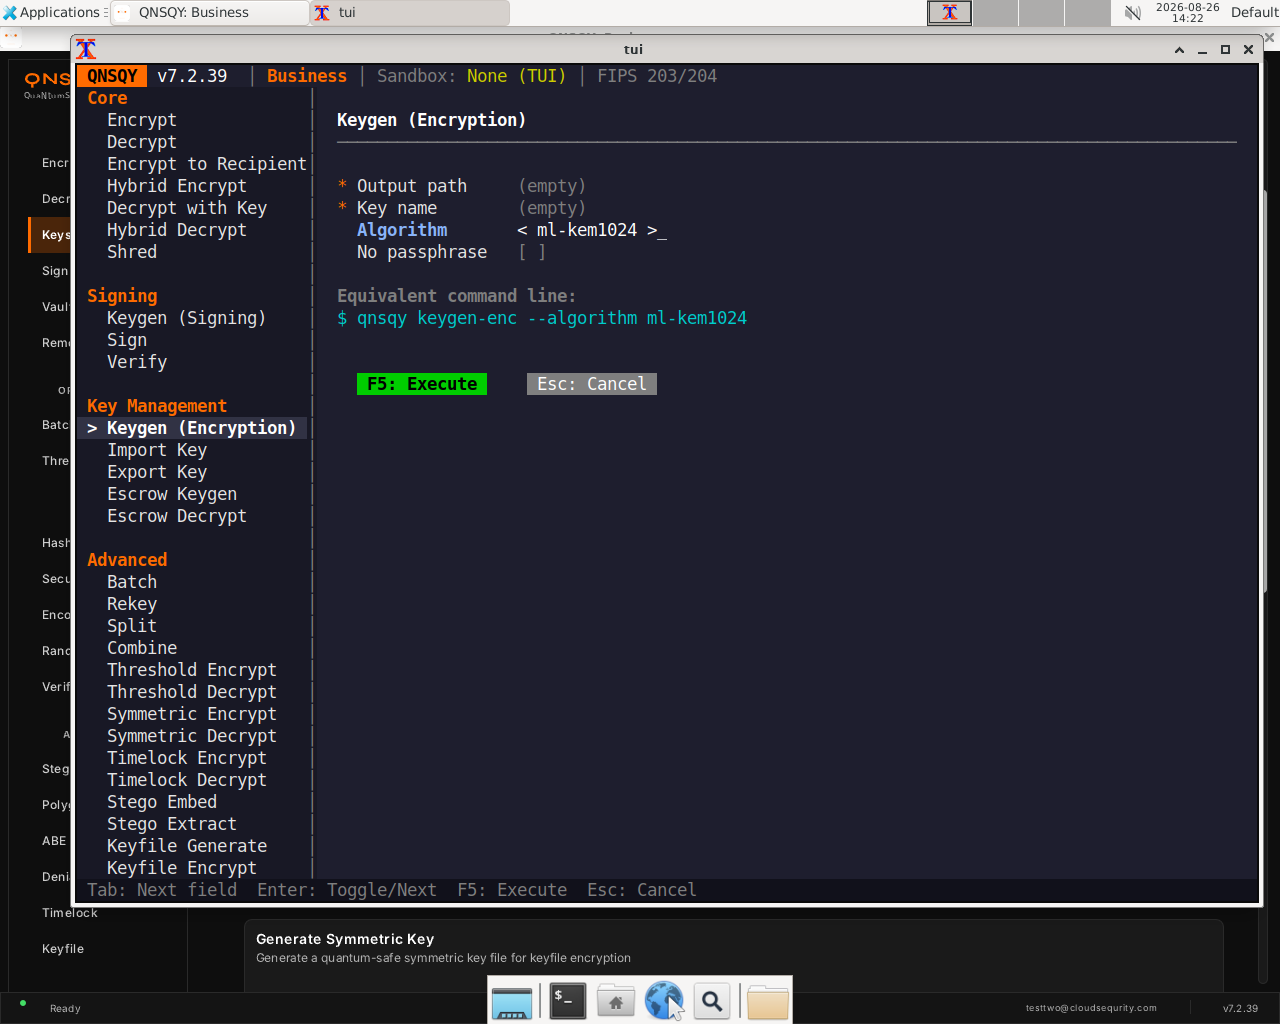
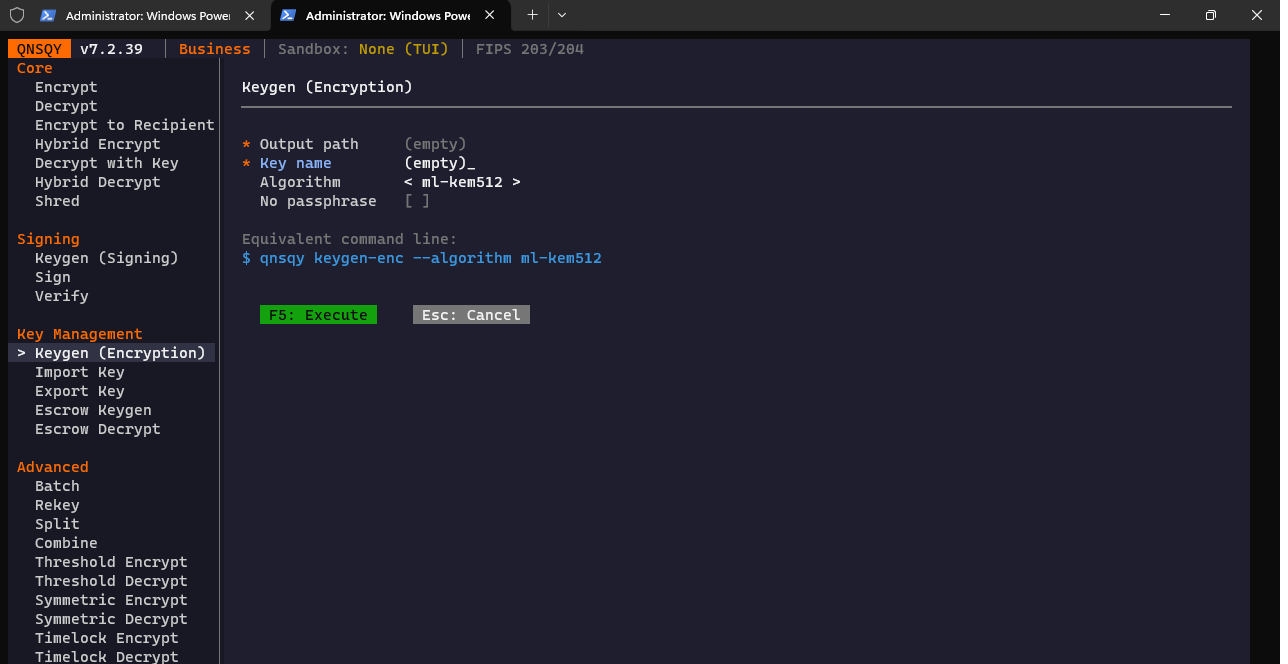
< ml-kem512 >) with the live qnsqy keygen-enc --algorithm ml-kem512Watch (Windows TUI): menu → Keygen algorithm form
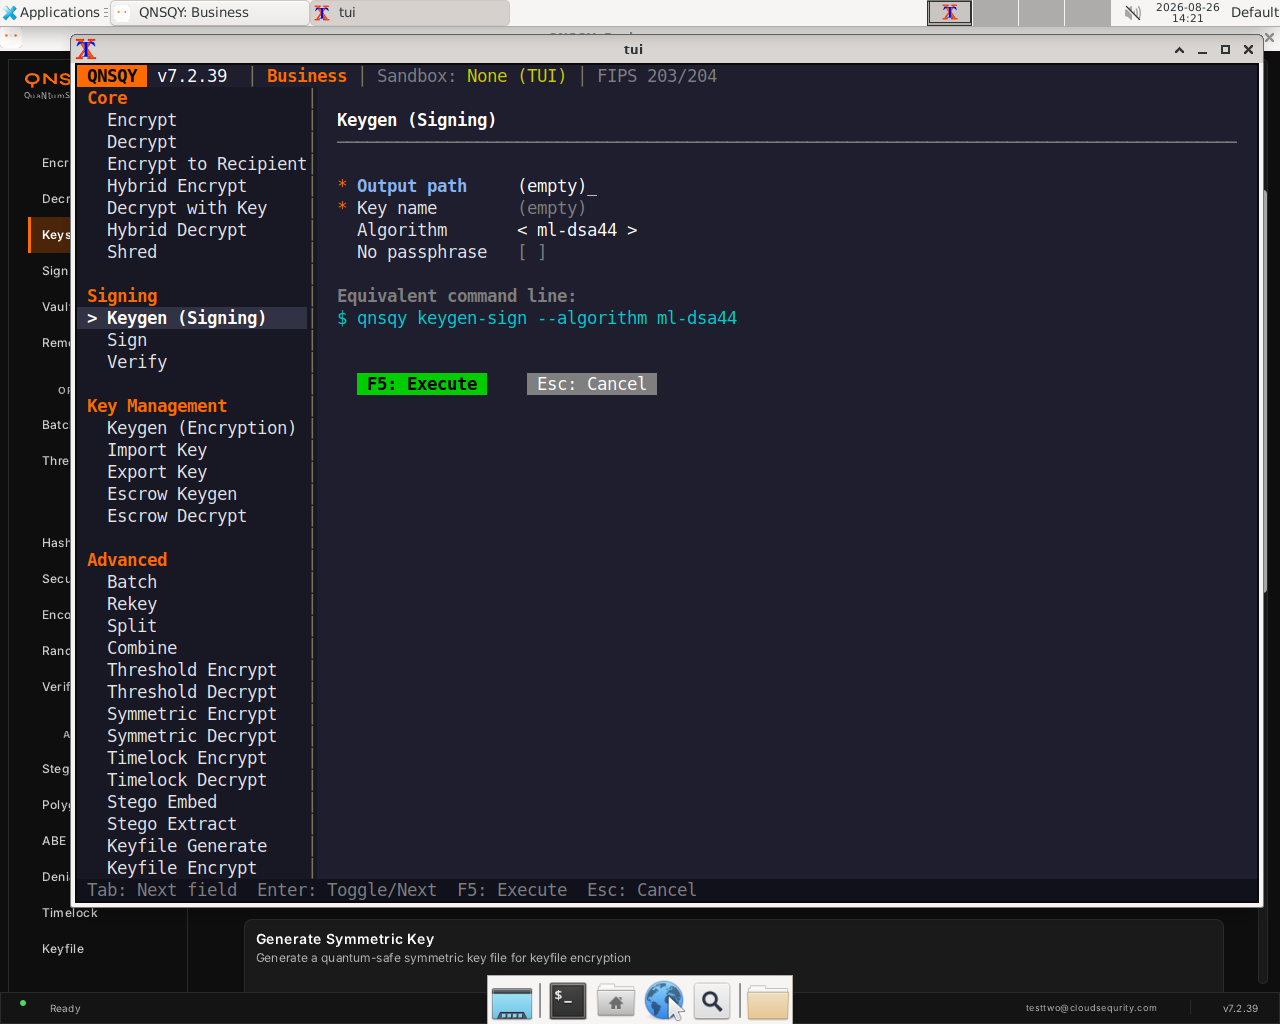
Watch (Linux TUI): choosing the signing algorithm
Windows shows the same dropdowns and accepts the same flags. The Windows captures of the Method, Algorithm and Security-Level pickers are shown alongside their Linux counterparts above.
Tiers: Free, Pro & Business
Free Pro BusinessYour tier is decided at runtime by the billing server, and it controls which post-quantum algorithms and features you can use. Free covers the NIST primary picks so anyone can go quantum-safe; Pro adds the higher security levels, hybrids and the classic algorithm-agility tools; Business unlocks everything, including HQC, the pure (no-X25519) variants, FN-DSA and stateful LMS.
At a glance
Encryption (KEM): Free: ML-KEM-512 hybrid only. Pro: ML-KEM-512/768/1024 hybrid. Business: all (adds HQC-128/192/256, all *-pure no-X25519 variants).
Signatures: Free: ML-DSA-44 only. Pro: ML-DSA-44/65/87 + SLH-DSA (128s/f,192s/f,256s/f) + their Ed25519 hybrids. Business: all (adds FN-DSA-512/1024 + hybrids, LMS).
Symmetric cipher: AES-256-GCM is the default (used by all tiers). Explicit --algorithm selection (incl. XChaCha20-Poly1305) requires Pro/Business.
Key-encapsulation (encryption) algorithms
| Algorithm | NIST level | Minimum tier | Notes |
|---|---|---|---|
| ML-KEM-512 | L1 | Free | ML-KEM-512 + X25519 hybrid |
| ML-KEM-768 | L3 | Pro | hybrid |
| ML-KEM-1024 | L5 | Pro | hybrid |
| HQC-128 | Business | HQC-128 + X25519 | |
| HQC-192 | Business | HQC-192 + X25519 | |
| HQC-256 | Business | HQC-256 + X25519 | |
| ML-KEM-512-pure | Business | no X25519 | |
| ML-KEM-768-pure | Business | no X25519 | |
| ML-KEM-1024-pure | Business | no X25519 | |
| HQC-128-pure | Business | no X25519 | |
| HQC-192-pure | Business | no X25519 | |
| HQC-256-pure | Business | no X25519 |
Signature algorithms
| Algorithm | NIST level | Minimum tier | Notes |
|---|---|---|---|
| ML-DSA-44 | L2 | Free | NIST PQC Level 2, all tiers, default |
| ML-DSA-65 | L3 | Pro | NIST PQC Level 3 |
| ML-DSA-87 | L5 | Pro | NIST PQC Level 5 |
| SLH-DSA-128s | Pro | FIPS 205, small signatures | |
| SLH-DSA-128f | Pro | FIPS 205, fast signing | |
| SLH-DSA-192s | Pro | FIPS 205, small signatures | |
| SLH-DSA-192f | Pro | FIPS 205, fast signing | |
| SLH-DSA-256s | Pro | FIPS 205, small signatures | |
| SLH-DSA-256f | Pro | FIPS 205, fast signing | |
| ML-DSA-44 + Ed25519 | L2 | Pro | hybrid |
| ML-DSA-65 + Ed25519 | L3 | Pro | hybrid |
| ML-DSA-87 + Ed25519 | L5 | Pro | hybrid |
| FN-DSA-512 | Business | FN-DSA (FIPS 206, not yet published; pre-standard Falcon implementation) | |
| FN-DSA-1024 | Business | FN-DSA (FIPS 206, not yet published; pre-standard Falcon implementation) | |
| FN-DSA-512 + Ed25519 | Business | hybrid | |
| FN-DSA-1024 + Ed25519 | Business | hybrid | |
| SLH-DSA-128s + Ed25519 | Pro | hybrid | |
| SLH-DSA-128f + Ed25519 | Pro | hybrid | |
| SLH-DSA-192s + Ed25519 | Pro | hybrid | |
| SLH-DSA-192f + Ed25519 | Pro | hybrid | |
| SLH-DSA-256s + Ed25519 | Pro | hybrid | |
| SLH-DSA-256f + Ed25519 | Pro | hybrid | |
| LMS-SHA256-H5-W1 | Business | SP 800-208, 32 signatures | |
| LMS-SHA256-H10-W2 | Business | SP 800-208, ~1K signatures | |
| LMS-SHA256-H15-W4 | Business | SP 800-208, ~32K signatures | |
| LMS-SHA256-H20-W8 | Business | SP 800-208, ~1M signatures |
SLH-DSA above is the FIPS 205 SHA-2 family. QNSQY can also verify SLH-DSA-SHAKE signatures for interoperability, but SHAKE is not offered as a key-generation choice in any interface, so it is not listed as a selectable algorithm.
Symmetric cipher (AEAD)
| Algorithm | Minimum tier | Notes |
|---|---|---|
| AES-256-GCM | All tiers | Default AEAD, used by every tier. Selecting it explicitly (over another cipher) needs Pro. |
| XChaCha20-Poly1305 | Pro | Explicit selection with --algorithm x-cha-cha20-poly1305 (Pro / Business). |
Tier is always determined at runtime by the billing server. Every algorithm ships in every build; the ones above your tier are simply refused at runtime, never silently downgraded. Free also caps data size at 100 MB; Pro and Business raise or remove that.
Platform notes
What the Windows clips do differently, and where a clip stops short. Each note is what the recordings actually show.
- Windows clips run in a console started as Administrator. (F-055)
- On Windows every command carries --acknowledge-no-sandbox, because the Windows build asks for it on every subcommand. (F-041)
- A standard (non-administrator) Windows user sees the operating system's security banners before the app starts. (F-057)
- LMS signing fails on Windows today: the stateful key update is refused, so the LMS clips show that error. (F-046)
- Key-generation previews in the desktop app still show <output-dir>/<name> placeholders after the form clears. (F-123)
- Escrow decryption needs an organization build, so the escrow clips stop at the point where an organization is required. (F-020)